Saltar al contenido principal

Esta guía ha sufrido modificaciones. Revisa la última versión sin revisar.

LeapFrog LeapPad Ultimate LCD Screen Replacement

Qué necesitas

  1. LeapFrog LeapPad Ultimate LCD Screen Replacement, Back Panel: paso 1, imagen 1 de 2 LeapFrog LeapPad Ultimate LCD Screen Replacement, Back Panel: paso 1, imagen 2 de 2
    • Flip over the Pad to its back side to begin the removal of the back panel.

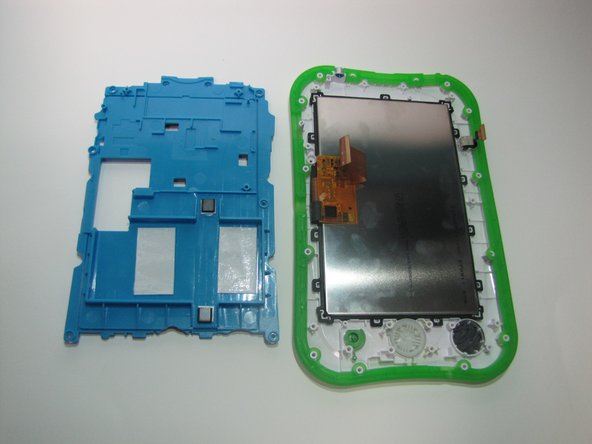
    • Begin by removing the blue rim along the edge of the device. It runs along the green silicone lining.

    • This is very difficult to remove , so do be patient. To help remove the seal, both a metal spudger and plastic opening tool may be used.

    • Remove the pen from its place before starting to avoid tangling.

  2. LeapFrog LeapPad Ultimate LCD Screen Replacement: paso 2, imagen 1 de 2 LeapFrog LeapPad Ultimate LCD Screen Replacement: paso 2, imagen 2 de 2
    • Once the blue rim is removed, the 12 screws will be visible.

    • Use the Phillips #1 screwdriver to unscrew all 12 screws.

  3. LeapFrog LeapPad Ultimate LCD Screen Replacement, LCD Screen: paso 3, imagen 1 de 3 LeapFrog LeapPad Ultimate LCD Screen Replacement, LCD Screen: paso 3, imagen 2 de 3 LeapFrog LeapPad Ultimate LCD Screen Replacement, LCD Screen: paso 3, imagen 3 de 3
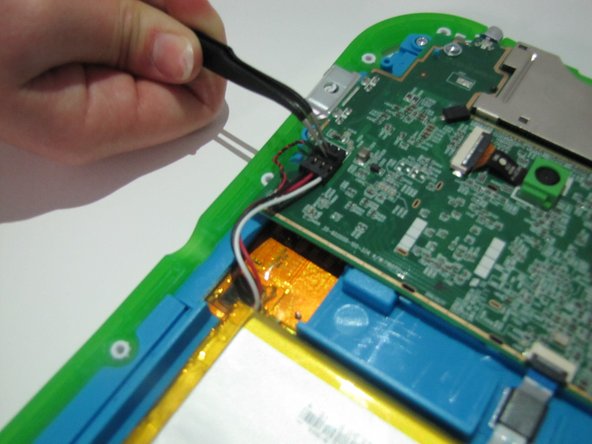
    • The segment connecting the battery to the motherboard will consist of red, white, and black wires.

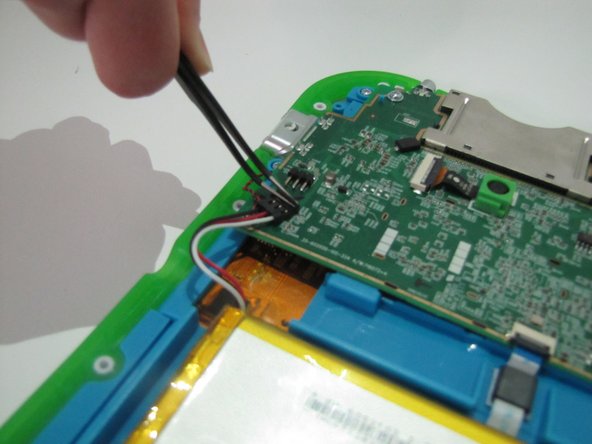
    • There is a small notch on the segment. Use the curved tweezers to pull the notch in the direction of the battery. this will disconnect the battery from the motherboard.

    • The battery is the bright orange rectangle.

    • The motherboard is the large dark green surface.

  4. LeapFrog LeapPad Ultimate LCD Screen Replacement: paso 4, imagen 1 de 1
    • Carefully remove the battery from its place and set aside.

    • Removing the battery will fully expose a white and blue ribbon cable that runs beneath the battery.

    • The ribbon cable must be disconnected from the motherboard and removed from the panel.

  5. LeapFrog LeapPad Ultimate LCD Screen Replacement: paso 5, imagen 1 de 2 LeapFrog LeapPad Ultimate LCD Screen Replacement: paso 5, imagen 2 de 2
    • The ZIF connector which connects the ribbon cable and the motherboard has a small flap on the top.

    • Use the curved tweezers to to flip the flap up.

    • Once it is disconnected, carefully pull the ribbon cable through the 2 black plastic arches holding it down.

  6. LeapFrog LeapPad Ultimate LCD Screen Replacement: paso 6, imagen 1 de 1
    • Use a Phillips #1 screwdriver to unscrew the 7 screws on the speaker.

    • 5 will be on the brown part and 2 on the circular blur part.

    • Once it is unscrewed completely, remove the speaker and set aside.

  7. LeapFrog LeapPad Ultimate LCD Screen Replacement: paso 7, imagen 1 de 1
    • An orange and black ribbon cable connects the motherboard and the area to the side of the panel.

    • There is a switch on top of it.

    • Use the curved tweezers to flip the switch.

  8. LeapFrog LeapPad Ultimate LCD Screen Replacement: paso 8, imagen 1 de 1
    • Unscrew the 3 screws on the motherboard with a Phillips #1 screwdriver.

  9. LeapFrog LeapPad Ultimate LCD Screen Replacement: paso 9, imagen 1 de 2 LeapFrog LeapPad Ultimate LCD Screen Replacement: paso 9, imagen 2 de 2
    • Flip the motherboard over to expose the uderside.

    • There is a wide black ribbon with a swtich. Flip the switch and set aside the motherboard.

  10. LeapFrog LeapPad Ultimate LCD Screen Replacement: paso 10, imagen 1 de 2 LeapFrog LeapPad Ultimate LCD Screen Replacement: paso 10, imagen 2 de 2
    • Along the side of the blue panel are 6 screws. Unscrew each of the screws with a Phillips #1 screwdriver.

    • Remove the panel and the remainder of its contents and set aside.

  11. LeapFrog LeapPad Ultimate LCD Screen Replacement: paso 11, imagen 1 de 1
    • The screen is now exposed and can be removed and replaced.

Conclusión

To reassemble your device, follow these instructions in reverse order.

2 personas más completaron esta guía.

Un comentario

Where did you find a Replacement screen? Are there any identifying part numbers?

Johan Rodriguez - Contestar

Agregar Comentario

Ver Estadísticas:

Ultimas 24 horas: 0

Ultimos 7 días: 5

Ultimos 30 días: 29

Todo El Tiempo: 4,597