Saltar al contenido principal

LG VX8700 Ear Piece Replacement

Qué necesitas

  1. LG VX8700 Ear Piece Replacement, Battery: paso 1, imagen 1 de 2 LG VX8700 Ear Piece Replacement, Battery: paso 1, imagen 2 de 2
    • Make sure the phone is completely off.

    • Remove the back cover by sliding the tab away from the phone using one finger.

  2. LG VX8700 Ear Piece Replacement: paso 2, imagen 1 de 2 LG VX8700 Ear Piece Replacement: paso 2, imagen 2 de 2
    • Lift one side of the battery using a plastic opening tool or your fingers.

    • Carefully remove the battery and set it aside.

    • When installing the new battery, make sure to align the metal pins with those of the phone.

  3. LG VX8700 Ear Piece Replacement, Front Bezel: paso 3, imagen 1 de 1
    • Turn your phone around and open the flip phone.

    • Locate the two grey rubber plugs on the LCD portion of the phone. These plugs cover up two screws.

    • Remove the two grey screw-covers at the bottom of the screen

  4. LG VX8700 Ear Piece Replacement: paso 4, imagen 1 de 2 LG VX8700 Ear Piece Replacement: paso 4, imagen 2 de 2
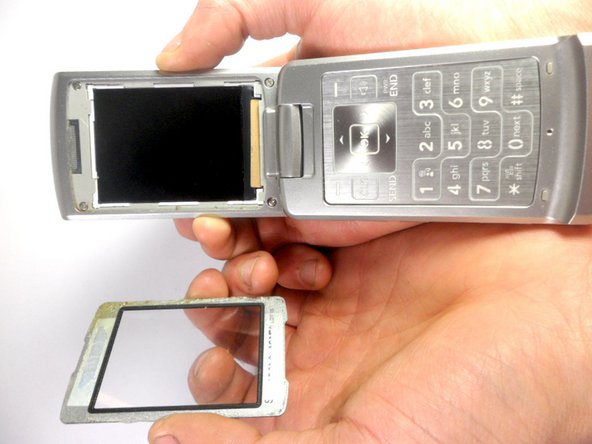
    • Remove the screen by using the tab to eject the screen.

    • There is a gap between the case and the screen near the ear piece

    • Insert the plastic opening tool in the gap and pry the screen up.

    • The plastic screen cover is glued onto the phone, do not be alarmed if it may be difficult to pry it off.

  5. LG VX8700 Ear Piece Replacement: paso 5, imagen 1 de 1
    • Unscrew the four corner 3.21mm screws to separate the the top cover of the phone

  6. LG VX8700 Ear Piece Replacement: paso 6, imagen 1 de 2 LG VX8700 Ear Piece Replacement: paso 6, imagen 2 de 2
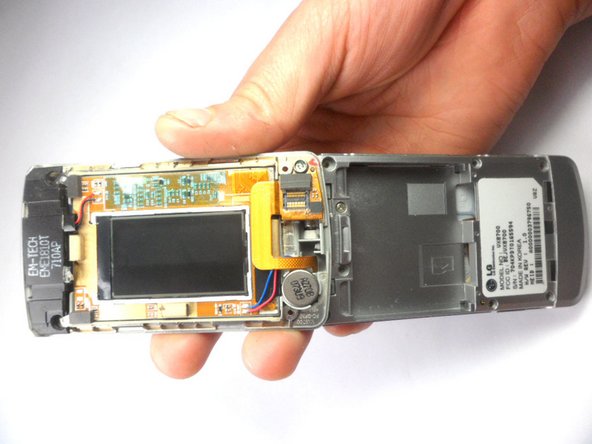
    • Turn your phone around

    • Remove the top cover of the phone by inserting the plastic opening tool into the groove.

    • Carefully open the cover.

  7. LG VX8700 Ear Piece Replacement, Ear Piece: paso 7, imagen 1 de 1
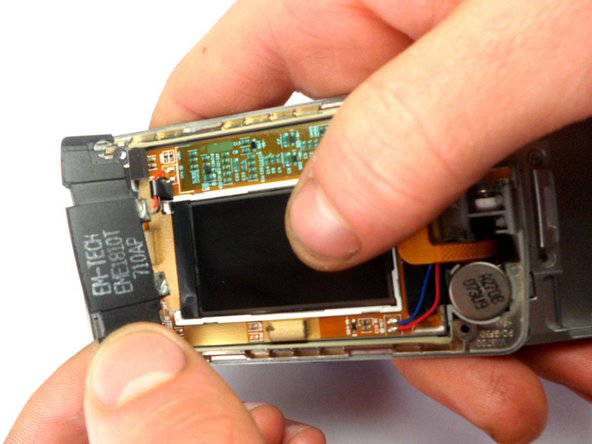
    • Desolder the top ear piece using a soldering iron to remove the component

    • The ear piece is the black component that is located at the top with black and red wires

  8. LG VX8700 Ear Piece Replacement: paso 8, imagen 1 de 2 LG VX8700 Ear Piece Replacement: paso 8, imagen 2 de 2
    • Remove the ear piece from the phone by lifting it using a plastic opening tool.

Conclusión

To reassemble your device, follow these instructions in reverse order.

Equipo

Cal Poly, Team 8-16, Maness Winter 2012 Miembro de Cal Poly, Team 8-16, Maness Winter 2012

CPSU-MANESS-W12S8G16

4 Miembros

14 Guías creadas

0 comentarios

Agregar Comentario

Ver Estadísticas:

Ultimas 24 horas: 0

Ultimos 7 días: 0

Ultimos 30 días: 0

Todo El Tiempo: 988