Saltar al contenido principal

LG Risio Screen Replacement

Qué necesitas

  1. LG Risio Screen Replacement, Back Panel: paso 1, imagen 1 de 2 LG Risio Screen Replacement, Back Panel: paso 1, imagen 2 de 2
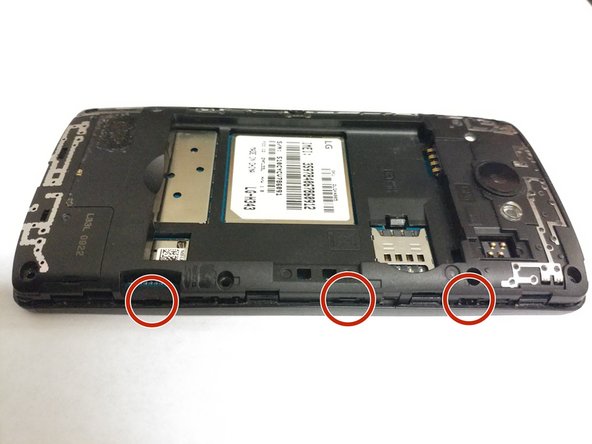
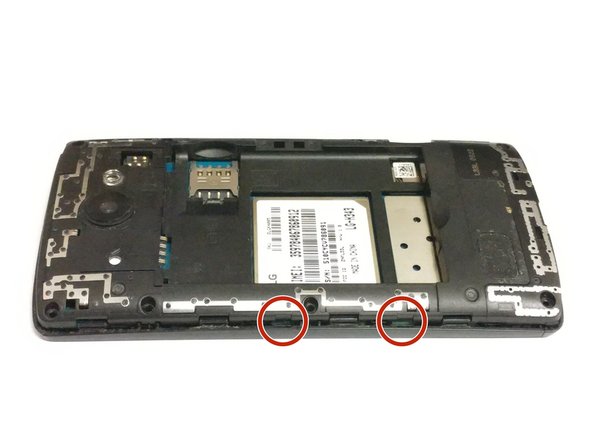
    • Use a plastic opening tool to seperate the back panel from the device.

    • Remove the back panel.

  2. LG Risio Screen Replacement, Battery: paso 2, imagen 1 de 1
    • Place your thumb along the bottom of the battery and pry upwards to remove.

  3. LG Risio Screen Replacement, Midframe: paso 3, imagen 1 de 1
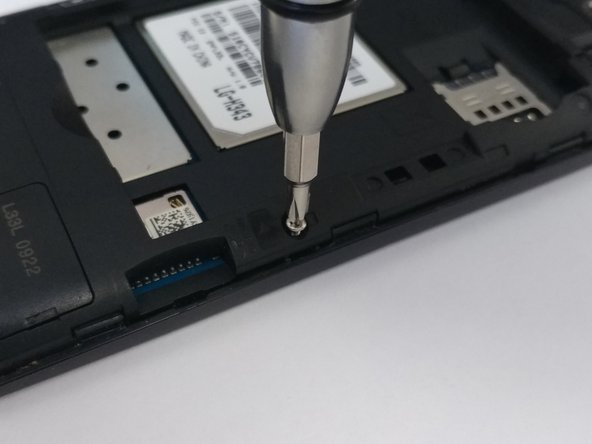
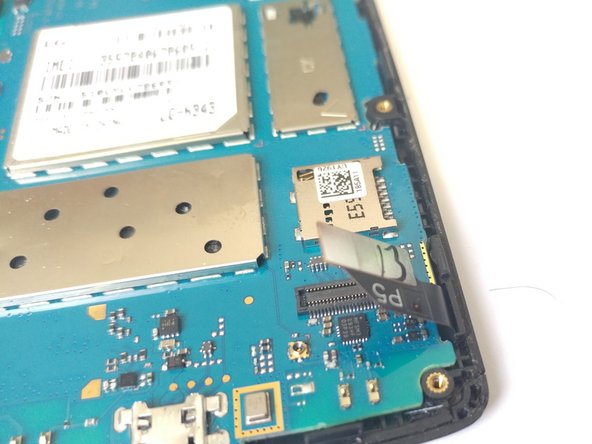
    • Press down on the SIM eject tab with a fingernail (or iFixit opening tool), and slide the SIM card out.

  4. LG Risio Screen Replacement: paso 4, imagen 1 de 2 LG Risio Screen Replacement: paso 4, imagen 2 de 2
    • Remove the eight Phillips #0 screws from the internal support frame.

  5. LG Risio Screen Replacement: paso 5, imagen 1 de 3 LG Risio Screen Replacement: paso 5, imagen 2 de 3 LG Risio Screen Replacement: paso 5, imagen 3 de 3
    • Use an opening tool on the marked locations to lift the edges up. There should be a small click when lifting these edges up.

  6. LG Risio Screen Replacement: paso 6, imagen 1 de 1
    • Using your hand, pick up the midframe to separate it from the phone.

  7. LG Risio Screen Replacement, Front-Facing Camera: paso 7, imagen 1 de 2 LG Risio Screen Replacement, Front-Facing Camera: paso 7, imagen 2 de 2
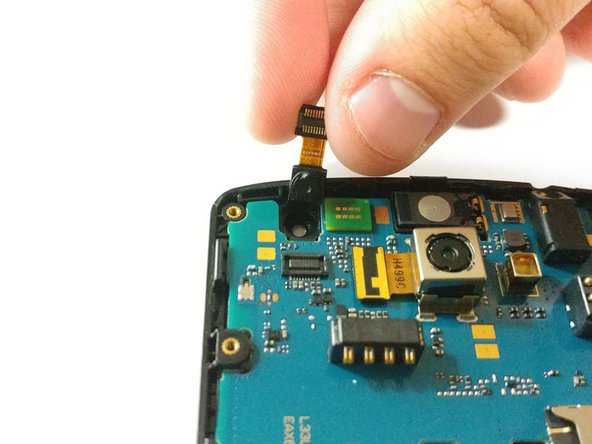
    • Unclip the front camera connector from the motherboard and lift it from the frame.

  8. LG Risio Screen Replacement, Motherboard: paso 8, imagen 1 de 2 LG Risio Screen Replacement, Motherboard: paso 8, imagen 2 de 2
    • Detach the screen connector from the motherboard by putting your thumb underneath it and lifting up.

    • The screen connector is the part that has P5 written on it.

  9. LG Risio Screen Replacement: paso 9, imagen 1 de 1
    • On the side with the screen connector, pull the two tabs away from the device.

    • Use the plastic opening tool to lift the motherboard starting on the bottom right corner and pulling upwards.

  10. LG Risio Screen Replacement, Screen: paso 10, imagen 1 de 2 LG Risio Screen Replacement, Screen: paso 10, imagen 2 de 2
    • Using a hot air gun or hair dryer, heat the screen assembly, and pry it from the frame using your fingers (or an iFixit prying tool).

Conclusión

To reassemble your device, follow these instructions in reverse order.

Una persona más ha completado esta guía.

2 comentarios

Thank you John Breaux! Clear and precise instructions! Easy to follow! Like a US Army instruction manual. Big help fixing my homeless friend's phone! Now she can at least stay in touch and find better help! I thank you and little June says thank you and she will pray for your health and happiness.She is 208 days sober and grateful for every bit of help in her life.

ericinpotrero@yahoo.com - Contestar

You're welcome! Congratulations to your friend for 208 days sober! I wish you both good health and happiness as well.

John Breaux -

Agregar Comentario

Ver Estadísticas:

Ultimas 24 horas: 0

Ultimos 7 días: 1

Ultimos 30 días: 3

Todo El Tiempo: 1,530