Saltar al contenido principal

Kurio Touch 4S Power Button Replacement

Qué necesitas

  1. Kurio Touch 4S Power Button Replacement, Power Button: paso 1, imagen 1 de 1
    • Make sure to open the back cover easily using the plastic opening tool.

  2. Kurio Touch 4S Power Button Replacement: paso 2, imagen 1 de 3 Kurio Touch 4S Power Button Replacement: paso 2, imagen 2 de 3 Kurio Touch 4S Power Button Replacement: paso 2, imagen 3 de 3
    • Remove back cover by prying away from the device.

    • The easiest place to remove the cover is from the bottom and top; try to open it from the right and left sides.

    • Open it gently. Do not open it with too much pressure, so that the plastic back cover do not break.

  3. Kurio Touch 4S Power Button Replacement: paso 3, imagen 1 de 2 Kurio Touch 4S Power Button Replacement: paso 3, imagen 2 de 2
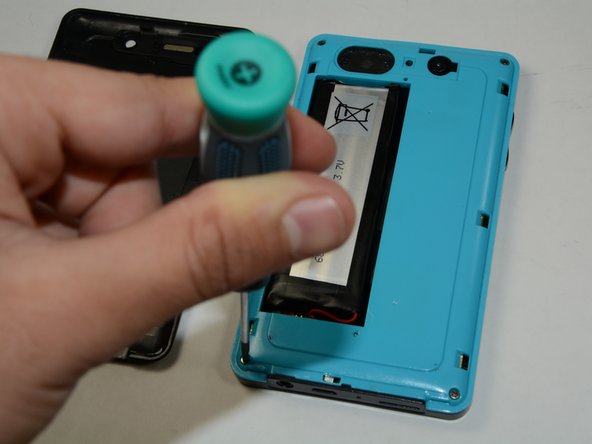
    • To remove the battery, make sure the four 5mm Phillips screws on each side of your device is open using the Phillips #1 Screwdriver

    • After you remove your four 5mm Phillips screws, use your plastic opening tool to help you open the plastic cover of your device.

  4. Kurio Touch 4S Power Button Replacement: paso 4, imagen 1 de 1
    • After you remove your four 5mm Philips screws use your plastic opening tool to help you open the plastic cover of your device.

  5. Kurio Touch 4S Power Button Replacement: paso 5, imagen 1 de 1
    • Separate the two halves of your Kurio Touch 4S and lay them besides each other.

  6. Kurio Touch 4S Power Button Replacement: paso 6, imagen 1 de 1
    • Gently remove the plastic cover that is covering the camera.

  7. Kurio Touch 4S Power Button Replacement: paso 7, imagen 1 de 1
    • Use Phillips # 1 screw to open the four 5mm Philips screws on the motherboard.

    • Open the screws gently and do not apply too much force as you could damage the motherboard.

  8. Kurio Touch 4S Power Button Replacement: paso 8, imagen 1 de 1
    • Use the plastic opener to remove the battery.

  9. Kurio Touch 4S Power Button Replacement: paso 9, imagen 1 de 1
    Herramienta utilizada en este paso:
    Tweezers
    $4.99
    Comprar
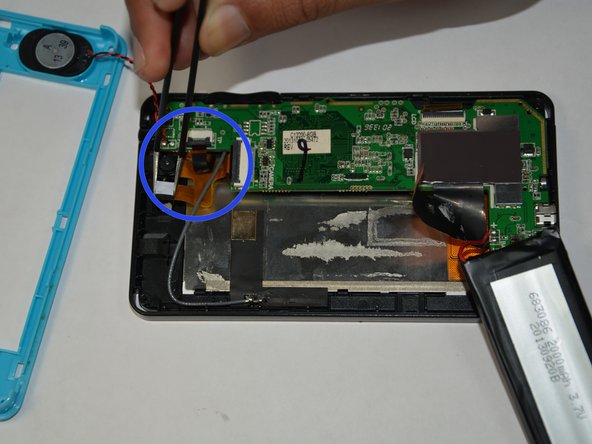
    • Use tweezers to remove the black tape that is attached to the motherboard.

  10. Kurio Touch 4S Power Button Replacement: paso 10, imagen 1 de 2 Kurio Touch 4S Power Button Replacement: paso 10, imagen 2 de 2
    • Detach all the wire that are connected to the motherboard.

    • Detach the camera module and other components that are attached to the motherboard.

  11. Kurio Touch 4S Power Button Replacement: paso 11, imagen 1 de 1
    • Remove the motherboard with the help of plastic opener.

    • Detach the power plug before you remove the motherboard.

  12. Kurio Touch 4S Power Button Replacement: paso 12, imagen 1 de 1
    • Use tweezers to hold the power button and gently lift it up.

    • Replace the old power button with the new one.

Conclusión

To reassemble your device, follow these instructions in reverse order.

Una persona más ha completado esta guía.

Moin Khan

Miembro Desde 01/21/15

234 Reputación

2 Guías creadas

Equipo

USF Tampa, Team 6-5, Brown Winter 2015 Miembro de USF Tampa, Team 6-5, Brown Winter 2015

USFT-BROWN-W15S6G5

3 Miembros

10 Guías creadas

0 comentarios

Agregar Comentario

Ver Estadísticas:

Ultimas 24 horas: 1

Ultimos 7 días: 2

Ultimos 30 días: 10

Todo El Tiempo: 473