Saltar al contenido principal

KitchenAid KHM512ER Eject Button Spring Replacement

Qué necesitas

  1. KitchenAid KHM512ER Eject Button Spring Replacement, Eject Button Spring: paso 1, imagen 1 de 2 KitchenAid KHM512ER Eject Button Spring Replacement, Eject Button Spring: paso 1, imagen 2 de 2
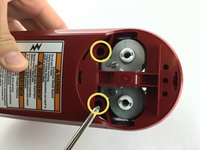
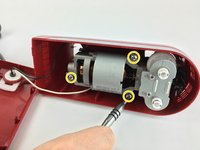
    • Insert the back of a plastic opening tool into one of the beater holes.

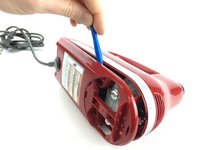
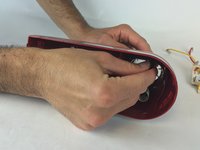
    • Apply force to pull the circular plastic part off.

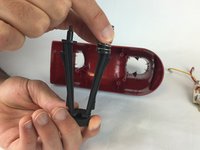
    • If necessary, use the other side of the plastic opening tool to pry the circular plastic part off.

  2. KitchenAid KHM512ER Eject Button Spring Replacement: paso 2, imagen 1 de 3 KitchenAid KHM512ER Eject Button Spring Replacement: paso 2, imagen 2 de 3 KitchenAid KHM512ER Eject Button Spring Replacement: paso 2, imagen 3 de 3
    • Use a plastic opening tool to remove the speed knob.

    • Use a plastic opening tool to remove the long plastic piece

    • Use a plastic opening tool to remove the speed switch.

  3. KitchenAid KHM512ER Eject Button Spring Replacement: paso 3, imagen 1 de 2 KitchenAid KHM512ER Eject Button Spring Replacement: paso 3, imagen 2 de 2
    • Use a Phillips 2 screwdriver to remove the two 20.0mm screws holding the bottom plastic piece on.

    • Your screwdriver may not be long or narrow enough to reach the screws in these holes. If that's the case, use another screwdriver.

    • Remove the bottom plastic piece using a plastic opening tool.

  4. KitchenAid KHM512ER Eject Button Spring Replacement: paso 4, imagen 1 de 3 KitchenAid KHM512ER Eject Button Spring Replacement: paso 4, imagen 2 de 3 KitchenAid KHM512ER Eject Button Spring Replacement: paso 4, imagen 3 de 3
    • Using a Phillips 2 screwdriver, remove the three 20.0mm screws holding the motor assembly in place.

    • Use your hands to remove the motor assembly.

    • Use your hands to hold the eject button from one side while using the other hand to remove the circuit board.

  5. KitchenAid KHM512ER Eject Button Spring Replacement: paso 5, imagen 1 de 2 KitchenAid KHM512ER Eject Button Spring Replacement: paso 5, imagen 2 de 2
    • Remove the eject button by pulling it from the inside of the mixer.

    • Hold the eject button firmly while pulling out the spring.

Conclusión

To reassemble your device, follow these instructions in reverse order.

2 personas más completaron esta guía.

Yuriy Zaynulin

Miembro Desde 02/10/16

191 Reputación

1 Guía escrita

Equipo

USF Tampa, Team 2-3, Sullivan Spring 2016 Miembro de USF Tampa, Team 2-3, Sullivan Spring 2016

USFT-SULLIVAN-S16S2G3

3 Miembros

4 Guías creadas

0 comentarios

Agregar Comentario

Ver Estadísticas:

Ultimas 24 horas: 2

Ultimos 7 días: 2

Ultimos 30 días: 8

Todo El Tiempo: 1,568