Saltar al contenido principal

Keurig Coffee Makerの分解と洗浄方法

Qué necesitas

  1. Keurig Coffee Makerの分解と洗浄方法, Keurig Coffee Makerの分解と洗浄方法: paso 1, imagen 1 de 3 Keurig Coffee Makerの分解と洗浄方法, Keurig Coffee Makerの分解と洗浄方法: paso 1, imagen 2 de 3 Keurig Coffee Makerの分解と洗浄方法, Keurig Coffee Makerの分解と洗浄方法: paso 1, imagen 3 de 3
    • Keurig K40が適切なコーヒー一杯の量12ozを作れません。

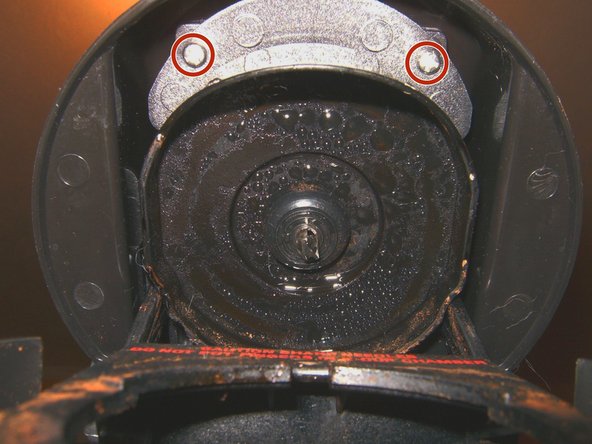
    • K-cupホルダーを取り出せるまで、Keurig の蓋を開きます。

    • K-cupのホルダーを単純にまっすぐ引き上げます。ネジのクリップから少し抵抗があるかもしれません。ボロボロと取れる汚れは、再利用できるK-cupフィルターから取れたコーヒーです。

  2. Keurig Coffee Makerの分解と洗浄方法: paso 2, imagen 1 de 3 Keurig Coffee Makerの分解と洗浄方法: paso 2, imagen 2 de 3 Keurig Coffee Makerの分解と洗浄方法: paso 2, imagen 3 de 3
    • K-cupのインサートが取れました。水で綺麗に洗浄してください。

    • K-cupインサートの底は先細い針が付いており、これがK-cupの底に穴を開けます。この反対側は小さな穴担っています。紙用クリップ(もしくはこれより小さいもの)を使ってコーヒーの削りかすなどの汚れを取り除くため差し込みます。

    • 次に先端の針を洗浄します。しかしながら、針のある側に手が届きにくいため、この作業は少し困難です。針の周辺には3つの穴があります。Keurigの蓋を全開し、再び紙用クリップ(または類似したもの)を使用します。

  3. Keurig Coffee Makerの分解と洗浄方法: paso 3, imagen 1 de 3 Keurig Coffee Makerの分解と洗浄方法: paso 3, imagen 2 de 3 Keurig Coffee Makerの分解と洗浄方法: paso 3, imagen 3 de 3
    • 注射用針や類似したものも排水口を開けるために利用できます。

    • 次にタンクを持ち上げて取り出します。

    • タンクの内側底からバルブを簡単にチェックでき、ここからタンクを取り外すことができます。それからタンクの中身を空にします。

  4. Keurig Coffee Makerの分解と洗浄方法: paso 4, imagen 1 de 3 Keurig Coffee Makerの分解と洗浄方法: paso 4, imagen 2 de 3 Keurig Coffee Makerの分解と洗浄方法: paso 4, imagen 3 de 3
    • 底部のチェックバルブの上部。 フィルタとして機能する細かい網目があります。 長い2番のプラスドライバーで3本のプラスネジを外して取り外します。 流水中のブラシでをきれいにします。 清掃後、組み立てを行ってください。

    • 次のステップは、トップカバーを外してK-cupへ水を供給することです。 Keurigを開きます。 所定の位置に固定している2本のプラスネジを取り外します。

    • 上部カバーを持ち上げて前方に持ち上げて取り外します。

  5. Keurig Coffee Makerの分解と洗浄方法: paso 5, imagen 1 de 3 Keurig Coffee Makerの分解と洗浄方法: paso 5, imagen 2 de 3 Keurig Coffee Makerの分解と洗浄方法: paso 5, imagen 3 de 3
    • ボイラーからK-cup ニードルへの水の供給は、チェックバルブを通るホースを介して行われます。

    • 水流を入口に向けて固定している2本の小さなネジを外します。

    • K-cup の針上のコネクタから、水線を外します。 簡単なプレスフィット式です。

    • 次に、タイストラップを取り外します。(この作業は必須ではありません。)ポンプからホースの反対側端を取り外します。 ホースの端を持ち上げるために、マイナスドライバーを使用しなければならない場合があります。

  6. Keurig Coffee Makerの分解と洗浄方法: paso 6, imagen 1 de 1
    • チェックバルブをテストします。 ボイラー側から空気を吹き込むと、ボイラーが開きます。 それを何回か繰り返して沈降物などを浮かします。それはK-cup側からの温水をチェックバルブに流して振るのにも役立ちます。 清掃が終わったら、チェックバルブとタイストラップを元に戻し、Keurigを再組み立てします。

Conclusión

デバイスを再組み立てする際は、これらのインストラクションを逆の順番に従って作業を進めてください。

104 personas más completaron esta guía.

Un agradecimiento especial a estos traductores:

en jp

100%

Estos traductores nos están ayudando a reparar el mundo! ¿Quieres contribuir?
Empezar a traducir ›

oldturkey03

Miembro Desde 09/29/10

783,207 Reputación

119 Guías creadas

Equipo

Global Fixers Miembro de Global Fixers

Community

33 Miembros

549 Guías creadas

90 comentarios

Perfect - been looking all over for a solution besides trashing the unit.

Thank you for the step by step instructions!

kellywihlm - Contestar

Awesome! didn't want to have to buy a new Keurig - worked like a charm!

cabate - Contestar

awesome thank you kindley

racinnut2001 - Contestar

Outstanding presentation. I've had my Keurig apart before. However, as I use well water and don't have the best filtration system, mine tends to clog frequently.

I will add however, that the case for, at least some Keurig coffee makers have clips holding the cover in place that can be rather difficult to release.

Bill Leach - Contestar

I should add, excellent photography!

Bill Leach - Contestar

Agregar Comentario

Ver Estadísticas:

Ultimas 24 horas: 99

Ultimos 7 días: 801

Ultimos 30 días: 3,671

Todo El Tiempo: 593,502