Saltar al contenido principal

Keurig B70 Platinum Check Valve Replacement

Qué necesitas

  1. Keurig B70 Platinum Check Valve Replacement, Check Valve: paso 1, imagen 1 de 2 Keurig B70 Platinum Check Valve Replacement, Check Valve: paso 1, imagen 2 de 2
    • Lift up the top lid.

    • Remove the two screws with a Phillips #0 screwdriver.

  2. Keurig B70 Platinum Check Valve Replacement: paso 2, imagen 1 de 2 Keurig B70 Platinum Check Valve Replacement: paso 2, imagen 2 de 2
    • Push down on the lid.

    • Lift up and remove the lid.

  3. Keurig B70 Platinum Check Valve Replacement: paso 3, imagen 1 de 2 Keurig B70 Platinum Check Valve Replacement: paso 3, imagen 2 de 2
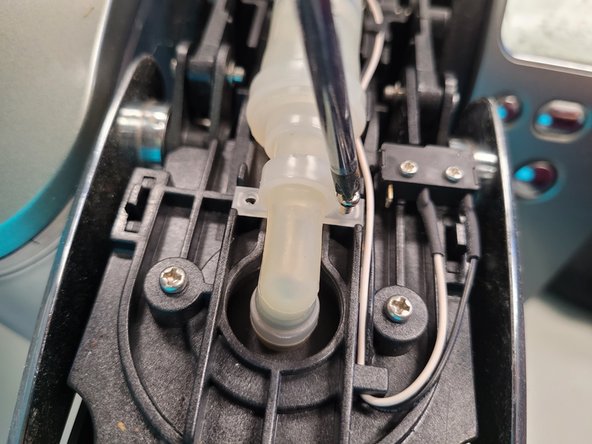
    • Using the Phillips #0 screwdriver, remove the two screws holding the tubing to the puncture needle.

  4. Keurig B70 Platinum Check Valve Replacement: paso 4, imagen 1 de 3 Keurig B70 Platinum Check Valve Replacement: paso 4, imagen 2 de 3 Keurig B70 Platinum Check Valve Replacement: paso 4, imagen 3 de 3
    • Twist and pull to disconnect the valve on that side.

  5. Keurig B70 Platinum Check Valve Replacement: paso 5, imagen 1 de 2 Keurig B70 Platinum Check Valve Replacement: paso 5, imagen 2 de 2
    • On the other side, cut the one zip tie closest to the valve.

  6. Keurig B70 Platinum Check Valve Replacement: paso 6, imagen 1 de 2 Keurig B70 Platinum Check Valve Replacement: paso 6, imagen 2 de 2
    • Twist and pull to disconnect valve on the other side.

  7. Keurig B70 Platinum Check Valve Replacement: paso 7, imagen 1 de 2 Keurig B70 Platinum Check Valve Replacement: paso 7, imagen 2 de 2
    • Reassemble the valve in place.

    • Resecure it with a zip tie.

    • Trim the excess plastic off of the zip tie.

Conclusión

To reassemble your device, follow these instructions in reverse order.

Una persona más ha completado esta guía.

0 comentarios

Agregar Comentario

Ver Estadísticas:

Ultimas 24 horas: 4

Ultimos 7 días: 23

Ultimos 30 días: 83

Todo El Tiempo: 2,073