Saltar al contenido principal

Joy-Con Motherboard Replacement

Qué necesitas

  1. Joy-Con Motherboard Replacement, Find Y00 screws: paso 1, imagen 1 de 1
    • I'm going to use left Joy-Con. The right Joy-Con might look a bit different but the steps should be the same

  2. Joy-Con Motherboard Replacement, Unscrewing: paso 2, imagen 1 de 2 Joy-Con Motherboard Replacement, Unscrewing: paso 2, imagen 2 de 2
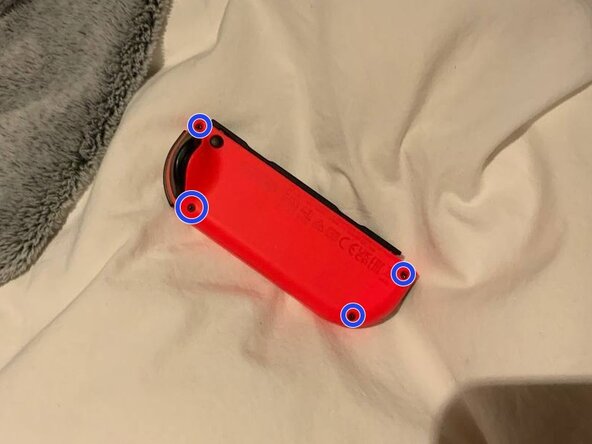
    • Take your Y00 screwdriver and get to work! Unscrew the four screws holding the back of the Joy-Con in place.

  3. Joy-Con Motherboard Replacement, Opening: paso 3, imagen 1 de 1
    • Carefully open the Joy-Con backshell, take your time!

    • Proceed with caution. It has ribbon cables attached, BE CAREFUL!

  4. Joy-Con Motherboard Replacement, Unscrewing backshell: paso 4, imagen 1 de 1
    • Backshell can get really annoying, so why won't we just unscrew it? Take 00 screwdriver and let's get it done!

    • Note: DO NOT unscrew bolts on an LED strip.

Conclusión

To reassemble your device, follow these instructions in reverse order.

Una persona más ha completado esta guía.

4Guía Comentarios

This guide only stops at removing the outer screws and doesn't show the fill process. Please update.

Shannon W - Contestar

this guide is horrible

parknich - Contestar

这个指南,残缺品,没有什么价值

好大一个瓜 - Contestar

to all the morons in the comments, the guide is marked as not finished for a reason

[deleted] - Contestar

Agregar Comentario

Ver Estadísticas:

Ultimas 24 horas: 1

Ultimos 7 días: 2

Ultimos 30 días: 19

Todo El Tiempo: 5,187