Saltar al contenido principal

Jawbone MINI JAMBOX Side Button Assembly Replacement

Qué necesitas

  1. Jawbone MINI JAMBOX Side Button Assembly Replacement, Outer Case: paso 1, imagen 1 de 2 Jawbone MINI JAMBOX Side Button Assembly Replacement, Outer Case: paso 1, imagen 2 de 2
    • Using the standard metal spudger, begin by prying at the bottom of the plain rubber end cap (the end without the USB or auxiliary input).

  2. Jawbone MINI JAMBOX Side Button Assembly Replacement: paso 2, imagen 1 de 1
    • Continue prying around the end panel, prying at different points until the entire panel is out of its seating.

    • Carefully remove the end panel.

    • The tabs which connect the panel are on the short sides.

    • WARNING: you will likely cause cosmetic damage to the end cap.

  3. Jawbone MINI JAMBOX Side Button Assembly Replacement: paso 3, imagen 1 de 1
    • Slide out the rubber foot located on the bottom of the case.

  4. Jawbone MINI JAMBOX Side Button Assembly Replacement: paso 4, imagen 1 de 1
    • Using a T6 bit, remove the flat topped 5mm screw located on the bottom of the casing, underneath the rubber foot.

    • This is the only flat topped screw in the speaker, so keep track of which one it is.

  5. Jawbone MINI JAMBOX Side Button Assembly Replacement: paso 5, imagen 1 de 3 Jawbone MINI JAMBOX Side Button Assembly Replacement: paso 5, imagen 2 de 3 Jawbone MINI JAMBOX Side Button Assembly Replacement: paso 5, imagen 3 de 3
    • Push against the side without end cap to slide the internal components out of the case.

    • While holding the metal outset casing with one hand, press on the black inner plastic casing with your thumb.

    • It will be very difficult the first time. There is a rubber seal on the outside of the plastic inner case that creates a lot of friction with the metal outer case.

  6. Jawbone MINI JAMBOX Side Button Assembly Replacement, Side Buttons Assembly: paso 6, imagen 1 de 2 Jawbone MINI JAMBOX Side Button Assembly Replacement, Side Buttons Assembly: paso 6, imagen 2 de 2
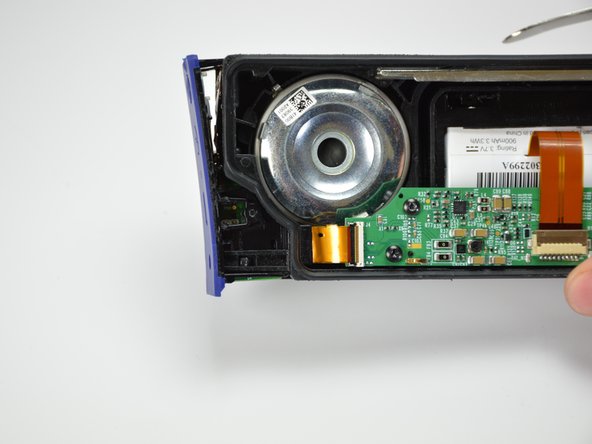
    • Using the standard metal spudger, carefully pry up the top 2 plastic tabs which hold the exterior button and port cover onto the interior plastic frame.

  7. Jawbone MINI JAMBOX Side Button Assembly Replacement: paso 7, imagen 1 de 1
    • Using the standard metal spudger, pry up the bottom 2 tabs attaching the other side of the button panel.

    • It should come off after prying up the first tab.

  8. Jawbone MINI JAMBOX Side Button Assembly Replacement: paso 8, imagen 1 de 3 Jawbone MINI JAMBOX Side Button Assembly Replacement: paso 8, imagen 2 de 3 Jawbone MINI JAMBOX Side Button Assembly Replacement: paso 8, imagen 3 de 3
    Herramienta utilizada en este paso:
    Tweezers
    $4.99
    Comprar
    • Carefully lift out the end panel.

    • Unplug both the connection ribbon and the ZIF or "zero insertion force" ribbon using tweezers or your hands.

    • There is a bit of glue to hold the connection ribbon down.

  9. Jawbone MINI JAMBOX Side Button Assembly Replacement: paso 9, imagen 1 de 1
    • Using the spudger, push the button in and create a small gap between the outside structure and the button.

  10. Jawbone MINI JAMBOX Side Button Assembly Replacement: paso 10, imagen 1 de 1
    • Using a computer duster, blow any contaminants out from the button junction.

    • Using a q-tip and cleaner, wipe off any stickiness from the buttons, ensuring to prevent excessive moisture.

    • Alternate Reassembly required, read on.

Conclusión

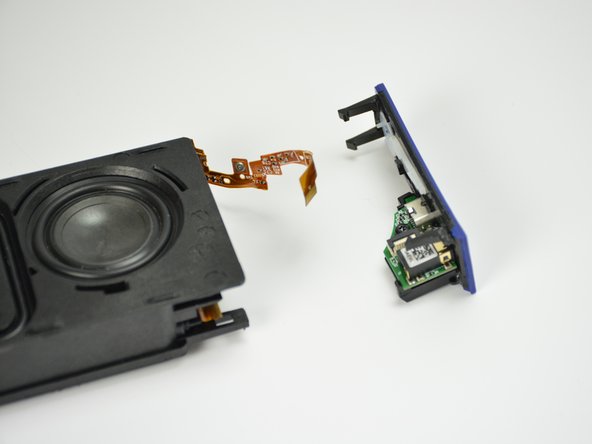
To reassemble your device, follow steps 1 through 5 in reverse order.

Liam McDonnell

Miembro Desde 04/01/15

559 Reputación

3 Guías creadas

Equipo

Cal Poly, Team 12-1, Lancaster Spring 2015 Miembro de Cal Poly, Team 12-1, Lancaster Spring 2015

CPSU-LANCASTER-S15S12G1

5 Miembros

11 Guías creadas

0 comentarios

Agregar Comentario

Ver Estadísticas:

Ultimas 24 horas: 0

Ultimos 7 días: 9

Ultimos 30 días: 13

Todo El Tiempo: 685