Esta versión puede contener ediciones incorrectas. Cambiar a la última instantánea verificada.
Qué necesitas
-
Este paso está sin traducir. Ayuda a traducirlo
-
Rest the TV on its top edge so you have access to the base.
-
Use a Phillips #2 screwdriver to take out the four screws on the bottom of the base.
-
Remove the base from the frame.
-
-
Este paso está sin traducir. Ayuda a traducirlo
-
Lay the TV face down.
-
Use the Phillips #00 screwdriver to remove all of the Phillips Head Screws from the the back of the TV.
-
-
Este paso está sin traducir. Ayuda a traducirlo
-
Stand the TV on its top edge.
-
Gently pry apart the front and back of the TV.
-
-
Este paso está sin traducir. Ayuda a traducirlo
-
Remove all the pieces of tape to detach the wires from both sides.
-
You want to gently peel the tape off, without pulling on the wires.
-
-
Este paso está sin traducir. Ayuda a traducirlo
-
Spread apart your TV the rest of the way, but do not disconnect any of the wires.
-
-
Este paso está sin traducir. Ayuda a traducirlo
-
Remove all strips of tape attached to the silver steel rectangular piece.
-
-
-
Este paso está sin traducir. Ayuda a traducirlo
-
Pull the red wire out from under the black plastic clip.
-
-
Este paso está sin traducir. Ayuda a traducirlo
-
Unscrew the four screws surrounding the steel rectangle with a Phillips 00 Screwdriver.
-
-
Este paso está sin traducir. Ayuda a traducirlo
-
The rectangular piece will still be attached to the motherboard beneath it with a strip of tape. Remove this strip of tape.
-
-
Este paso está sin traducir. Ayuda a traducirlo
-
Use a Phillips #00 screwdriver to remove the two screws on both sides of the motherboard.
-
-
Este paso está sin traducir. Ayuda a traducirlo
-
Carefully lift the motherboard away from the television.
-
-
Este paso está sin traducir. Ayuda a traducirlo
-
There are 5 wires attached to the motherboard. Remove the two thicker white wires to the right of the red wire.
-
-
Este paso está sin traducir. Ayuda a traducirlo
-
Remove the remaining three wires from the mainboard.
-
-
Este paso está sin traducir. Ayuda a traducirlo
-
Carefully remove the mainboard from the television.
-
You have now successfully removed the mainboard.
-
-
Este paso está sin traducir. Ayuda a traducirlo
-
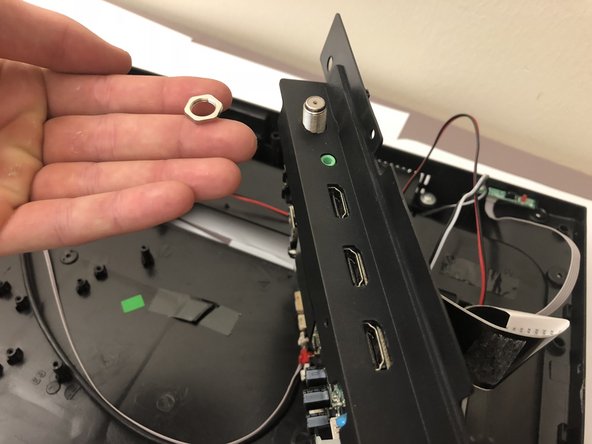
After following the prerequisite guides, you should have the main board off with the black plastic still on. To remove the plastic, unscrew the nut that holds this plastic to the cable input on the board.
-
-
Este paso está sin traducir. Ayuda a traducirlo
-
After removing the nut from the cable input, the black plastic should easily slide off of the inputs on the board. There are two separate pieces of plastic on the board, so be sure to remove both.
-


Cancelar: No complete esta guía.
Una persona más ha completado esta guía.
Equipo

Cal Poly, Team S16-G2, Banghart Winter 2018 Miembro de Cal Poly, Team S16-G2, Banghart Winter 2018
CPSU-BANGHART-W18S16G2
4 Miembros
6 Guías creadas