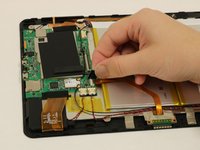
Saltar al contenido principal

Insignia Flex 10.1 NS-P10W8100 Keyboard Connector Replacement

Qué necesitas

  1. Insignia Flex 10.1 NS-P10W8100 Keyboard Connector  Replacement, Keyboard Connector: paso 1, imagen 1 de 2 Insignia Flex 10.1 NS-P10W8100 Keyboard Connector  Replacement, Keyboard Connector: paso 1, imagen 2 de 2
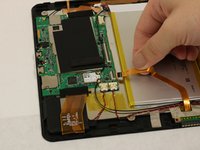
    • Carefully open the laptop and remove the keyboard by disconnecting it.

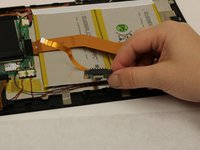
    • Place keyboard to the side as you will not need it.

    • Beware of plastic clips on the side of the device.

  2. Insignia Flex 10.1 NS-P10W8100 Keyboard Connector  Replacement: paso 2, imagen 1 de 2 Insignia Flex 10.1 NS-P10W8100 Keyboard Connector  Replacement: paso 2, imagen 2 de 2
    • Lay the screen flat on its surface and use the iFixit opening tool to remove the cover by gently prying the back cover from the screen.

    • Apply the opening tool to each side to help pry the back cover evenly.

    • Apply the opening tool to each side which will help pry the back cover evenly.

    • Do not pry on the bottom side of the device. This is the side across from the camera.

  3. Insignia Flex 10.1 NS-P10W8100 Keyboard Connector  Replacement: paso 3, imagen 1 de 1
    • Use your fingers and pry the back cover from the screen. You may need to wiggle the cover a bit to separate the pieces.

    • If the back cover does not come off work your fingers around the corners and slowly pry the cover off.

    • Be careful with potential sharp edges and any exposed electrical components.

  4. Insignia Flex 10.1 NS-P10W8100 Keyboard Connector  Replacement: paso 4, imagen 1 de 2 Insignia Flex 10.1 NS-P10W8100 Keyboard Connector  Replacement: paso 4, imagen 2 de 2
    • Use your fingers to remove the tape holding down the zero insertion force (ZIF) connector ribbon attached to the keyboard.

    • Use your fingernails to flip the small locking flap. Then, you can safely pull the cable out.

  5. Insignia Flex 10.1 NS-P10W8100 Keyboard Connector  Replacement: paso 5, imagen 1 de 1
    • Pull back the yellow tape holding down the keyboard connector.

  6. Insignia Flex 10.1 NS-P10W8100 Keyboard Connector  Replacement: paso 6, imagen 1 de 1
    • Remove the two 4 mm screws using a Phillips #2 screwdriver.

  7. Insignia Flex 10.1 NS-P10W8100 Keyboard Connector  Replacement: paso 7, imagen 1 de 2 Insignia Flex 10.1 NS-P10W8100 Keyboard Connector  Replacement: paso 7, imagen 2 de 2
    • Remove the connector by lifting it upward.

Conclusión

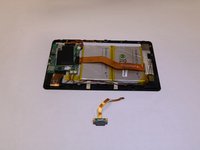
To reassemble your device, follow these instructions in reverse order.

0 comentarios

Agregar Comentario

Ver Estadísticas:

Ultimas 24 horas: 0

Ultimos 7 días: 4

Ultimos 30 días: 12

Todo El Tiempo: 940