Saltar al contenido principal

IBM ThinkPad X41 LCD Screen Replacement

Qué necesitas

  1. IBM ThinkPad X41 LCD Screen Replacement, LCD Screen: paso 1, imagen 1 de 3 IBM ThinkPad X41 LCD Screen Replacement, LCD Screen: paso 1, imagen 2 de 3 IBM ThinkPad X41 LCD Screen Replacement, LCD Screen: paso 1, imagen 3 de 3
    • Open the laptop and turn to the side.

    • Using the spudger, remove the 6 black rectangular-shaped screw coverings (3 on each side)

  2. IBM ThinkPad X41 LCD Screen Replacement: paso 2, imagen 1 de 1
    • Using a Phillips Screw Driver, remove the (6) Phillips Head (Size PH001) 3.0 mm length screws (3 on each side) from the side of the LCD Screen Cover

  3. IBM ThinkPad X41 LCD Screen Replacement: paso 3, imagen 1 de 2 IBM ThinkPad X41 LCD Screen Replacement: paso 3, imagen 2 de 2
    • Using the spudger, remove the two round, black screw coverings on the lower, left, and right corners of the LCD screen bezel.

  4. IBM ThinkPad X41 LCD Screen Replacement: paso 4, imagen 1 de 2 IBM ThinkPad X41 LCD Screen Replacement: paso 4, imagen 2 de 2
    • Using a Phillips Screwdriver (Size PH001), remove the 3.0 mm screws from the lower, left and right corners of the LCD screen Bezel

  5. IBM ThinkPad X41 LCD Screen Replacement: paso 5, imagen 1 de 2 IBM ThinkPad X41 LCD Screen Replacement: paso 5, imagen 2 de 2
    • Using 2 Fingers, pull the bottom of the screen bezel towards you.

    • Pull the bottom of the screen bezel approximately 1 inch away from the LCD screen.

    • Next, pull screen bezel downward and away from the LCD screen.

  6. IBM ThinkPad X41 LCD Screen Replacement: paso 6, imagen 1 de 1
    • Using your index finger and thumb, gently lift and pull away laptop closure latch of the side of the screen assembly.

  7. IBM ThinkPad X41 LCD Screen Replacement: paso 7, imagen 1 de 2 IBM ThinkPad X41 LCD Screen Replacement: paso 7, imagen 2 de 2
    • Use a Phillips head screwdriver to remove the internal LCD screen support assembly above the F6 key.

  8. IBM ThinkPad X41 LCD Screen Replacement: paso 8, imagen 1 de 3 IBM ThinkPad X41 LCD Screen Replacement: paso 8, imagen 2 de 3 IBM ThinkPad X41 LCD Screen Replacement: paso 8, imagen 3 de 3
    • Close the laptop and turn so that the laptop's backside is facing you.

    • Using a thumb and index finger, gently lift the LCD screen back cover away from laptop.

  9. IBM ThinkPad X41 LCD Screen Replacement: paso 9, imagen 1 de 3 IBM ThinkPad X41 LCD Screen Replacement: paso 9, imagen 2 de 3 IBM ThinkPad X41 LCD Screen Replacement: paso 9, imagen 3 de 3
    • Using a spudger, remove the black, rectangular support tape.

  10. IBM ThinkPad X41 LCD Screen Replacement: paso 10, imagen 1 de 2 IBM ThinkPad X41 LCD Screen Replacement: paso 10, imagen 2 de 2
    • Carefully disconnect the orange cable from back of LCD screen.

  11. IBM ThinkPad X41 LCD Screen Replacement: paso 11, imagen 1 de 2 IBM ThinkPad X41 LCD Screen Replacement: paso 11, imagen 2 de 2
    • Using a Phillips Screwdriver (Size PH001), remove the screws from the LCD screen support arms.

  12. IBM ThinkPad X41 LCD Screen Replacement: paso 12, imagen 1 de 2 IBM ThinkPad X41 LCD Screen Replacement: paso 12, imagen 2 de 2
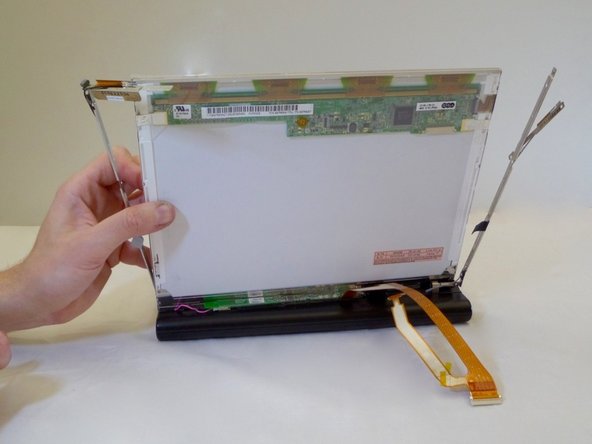
    • Unplug the orange LCD screen cable from the small circuit board near the laptop keyboard.

  13. IBM ThinkPad X41 LCD Screen Replacement: paso 13, imagen 1 de 2 IBM ThinkPad X41 LCD Screen Replacement: paso 13, imagen 2 de 2
    • Using one hand, gently lift the LCD screen out of support arms.

Conclusión

To reassemble your device, follow these instructions in reverse order.

Una persona más ha completado esta guía.

Justin Macik

Miembro Desde 09/12/16

228 Reputación

1 Guía escrita

Equipo

CSU Fullerton, Team 2-4, Bruce Fall 2016 Miembro de CSU Fullerton, Team 2-4, Bruce Fall 2016

CSUF-BRUCE-F16S2G4

4 Miembros

8 Guías creadas

Un comentario

nice little guide, short and too the point,

Vaughan Prendergast - Contestar

Agregar Comentario

Ver Estadísticas:

Ultimas 24 horas: 1

Ultimos 7 días: 3

Ultimos 30 días: 10

Todo El Tiempo: 1,287