Saltar al contenido principal

Huawei Mate 20 Battery Replacement

Qué necesitas

  1. Huawei Mate 20 Battery Replacement, Rear Glass: paso 1, imagen 1 de 1
    • Before you begin, switch off your phone.

    • Apply a heated iOpener to the back of the phone to loosen the adhesive beneath the back cover. Apply the iOpener for at least two minutes.

  2. Huawei Mate 20 Battery Replacement: paso 2, imagen 1 de 3 Huawei Mate 20 Battery Replacement: paso 2, imagen 2 de 3 Huawei Mate 20 Battery Replacement: paso 2, imagen 3 de 3
    • Secure a suction handle to the bottom of the back cover, as close to the edge as possible.

    • If the phone's rear glass is cracked, the suction handle may not stick. Try lifting it with strong tape, or superglue the suction handle in place and allow it to cure so you can proceed.

    • Lift the back cover with the suction handle to create a small gap between the cover and the frame.

    • Insert an opening pick into the gap.

    • If you have trouble, apply more heat to further soften the adhesive. Follow the iOpener instructions to avoid overheating.

    • Slide the opening pick to the bottom right corner.

  3. Huawei Mate 20 Battery Replacement: paso 3, imagen 1 de 2 Huawei Mate 20 Battery Replacement: paso 3, imagen 2 de 2
    • Insert a second opening pick and slide it to the bottom left corner to cut the adhesive.

    • Leave the opening picks in place to prevent the adhesive from resealing.

  4. Huawei Mate 20 Battery Replacement: paso 4, imagen 1 de 3 Huawei Mate 20 Battery Replacement: paso 4, imagen 2 de 3 Huawei Mate 20 Battery Replacement: paso 4, imagen 3 de 3
    • Insert a third opening pick at the bottom left corner.

    • Slide the tip of the opening pick from the bottom left corner along the side of the phone to cut the adhesive.

    • Leave the opening pick in its place at the top left corner to prevent the adhesive from resealing.

  5. Huawei Mate 20 Battery Replacement: paso 5, imagen 1 de 2 Huawei Mate 20 Battery Replacement: paso 5, imagen 2 de 2
    • If the adhesive becomes hard to cut, it has most likely cooled down. Use your iOpener to reheat it.

    • Insert a fourth opening pick under the top left corner of the back cover.

    • Slide the opening pick along the top edge of the phone to cut the adhesive.

    • Leave the opening pick in the top right corner to prevent the adhesive from resealing.

  6. Huawei Mate 20 Battery Replacement: paso 6, imagen 1 de 2 Huawei Mate 20 Battery Replacement: paso 6, imagen 2 de 2
    • Insert a fifth opening pick at the top right corner of the phone.

    • Slide the opening pick along the right side to cut the remaining adhesive.

    • Try not to remove the rear glass all the way yet, the fingerprint cable is still connected to the motherboard and rips easily if not handled with care.

  7. Huawei Mate 20 Battery Replacement: paso 7, imagen 1 de 2 Huawei Mate 20 Battery Replacement: paso 7, imagen 2 de 2
    • Carefully fold the back cover to the right side of the phone assembly. Avoid tension to the fingerprint cable during this procedure.

  8. Huawei Mate 20 Battery Replacement: paso 8, imagen 1 de 2 Huawei Mate 20 Battery Replacement: paso 8, imagen 2 de 2
    • Slide an opening pick under the bottom end of the black protective foil that covers the battery. Use the opening pick to loosen the adhesive that attaches the foil to the loudspeaker.

  9. Huawei Mate 20 Battery Replacement: paso 9, imagen 1 de 2 Huawei Mate 20 Battery Replacement: paso 9, imagen 2 de 2
    • Use an opening pick to carefully pry the flash assembly off the motherboard cover and fold it into the direction of the battery. Avoid damaging the flash assembly flex cable.

  10. Huawei Mate 20 Battery Replacement: paso 10, imagen 1 de 1
    • Remove the eleven Phillips #00 screws (2.8 mm length).

  11. Huawei Mate 20 Battery Replacement: paso 11, imagen 1 de 2 Huawei Mate 20 Battery Replacement: paso 11, imagen 2 de 2
    • Use the pointed end of a spudger to unhinge the motherboard cover from the small hook above the left side of the battery.

  12. Huawei Mate 20 Battery Replacement: paso 12, imagen 1 de 2 Huawei Mate 20 Battery Replacement: paso 12, imagen 2 de 2
    • Slide an opening pick underneath the left side of the motherboard cover.

    • Use the opening pick to pry up the motherboard cover.

  13. Huawei Mate 20 Battery Replacement: paso 13, imagen 1 de 2 Huawei Mate 20 Battery Replacement: paso 13, imagen 2 de 2
    • Remove the motherboard cover including the NFC and the black protective foil. Avoid damaging the flash assembly during this procedure.

  14. Huawei Mate 20 Battery Replacement: paso 14, imagen 1 de 3 Huawei Mate 20 Battery Replacement: paso 14, imagen 2 de 3 Huawei Mate 20 Battery Replacement: paso 14, imagen 3 de 3
    • Use a spudger to pry up and disconnect the fingerprint flex cable.

    • Before installing fresh adhesive and reassembling, remove any remaining adhesive from the phone, and clean the glued areas with isopropyl alcohol (>90%) and a lint-free cloth.

    • During reassembly, this is a good point to power on your phone and test all functions before sealing it up. Be sure to power your phone back down completely before you continue working.

    • Secure the new back cover with pre-cut adhesive or double-sided adhesive tape. After installing the rear glass, apply pressure for several minutes to help the adhesive form a good bond, such as by placing it under a stack of heavy books.

  15. Huawei Mate 20 Battery Replacement, Battery Disconnect: paso 15, imagen 1 de 2 Huawei Mate 20 Battery Replacement, Battery Disconnect: paso 15, imagen 2 de 2
    • Use a spudger to pry up and disconnect the battery connector.

  16. Huawei Mate 20 Battery Replacement, Loudspeaker: paso 16, imagen 1 de 2 Huawei Mate 20 Battery Replacement, Loudspeaker: paso 16, imagen 2 de 2
    • Use a pair of tweezers to pry up and disconnect the antenna cable.

  17. Huawei Mate 20 Battery Replacement, Loudspeaker: paso 17, imagen 1 de 1
    • Remove the four Phillips #00 screws (3.3 mm length).

    • Remove the two Phillips #00 screws (3.9 mm length).

  18. Huawei Mate 20 Battery Replacement: paso 18, imagen 1 de 3 Huawei Mate 20 Battery Replacement: paso 18, imagen 2 de 3 Huawei Mate 20 Battery Replacement: paso 18, imagen 3 de 3
    • Slide an opening pick under the loudspeaker cover where the main flex cable is located.

    • Slide the opening pick around the right side of the loudspeaker cover and start to pry it up. Avoid damaging the antenna cable during this step.

  19. Huawei Mate 20 Battery Replacement: paso 19, imagen 1 de 2 Huawei Mate 20 Battery Replacement: paso 19, imagen 2 de 2
    • Work your way along the bottom edge of the loudspeaker cover into the direction of the charging port. Use the opening pick to pry up the loudspeaker during this procedure.

  20. Huawei Mate 20 Battery Replacement: paso 20, imagen 1 de 2 Huawei Mate 20 Battery Replacement: paso 20, imagen 2 de 2
    • Remove the loudspeaker.

  21. Huawei Mate 20 Battery Replacement, Main Flex Cable: paso 21, imagen 1 de 2 Huawei Mate 20 Battery Replacement, Main Flex Cable: paso 21, imagen 2 de 2
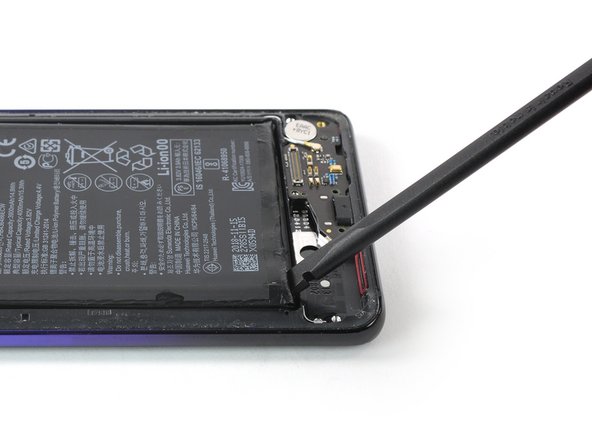
    • Use a spudger to pry up and disconnect the connector on the bottom end of the main flex cable.

  22. Huawei Mate 20 Battery Replacement: paso 22, imagen 1 de 3 Huawei Mate 20 Battery Replacement: paso 22, imagen 2 de 3 Huawei Mate 20 Battery Replacement: paso 22, imagen 3 de 3
    • Use a spudger to pry up and disconnect the connector on the upper end of the main flex cable.

    • Remove the main flex cable.

  23. Huawei Mate 20 Battery Replacement, Battery: paso 23, imagen 1 de 2 Huawei Mate 20 Battery Replacement, Battery: paso 23, imagen 2 de 2
    • The adhesive that holds down the battery in the Huawei Mate 20 is extremely strong. In most cases you'll need a combination of high isopropyl alcohol (>90%) and heat to remove it.

    • Try your best not to deform the battery during the following removal process. Soft-shell lithium-ion batteries can leak dangerous chemicals, catch fire, or even explode if damaged. Do not use excessive force or pry at the battery with metal tools.

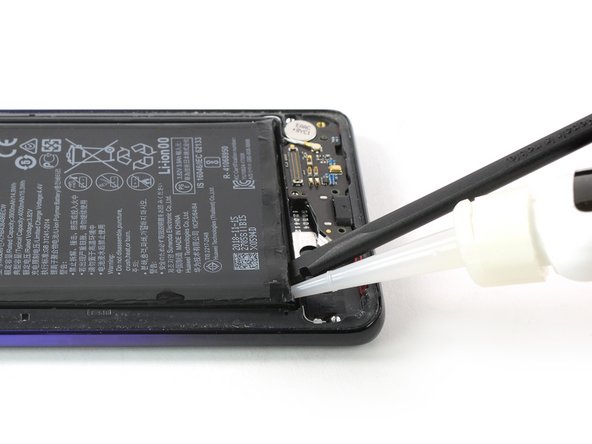
    • Apply adhesive remover or high isopropyl alcohol (>90%) in every corner of the battery and let it penetrate the adhesive beneath the battery for several minutes.

    • At this point you can attempt to continue with the following steps. If you aren't able to pry up the battery apply a heated iOpener to the screen to loosen the adhesive beneath. Apply the iOpener for at least two minutes. You may need to repeat the adhesive remover and heat procedure several times during the removal procedure.

  24. Huawei Mate 20 Battery Replacement: paso 24, imagen 1 de 3 Huawei Mate 20 Battery Replacement: paso 24, imagen 2 de 3 Huawei Mate 20 Battery Replacement: paso 24, imagen 3 de 3
    • Insert a spudger into the gap between the midframe and the battery at the bottom left corner of the battery.

    • Use the spudger to pry up the battery until you created a small gap underneath. Try your best not to deform the battery during this procedure.

    • Apply some more adhesive remover into the created gap and let it penetrate the adhesive for several minutes.

  25. Huawei Mate 20 Battery Replacement: paso 25, imagen 1 de 2 Huawei Mate 20 Battery Replacement: paso 25, imagen 2 de 2
    Herramienta utilizada en este paso:
    Plastic Cards
    $2.99
    Comprar
    • Slide a plastic card into the gap you created with the spudger.

    • If you cannot manage to slide the plastic card along the left side of the battery leave it in its place and apply more adhesive remover or heat to loosen the adhesive furthermore.

  26. Huawei Mate 20 Battery Replacement: paso 26, imagen 1 de 3 Huawei Mate 20 Battery Replacement: paso 26, imagen 2 de 3 Huawei Mate 20 Battery Replacement: paso 26, imagen 3 de 3
    • Slide the plastic card underneath the battery and cut the adhesive with it. Work your way along the left edge of the battery until you've loosened all adhesive.

    • Use the plastic card to pry up the battery.

  27. Huawei Mate 20 Battery Replacement: paso 27, imagen 1 de 2 Huawei Mate 20 Battery Replacement: paso 27, imagen 2 de 2
    Herramienta utilizada en este paso:
    Tesa 61395 Tape
    $5.99
    Comprar
    • Remove the battery.

    • Before installing a new battery, remove all traces of the old adhesive from the frame, and clean the glued areas with isopropyl alcohol (>90%) and a lint-free cloth.

    • During re-assembly, temporarily re-connect the battery to the motherboard to help align it correctly. Disconnect the battery after it is seated.

    • When reassembling your phone, replace old adhesive with stretch release adhesive strips, double-sided tape, or pre-cut adhesive strips.

Conclusión

To reassemble your device, follow these instructions in reverse order.

For optimal performance, calibrate your newly installed battery: Charge it to 100%, and keep charging it for at least two more hours. Then, use it until it shuts off due to low battery. Finally, charge it uninterrupted to 100%.

Take your e-waste to an R2 or e-Stewards certified recycler.

Repair didn’t go as planned? Check out our Answers community for troubleshooting help.

7 personas más completaron esta guía.

Dominik Schnabelrauch

Miembro Desde 11/23/16

202,836 Reputación

682 Guías creadas

Equipo

iFixit Miembro de iFixit

Staff

135 Miembros

16,732 Guías creadas

0 comentarios

Agregar Comentario

Ver Estadísticas:

Ultimas 24 horas: 10

Ultimos 7 días: 76

Ultimos 30 días: 316

Todo El Tiempo: 13,083