Introducción
This headset is pretty lightweight and comfortable, sadly, it is easy to damage the cable part between the earcups and the headband. And unfortunately, this cable is no joke, it is a 10 strands cable with insulating paint, and it conveys battery voltage, audio signal, and even button commands from one side of the headset to the other.
In my case, only one important strand was damaged, so instead of replacing the whole cable, I just patched the damaged part.
Qué necesitas
-
-
On both sides:
-
Remove foam protection
-
Turn the plastic cover 45° to remove it
-
-
-
Left earcup casing contains:
-
Lithium battery
-
Button and button connection PCB
-
Left speaker
-
-
-
Right earcup casing contains:
-
System on Module with all logic and amplification
-
Jack connection
-
Microphone
-
Right speaker
-
-
-
Cable between left and right is a 5-pairs cable with insulating paint.
-
Cable pinout is: Play/Pause, Next, Back, Volume +, Volume -, GND, Bat+, NTC, Left speaker +, Left speaker -
-
-
-
-
Desolder and insulate the V+ battery red cable
-
This way you will keep things safe from false contacts and destruction
-
-
-
To test if the speakers are working, use a multimeter
-
Resistance between speaker + and - plots (red and black cables) should be around 62 ohms
-
-
-
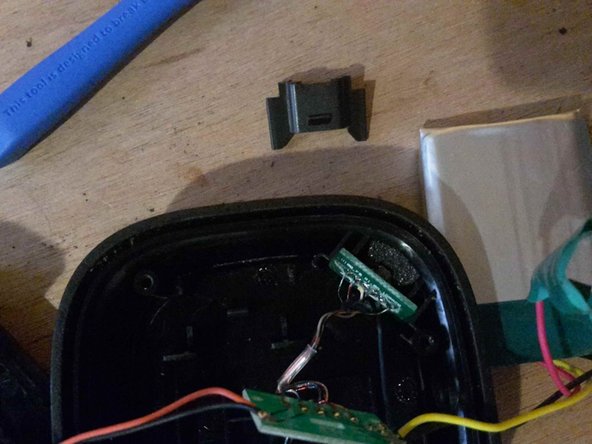
If you need to remove the button board from its casing, there is a small clips allowing to free the plastic piece holding it in place
-
-
-
With the multimeter, test the continuity for each line between left and right boards
-
-
-
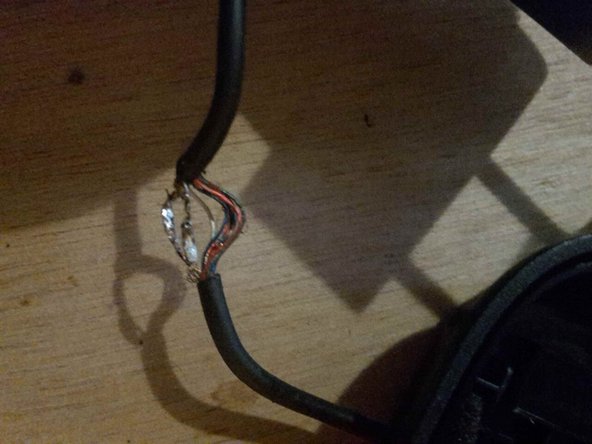
In my case, the cable is damaged close to the left side
-
In order to free more of the cable to be able to work on it, remove the glue holding it on the earcup casing
-
Remove the gold crimp piece with a wire cutter
-
-
-
Need even more cable length? Attack on the headband side
-
First, remove the copper clip holding the fabric and foam
-
Scrap the glue to push fabric and foam away
-
There is a plastic piece holding the cable inside the headband, the only solution I found to get me some more cable length was breaking a part of this plastic piece
-
-
-
Separate the damaged strand from the others
-
Gently scratch the insulating paint from the strand with a scalpel until you see some shiny, fresh copper color
-
-
-
Tin the strand
-
If need be, add an additional tinned bit of thin cable to help you reconstruct the strand
-
Test the cable with a multimeter until you manage to reconstruct continuity
-
-
-
Using your favorite option, electrician tape, hot glue or else, make sure the repaired strands never touch each other
-
Reconstruct the cable as solid as you can, using tape or glue
-
-
-
Don’t forget to resolder the plus side of the battery, without making any contact with anything else
-
-
-
Add some tape or glue to secure the cable:
-
In the headband, where we broke a bit of plastic
-
In the earcup, where we removed glue and crimp around the cable
-
-
-
If the skai finish on top of the headband is ragged, you can scrap it away, for instance with a stainless steel sponge
-


To reassemble your device, follow the unmounting instructions in reverse order.
If you cannot patch your cable, use one of the button commands strands to replace your damaged strand. You would just sacrifice a minor feature for the greater good.
This fix is quite fragile, so next time I have to repair this headset, I will try completely changing the cable for a sturdier 4-pairs Cat-5 cable - I will just disconnect Previous and Next to spare one pair.
