Saltar al contenido principal

How to clean the HP PSC 2410 Photosmart All In One Printer scanner glass

Qué necesitas

  1. How to clean the HP PSC 2410 Photosmart All In One Printer scanner glass, Scanner Glass: paso 1, imagen 1 de 1
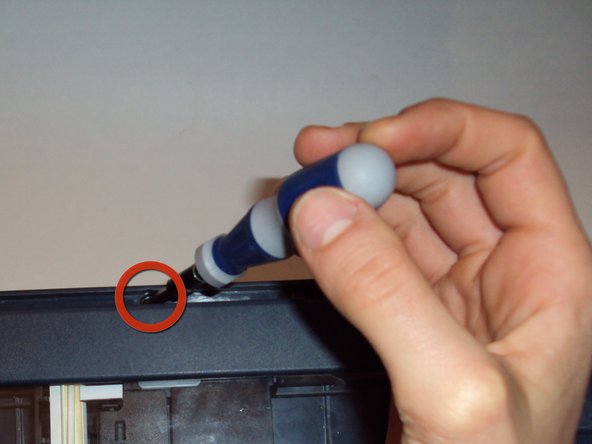
    • Carefully wedge the flathead 3/32" screwdriver on the outer groove of the control panel faceplate.

    • Follow the perimeter of the groove with the flathead 3/32" screwdriver making sure to gently pry and lift upward until the control panel faceplate comes off.

    • Potential for device damage: Take your time prying off the control panel faceplate. If too much pressure is applied, the control panel faceplate can break.

  2. How to clean the HP PSC 2410 Photosmart All In One Printer scanner glass: paso 2, imagen 1 de 1
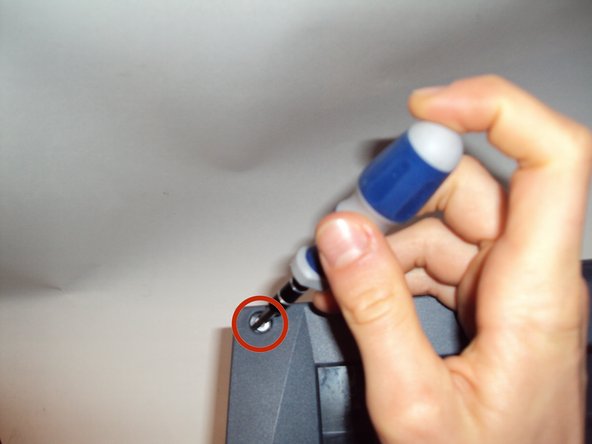
    • Once the control panel faceplate is off, look for the Lock/Unlock tab located underneath the off button.

    • To unlock and release the control panel, insert the flathead 3/32" screwdriver into the tab and carefully push down. The control panel will then separate from the printer's base by sliding it downward a little.

  3. How to clean the HP PSC 2410 Photosmart All In One Printer scanner glass: paso 3, imagen 1 de 1
    • Underneath the control panel will be a flat grey ribbon cable. This cable is attached at the base of the green control board with the other end of the cable located on the back side of the printer's base.

    • Carefully disconnect both ends of the flat grey ribbon cable to release the control panel in its entirety.

    • Potential for device damage: Only pull from the connector portion of the cable, as pulling on the wires may damage them.

  4. How to clean the HP PSC 2410 Photosmart All In One Printer scanner glass: paso 4, imagen 1 de 1
    • Lift open the scanner lid and locate a black tab located at the center of the scanner bed.

    • Using your finger push (pull on some printers) the tab towards the scanner lid. This will release the scanner lid

  5. How to clean the HP PSC 2410 Photosmart All In One Printer scanner glass: paso 5, imagen 1 de 2 How to clean the HP PSC 2410 Photosmart All In One Printer scanner glass: paso 5, imagen 2 de 2
    • Once the scanner lid is removed, use the Philips #1(Torx on some printers) Screwdriver to remove the screw.

  6. How to clean the HP PSC 2410 Photosmart All In One Printer scanner glass: paso 6, imagen 1 de 2 How to clean the HP PSC 2410 Photosmart All In One Printer scanner glass: paso 6, imagen 2 de 2
    • Remove all four silver screws from the corners of the scanner glass cover with a T10 Torx Screwdriver.

    • Organization is everything. Remember to have your iFixit Magnetic Work Mat next to you. It will help keep screws organized and in place.

  7. How to clean the HP PSC 2410 Photosmart All In One Printer scanner glass: paso 7, imagen 1 de 1
    • Once you have removed the four torx screws, gently lift the scanner glass cover from the printer's base.

  8. How to clean the HP PSC 2410 Photosmart All In One Printer scanner glass, How to clean the HP PSC 2410 Photosmart All In One Printer scanner glass: paso 8, imagen 1 de 1
    • Turn the scanner glass over so its underside is facing upward.

    • Place the scanner glass on a clean surface.

  9. How to clean the HP PSC 2410 Photosmart All In One Printer scanner glass: paso 9, imagen 1 de 1
    • Moisten a lint-free cloth with alcohol. Wipe down the underside of the scanner glass until all dust is removed.

Conclusión

To reassemble your device, follow these instructions in reverse order.

16 personas más completaron esta guía.

Hilary Olsen

Miembro Desde 04/12/11

251 Reputación

2 Guías creadas

Equipo

Cal Poly, Team 12-31, Maness Spring 2011 Miembro de Cal Poly, Team 12-31, Maness Spring 2011

CPSU-MANESS-S11S12G31

5 Miembros

9 Guías creadas

8 comentarios

I thought my printer was a goner for sure, then I stumbled on this site. All I had to do was clean the glass- it looked terrible!- and put it all back together. It was easy. I truly appreciate not having to get another printer- THANKS!

Ben - Contestar

Brilliant! Easy to follow instructions. Printer stoped clicking and works fine now. Thank you!

AL Pierce - Contestar

Great! I followed the instructions already a couple of years ago, and found it now again! Great help! Thank you!

Fritz Abraschek - Contestar

Worked great, but it did take more than 2-3 minutes!

clintsmith - Contestar

This saved me and my printer!! Thx so much! In fact, the dust flocks were just against the internal buses and under the control panel. And I also found out that one can check most of the machine without having to uncable the grey ribbons.

Handle with extreem care though.

Thx thx thx!

Ambriel - Contestar

Agregar Comentario

Ver Estadísticas:

Ultimas 24 horas: 0

Ultimos 7 días: 4

Ultimos 30 días: 24

Todo El Tiempo: 14,610