Saltar al contenido principal
Únete a la Comunidad de Reparación - Crear Cuenta

How to Tie a Tie: Pratt

Qué necesitas

    1. How to Tie a Tie: Pratt, Preparation: paso 1, imagen 1 de 1
      • Fold the collar of your shirt up.

      Pregunta a FixBot

      Agregar Comentario

    2. How to Tie a Tie: Pratt: paso 2, imagen 1 de 1
      • Wrap the tie around the back of your neck with the narrow end on the left side of your body and the wide end on the right side.

      • The wide end of the tie will be your active end.

      • Note: the narrow end of the tie should be around the height of your belly button or a little higher. It may need to adjusted for personal height.

      Pregunta a FixBot

      Agregar Comentario

    3. How to Tie a Tie: Pratt, Tying: paso 3, imagen 1 de 1
      • Take the active end and cross it under the narrow end, so that it points to the left.

      • Note: be sure that the tie always lays flat so there are no twists in the fabric.

      Pregunta a FixBot

      Agregar Comentario

    4. How to Tie a Tie: Pratt: paso 4, imagen 1 de 1
      • Lift the active end up, so that it is now pointing up.

      Pregunta a FixBot

      Agregar Comentario

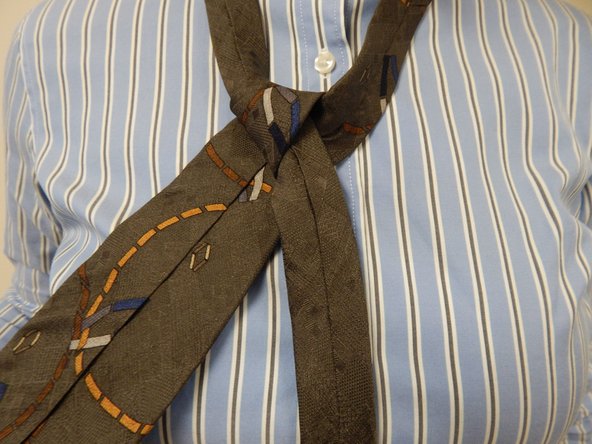
    5. How to Tie a Tie: Pratt: paso 5, imagen 1 de 2 How to Tie a Tie: Pratt: paso 5, imagen 2 de 2
      • Pull the active end down through the loop around your neck, so that it is now pointing down and to the left.

      Pregunta a FixBot

      Agregar Comentario

    6. How to Tie a Tie: Pratt: paso 6, imagen 1 de 1
      • Cross the active end over the front of the knot, so that it is now pointing to the right.

      • Note: leave this wrap a little loose, as it will be used in step 8.

      Pregunta a FixBot

      Agregar Comentario

    7. How to Tie a Tie: Pratt: paso 7, imagen 1 de 1
      • Pull the active end up through the neck loop, so that it is now pointing up.

      Pregunta a FixBot

      Agregar Comentario

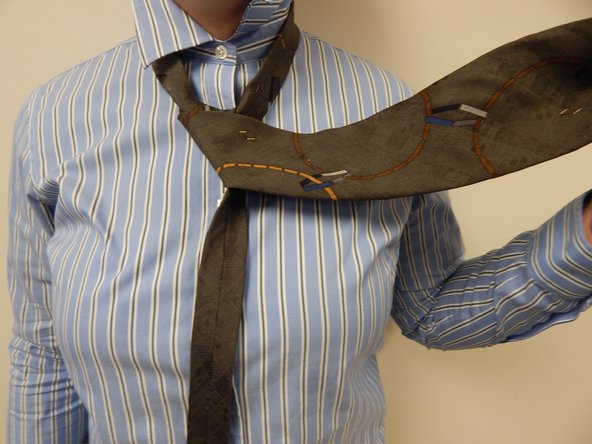
    8. How to Tie a Tie: Pratt: paso 8, imagen 1 de 2 How to Tie a Tie: Pratt: paso 8, imagen 2 de 2
      • Pull the active end down through the wrap you created in step 6 (see second picture).

      Pregunta a FixBot

      Agregar Comentario

    9. How to Tie a Tie: Pratt, Finishing: paso 9, imagen 1 de 1
      • Tighten the knot by pulling down on the active end and up on the knot, adjusting for size and evenness.

      Pregunta a FixBot

      Agregar Comentario

    10. How to Tie a Tie: Pratt: paso 10, imagen 1 de 1
      • Tighten the neck loop by pulling down on the narrow end of the tie and sliding the knot up toward your neck.

      Pregunta a FixBot

      Agregar Comentario

    11. How to Tie a Tie: Pratt: paso 11, imagen 1 de 1
      • Tuck the narrow end of the tie through the keeper loop.

      • Note: if the narrow end is too long, a simple solution lies in tucking the narrow end between two buttons of your shirt.

      • Fold your collar down when the knot is finished.

      Pregunta a FixBot

      Agregar Comentario

Conclusión

Congratulations! You've successfully tied the Pratt knot!

Cancelar: No complete esta guía.

3 personas más completaron esta guía.

Wes

Miembro Desde 03/29/17

535 Reputación

2 Guías creadas

Equipo

The Electric Warthogs Miembro de The Electric Warthogs

Community

Miembros de 3

5 Guías creadas

0Guía Comentarios

Agregar Comentario

Ver Estadísticas:

Ultimas 24 horas: 1

Ultimos 7 días: 15

Ultimos 30 días: 54

Todo El Tiempo: 1,327