Saltar al contenido principal

How to Replace a Chain Link Fence Gate

Qué necesitas

  1. How to Replace a Chain Link Fence Gate, Chain link fence gate: paso 1, imagen 1 de 1
    • Spray WD-40 on each hinge bolt. This will make it easier to remove them.

  2. How to Replace a Chain Link Fence Gate: paso 2, imagen 1 de 3 How to Replace a Chain Link Fence Gate: paso 2, imagen 2 de 3 How to Replace a Chain Link Fence Gate: paso 2, imagen 3 de 3
    • Remove the bolt from the hinge strap on the fence post.

    • Wipe the excess lubricant from the bolt to avoid slipping.

    • Slide the loosened hinge strap up to remove the pin from the loop on the gate hinge.

    • Use a 9/16" socket wrench or a crescent wrench.

    • Repeat this process for the bottom hinge.

  3. How to Replace a Chain Link Fence Gate: paso 3, imagen 1 de 2 How to Replace a Chain Link Fence Gate: paso 3, imagen 2 de 2
    • Slide the gate away from the fence post set it aside.

  4. How to Replace a Chain Link Fence Gate: paso 4, imagen 1 de 1
    • Repeat the previous steps to remove the second gate pane.

  5. How to Replace a Chain Link Fence Gate: paso 5, imagen 1 de 1
    • Remove the unbolted post hinges from the fence posts.

  6. How to Replace a Chain Link Fence Gate: paso 6, imagen 1 de 3 How to Replace a Chain Link Fence Gate: paso 6, imagen 2 de 3 How to Replace a Chain Link Fence Gate: paso 6, imagen 3 de 3
    • Open the Galvanized Drive Gate Set and verify that you have four hinge pairs.

    • Separate one of the hinge pairs.

    • The Post Hinge has a pin. The Gate Hinge has a loop.

  7. How to Replace a Chain Link Fence Gate: paso 7, imagen 1 de 3 How to Replace a Chain Link Fence Gate: paso 7, imagen 2 de 3 How to Replace a Chain Link Fence Gate: paso 7, imagen 3 de 3
    • Slide the hinge strap onto the post so that the pin is facing down.

    • Slide the hinge strap onto the post so that the pin is facing down.

    • Slide a nut onto the end of the bolt.

    • Tighten the nut using the socket wrench.

  8. How to Replace a Chain Link Fence Gate: paso 8, imagen 1 de 3 How to Replace a Chain Link Fence Gate: paso 8, imagen 2 de 3 How to Replace a Chain Link Fence Gate: paso 8, imagen 3 de 3
    • Slide the hinge strap onto the post so that the pin is facing up.

    • Slide a bolt through the holes in the strap.

    • Slide a nut onto the end of the bolt.

    • Tighten the nut using the socket wrench.

  9. How to Replace a Chain Link Fence Gate: paso 9, imagen 1 de 1
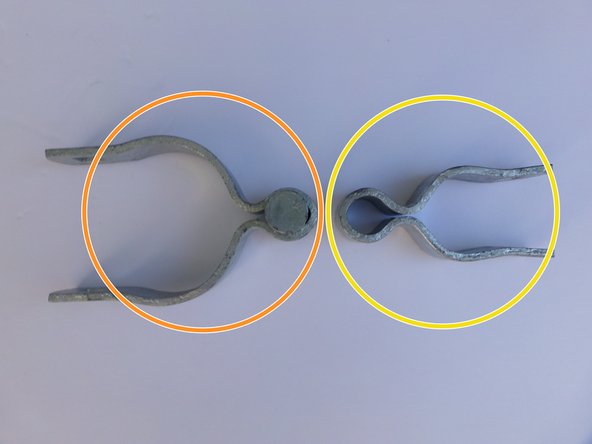
    • Attach the two gate hinges to the side of the gate frame with the loops facing out.

    • Keep the straps loose enough so that you can slide the hinges up and down on the gate frame, since you will need to adjust them once the gate is in position.

  10. How to Replace a Chain Link Fence Gate: paso 10, imagen 1 de 2 How to Replace a Chain Link Fence Gate: paso 10, imagen 2 de 2
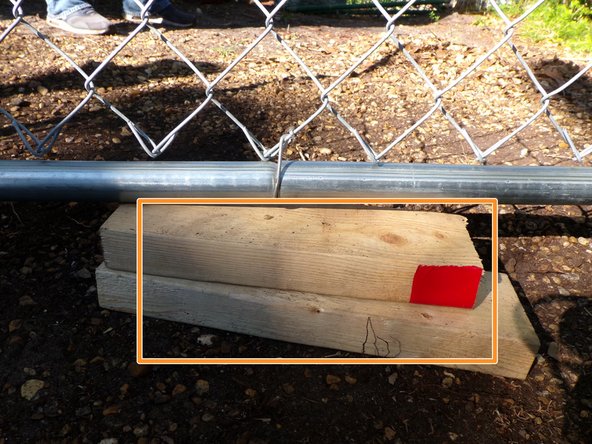
    • Place blocks on the ground at the where you will install the gate. These will support the gate while you are connecting the hinges.

    • Lift the gate panel into position so that the gate lines up with the fence and at the desired height. Adjust the blocks as necessary to achieve the desired height.

  11. How to Replace a Chain Link Fence Gate: paso 11, imagen 1 de 2 How to Replace a Chain Link Fence Gate: paso 11, imagen 2 de 2
    • Slide the top gate hinge up as you slide the loop over the pin on the top post hinge.

    • Tighten the nut on the gate hinge straps.

    • Repeat for the bottom gate hinge.

  12. How to Replace a Chain Link Fence Gate: paso 12, imagen 1 de 2 How to Replace a Chain Link Fence Gate: paso 12, imagen 2 de 2
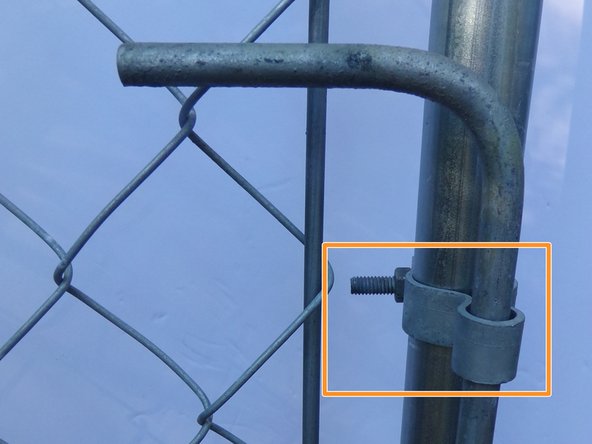
    • Adjust the hinges so that the gate can swing freely.

    • If the gate is too wide to close properly, adjust the angle of the hinges so that they are almost perpendicular, which brings the gate edge closer to the fence post.

  13. How to Replace a Chain Link Fence Gate: paso 13, imagen 1 de 3 How to Replace a Chain Link Fence Gate: paso 13, imagen 2 de 3 How to Replace a Chain Link Fence Gate: paso 13, imagen 3 de 3
    • Using a a 1/2" socket wrench or adjustable wrench, bolt the two latch plates on the inside of the gate frame together on one end.

    • Insert the latch between the two plates on the outside of the gate frame.

    • Insert a bolt and nut. Tighten to secure the latch.

    • Make sure the latch is loose enough to swing up and down.

  14. How to Replace a Chain Link Fence Gate: paso 14, imagen 1 de 3 How to Replace a Chain Link Fence Gate: paso 14, imagen 2 de 3 How to Replace a Chain Link Fence Gate: paso 14, imagen 3 de 3
    • Bolt the two post holders onto the gate frame.

    • Slide the post down through the post holders and secure in the ground.

Linea de Meta

6 personas más completaron esta guía.

Lucy Wiswall

Miembro Desde 01/18/17

272 Reputación

1 Guía escrita

Equipo

0 comentarios

Agregar Comentario

Ver Estadísticas:

Ultimas 24 horas: 6

Ultimos 7 días: 41

Ultimos 30 días: 142

Todo El Tiempo: 16,013