Introducción
En algunas ocasiones el cable se empieza a desprender en el punto donde se conecta con el adaptador de corriente. He conocido a mucha gente que tira sus cargadores debido a esto. Llevará algo de tiempo y paciencia ¡pero se puede reparar!
Qué necesitas
-
-
Mira la línea que atraviesa el cargador. Todo esto está adherido con un súper pegamento que impedirá que lo desarmes.
-
Habrá que cortar a través de todo ese plástico, sigue toda la línea de alrededor a través de ese pequeño espacio con tu navaja.
-
Llevará algo de tiempo, pero hay que cortar el plástico por los 4 lados. Sentirás cuando ya hayas cortado la mayoría de este.
-
-
-
Con un destornillador de punta plana comienza a separar las caras de plástico del cargador. Necesitarás aplicar un poco de fuerza para hacerlo.
-
Una vez que ya hayas separado las caras con el desatornillador, estas seguirán sin desprenderse del cuerpo. Esa cosa está pegada con adhesivo en todas las partes del plástico.
-
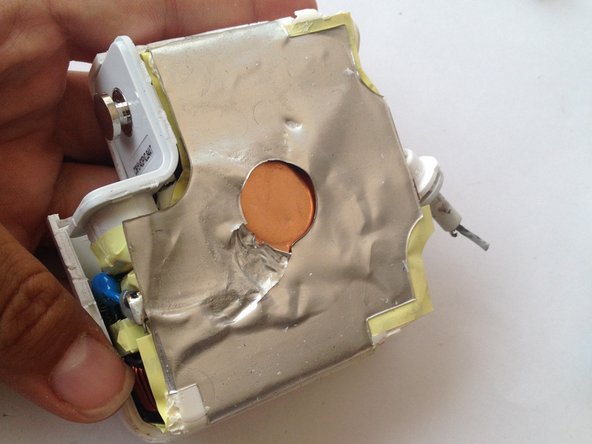
Inserta el desatornillador dentro de la parte superior del cargador y cuidadosamente separa la lámina de la cubierta plástica. Ten mucho cuidado de no desprender la lámina interna del cargador en el proceso.
-
-
-
-
Cubre con cinta eléctrica el resto del cable blanco y del cable negro/cable externo que acabas de soldar.
-
Únelos con cinta aislante para que parezca un sólo cable. Coloca el cargador dentro de una de las caras de la cubierta plástica.
-
Toma 3 cinchos de plástico pequeños y átalos alrededor del cable para prevenir que se salga de la cubierta plástica.
-
-
-
Sujeta la cubierta con 4 cinchos de plástico largos, 2 por cada lado.
-
Algunas personas prefieren usar solamente el súper pegamento porque le da mejor aspecto pero los cinchos de plástico lo hacen más seguro. Si gustas dejarlo sin los cinchos, quítalos después de algunas horas cuando el pegamento haya secado completamente.
-


Cancelar: No complete esta guía.
240 personas más completaron esta guía.
Un agradecimiento especial a estos traductores:
100%


Estos traductores nos están ayudando a reparar el mundo! ¿Quieres contribuir?
Empezar a traducir ›

55 comentarios
Some tips:
* There is a better way to open the enclosure without damaging the edge: using a pliers to push the two sides apart where the bunny ears lift up (google for videos).
* The cable can actually be threaded through the rubber/plastic grommet if you have the patience to remove the broken cable from it and make the two small holes bigger with a drill bit. This can be frustrating but is the only way to keep the original appearance. Be sure to leave enough cable after the grommet for soldering.
* Thin (2-3mm) heat shrink is a good way to insulate the exposed wire after threading it through the grommet.
* If you trust your soldering skills, consider de-soldering the old cables from the terminals.
* Applying a little super glue along the edge and clamping for a few hours is all that is needed to keep it closed permanently.
Thanks for the tips! If you have pictures of the processes please feel free to modify this guide (especially the opening of the enclosure!) ^__^
* I have seen that in some tutorials and I wanted to to drill a hole through the rubber plastic grommet but didn't have a drill at my office =(
* I did consider de-soldering the old cables but that involved de-soldering other components that are attached to copper plates to get to those terminals. In earlier versions of the AC Adapter this can be done with not so much trouble.
I really appreciate your feedback! Thanks!
I didn't try that... We actually ended up just heating it to soften the plastic and that worked, wouldn't advise it though
Same for me, don: see this as a much easier way to open the case: https://www.youtube.com/watch?v=Yqa9uUKu...
Would be nice if you refer to this solution as alternative, befor starting to cut the case.
Thanks for the manual, I just fixed it!
Lukas -