Saltar al contenido principal

Honeywell HY-204 Fan Motor Replacement

Qué necesitas

  1. Honeywell HY-204 Fan Motor Replacement, Case: paso 1, imagen 1 de 2 Honeywell HY-204 Fan Motor Replacement, Case: paso 1, imagen 2 de 2
    • Before you begin, be sure to unplug the fan.

    • Remove the four 14 mm screws from the back of the device using the Phillips #0 Screwdriver.

  2. Honeywell HY-204 Fan Motor Replacement: paso 2, imagen 1 de 2 Honeywell HY-204 Fan Motor Replacement: paso 2, imagen 2 de 2
    • Pull the front and back parts of the case away from each other until the back is free from the front. This may require a large amount of force.

  3. Honeywell HY-204 Fan Motor Replacement, Fan Blades: paso 3, imagen 1 de 2 Honeywell HY-204 Fan Motor Replacement, Fan Blades: paso 3, imagen 2 de 2
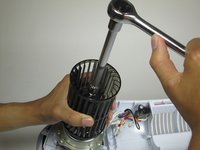
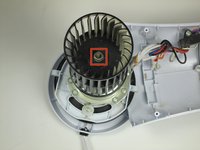
    • Remove the hex nut from the fan motor with a 10mm hexagonal ratcheting socket wrench.

    • The nut uses a left-handed thread.

  4. Honeywell HY-204 Fan Motor Replacement: paso 4, imagen 1 de 2 Honeywell HY-204 Fan Motor Replacement: paso 4, imagen 2 de 2
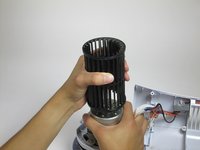
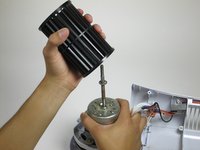
    • Grasp the fan blade firmly and pull upward to remove it from the center column of the fan.

    • The slots on the fan blades and center column need to be aligned for reassembly.

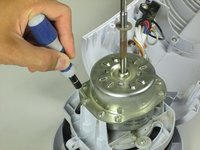
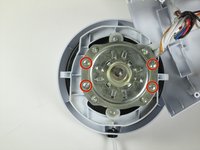
  5. Honeywell HY-204 Fan Motor Replacement, Fan Motor: paso 5, imagen 1 de 2 Honeywell HY-204 Fan Motor Replacement, Fan Motor: paso 5, imagen 2 de 2
    • Remove the four 12.7mm screws using the Phillips #0 Screwdriver.

    • Once the screws are removed, lift the motor off its base.

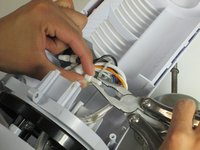
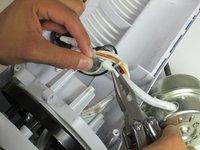
  6. Honeywell HY-204 Fan Motor Replacement: paso 6, imagen 1 de 2 Honeywell HY-204 Fan Motor Replacement: paso 6, imagen 2 de 2
    • Remove the wire connectors from the black, brown, red, blue, white, grey, and green wires. To do this, grip each wire with your hand and use the pliers to de-crimp the heads of each wire connector by applying pressure to the wider ends of the connector until it falls free.

    • While reassembling, apply pressure to the more narrow ends of the wire connectors to re-crimp them onto the wires.

Conclusión

To reassemble your device, follow these instructions in reverse order.

2 personas más completaron esta guía.

Equipo

Cal Poly, Team 10-40, Amido Fall 2014 Miembro de Cal Poly, Team 10-40, Amido Fall 2014

CPSU-AMIDO-F14S10G40

3 Miembros

7 Guías creadas

2 comentarios

Where do you purchase the replacement fan motors from?

mattb - Contestar

Do you know where I can find the fan motor replacement?

Dave Smith - Contestar

Agregar Comentario

Ver Estadísticas:

Ultimas 24 horas: 0

Ultimos 7 días: 7

Ultimos 30 días: 19

Todo El Tiempo: 6,389