Introducción
El amado asistente de voz de Apple ha regresado, esta vez en forma de toilet-paper roll Mac Pro usando una chaqueta. Siri ahora puede (intentar) responder sus preguntas con 360 °, sonido de alta fidelidad. ¿Cómo encajaba Apple un sonido tan grande en un espacio tan pequeño? ¿Y qué les llevó tanto tiempo hacerlo? ¡Podríamos tener que desmontarlo para descubrirlo!
Hola Siri, ¿dónde puedo obtener más noticias de desmontaje? Visítanos en Facebook, Instagram, y [https: // twitter. com / ifixit | Twitter | new_window = true]. Si desea que se entregue su desmontaje, anótese en nuestro newsletter.
Qué necesitas
Resumen del Video
-
-
¿Qué tipo de tecnología escondió Apple allí? Esto es lo que nos dijeron:
-
Procesador Apple A8
-
Altavoz de graves de 4 "de alta excursión y disparo hacia arriba
-
Beamforming siete-tweeter array
-
Beamforming matriz de seis micrófonos
-
Micrófono de baja frecuencia para calibración de woofer en tiempo real
-
Interfaz táctil montada en la parte superior
-
802.11ac Wi-Fi with MIMO + Bluetooth 5.0
-
-
-
El HomePod puede no ser el más alto en esta alineación, pero sin duda es el más ominoso.
-
Aún así, mantiene el factor de forma básicamente cilíndrico típico de los altavoces inteligentes de 360 °
-
Además de la relación de aspecto, la diferencia más evidente es que, a diferencia de Amazon Echo y Google Home, el HomePod cuenta con una fuente de alimentación integrada y un cable de alimentación no extraíble. (si tira lo suficientemente fuerte)
-
-
-
Espiamos una gran cantidad de información normativa impresa discretamente bajo el pie:
-
La FCC, las advertencias de desechos electrónicos y la UE, Australia y las marcas reglamentarias, a pesar del enchufe permanente de EE. UU. En nuestro modelo, y un marcador de doble aislamiento.
-
Número de modelo recién acuñado, A1639.
-
Y un par de pequeños agujeros.
-
-
-
A continuación, tomamos nuestra primera mirada en la malla acústica 3D sin fisuras de Apple.
-
Una interfaz elegante ( en caso de que SIRI necesite un descanso) y un indicador LED bastante familiar sentarse en la sima del HomePod.
-
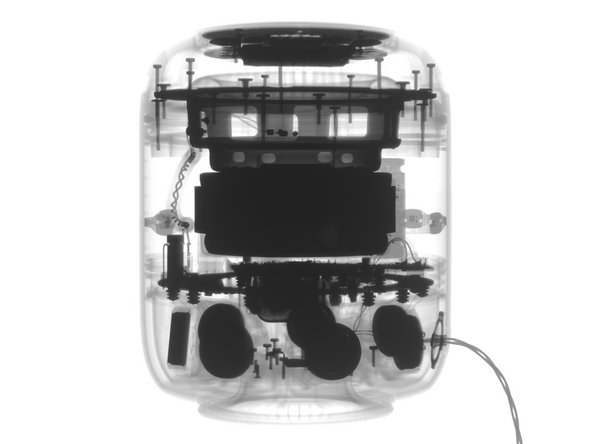
Gracias a los rayos X de Creative Electron, nos damos un vistazo en lo interno, y parece que hay unos imanes enormes aquí ( cómo se muestran en esos puntos oscuros).
-
-
-
Nuestra inteligencia de rayos X nos mostró unos tornillos debajo del pie, así que concentramos nuestro fuego en el adhesivo que lo sujeta. Solo después de un disparo de calor serio pudimos despegar el pie lentamente.
-
Incluso sabiendo que los tornillos están allí, estamos preparados para lo peor, después de la tarea pegajosa.
-
…pero se siente alivio de encontrar los tornillos Torx fáciles de reparar listos para desenroscar. También bajo el pie del pegamento hay un puerto de 14 pines, que probablemente se utiliza para probar o programar los HomePod en los pines pogo durante el ensamblaje.
-
-
-
Tal vez esos tornillos no sean tan amigables como pensábamos. Después de quitarlos, la placa de plástico que sujetan está... todavía retenida. Parece que la malla sujeta la placa de acceso hacia abajo.
-
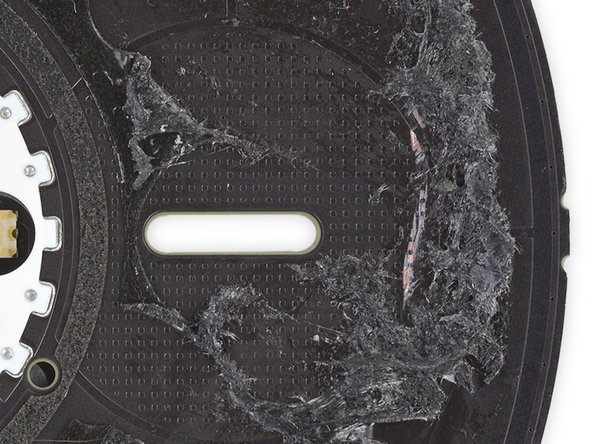
Realmente no queremos cortar esta malla, así que deslizamos una púa a lo largo del borde pegado de la malla y sacamos la placa. ¿Nuestro premio? Más plástico inexpugnable que no va a ninguna parte.
-
-
-
Probablemente algo afilado. Hicimos todo lo posible para mantener la malla sin costuras, pero fue en vano. Bueno, esta no será la primera vez que tengamos que cortar una tela elegante.
-
Cortando a través de la malla 3D gruesa y fibrosa, encontramos una funda de tela interna secundaria.
-
Esta manga más delgada y flexible queda atrapada debajo de la parte superior, por lo que permanece en su lugar por ahora.
-
Insertar traducción aquí
-
-
-
Este paso está sin traducir. Ayuda a traducirlo
-
One benefit of our newly-made seam: we get to see just what kind of fiber magic went into this sleeve.
-
No magic, but we can see that the mesh consists of a net-like layer on the top and bottom, with tiny wiry coils in between.
-
Now that we have the mesh off, we can see that it had a drawstring all along! Does this mean that there's a non-destructive way in through the top?
-
-
Este paso está sin traducir. Ayuda a traducirlo
-
In pursuit of an entrance, we peel the glue-covered top up, only to find more screws that lead—well, seemingly nowhere.
-
After even more heat, and another glue pad, we dive another layer deeper and finally hit pay dirt.
-
Under door number three, we get: a well-shielded board, a wide ribbon cable, and the drawstring's mooring posts.
-
-
Este paso está sin traducir. Ayuda a traducirlo
-
De-shielding that board shows us some of the fun that's running the light show up top:
-
Texas Instruments TLC5971 LED driver
-
Cypress CY8C4245LQI-483 Programmable System-on-Chip, likely tasked with touch control
-
ON Semiconductor FPF1039 slew-rate-controlled load switch
-
Texas Instruments TPS62135 4 A step-down converter
-
The flip side of the board houses the LEDs and the diffuser that gives the indicator its cloudy look.
-
The top side of the board (second photo) sports a neatly organized pattern of tiny divots—possibly a capacitive grid, like on the Google Home, for registering your taps and touches on the surface above.
-
-
Este paso está sin traducir. Ayuda a traducirlo
-
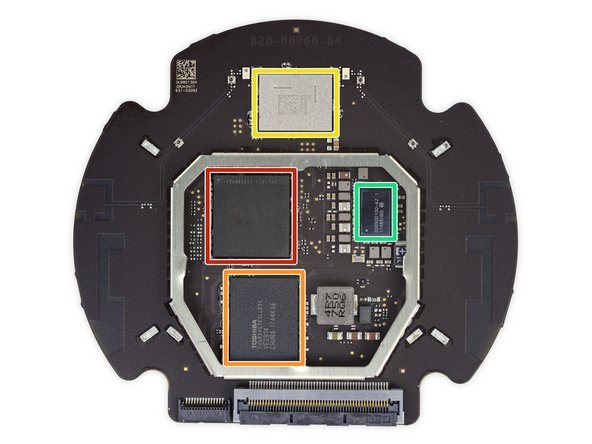
The next disc to come out holds those elaborate drawstring moorings—and behind it, the main logic board.
-
Chipwise, we spy:
-
Apple A8 APL1011 SoC (we’ve seen this before, but doing a different job), likely paired with 1 GB RAM (layered on top in typical PoP configuration)
-
Toshiba THGBX4G7D2LLDYC 16 GB NAND flash
-
USI 339S00450 WiFi/Bluetooth module, likely with a Broadcom BCM43572 trapped inside
-
Apple/Dialog Semiconductor 338S00100-AZ PMIC
-
Interestingly, the reverse has some unpopulated SMD pads, for a few chips and several passives. Maybe the HomePod underwent some last-minute design changes?
-
-
Este paso está sin traducir. Ayuda a traducirlo
-
After a lot of fruitless goofing around with all manner of heat and twisting, we're stumped as to how to proceed from here. Finally we get impatient and grab the hacksaw (and our ultrasonic cutter) and release the super beefy woofer.
-
If the magnet on this woofer looks big for a speaker this size, that's because it is. Deep, dramatic bass notes depend on a speaker's ability to move lots of air.
-
-
Este paso está sin traducir. Ayuda a traducirlo
-
After slicing and prying our way into this fortress of a speaker, we reach the final obstacle: a threaded ring.
-
We're forced to conclude that—at some point—the HomePod was able to be unscrewed to separate the control/woofer component and the tweeter/power supply unit.
-
But we don't feel too bad about getting hacky: judging by the adhesive you can see on the lower face of the tube, the threads aren't meant for the consumer—this thing was glued shut.
-
-
Este paso está sin traducir. Ayuda a traducirlo
-
The next layer of our HomePod onion (or maybe parfait?) is the two-part power supply, composed of an inner block handling the AC/DC conversion, and an outer ring distributing power to all eight of the speakers.
-
The AC-in board's hefty hardware is flooded with epoxy, probably to keep the mad vibes from shaking it apart. It sends power to the ring board via conductive posts à la Mac Pro.
-
-
Este paso está sin traducir. Ayuda a traducirlo
-
We've got part two of the power supply, the
StargateHalopower distribution ring, on the hook. -
The capacitor-studded side of our intergalactic power supply board is home to a STMicroelectronics STM32L051C8T7 ultra-low-power ARM MCU.
-
And on the other side we find:
-
International Rectifier PowlRaudio 98-0431 audio amplifier
-
Cirrus Logic CS4350 stereo DAC w/ intergrated PLL
-
And around the perimeter, seven Analog Devices SSM3515B audio amplifiers—looks like these are the individual amps for the tweeters!
-
Maxim Integrated MAX9938 and Texas Instruments INA210 current sense amplifier
-
Texas Instruments TPS54560 5 A step down converter
-
-
Este paso está sin traducir. Ayuda a traducirlo
-
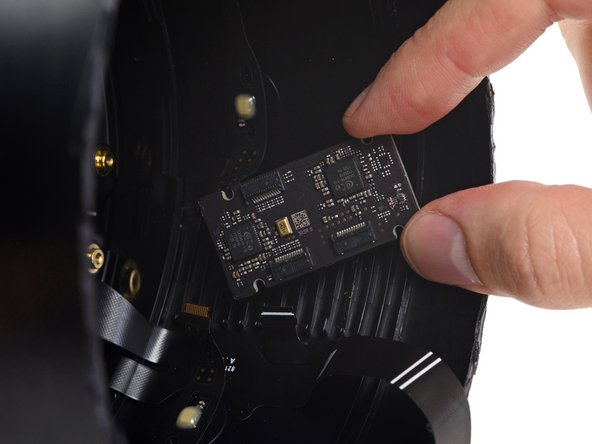
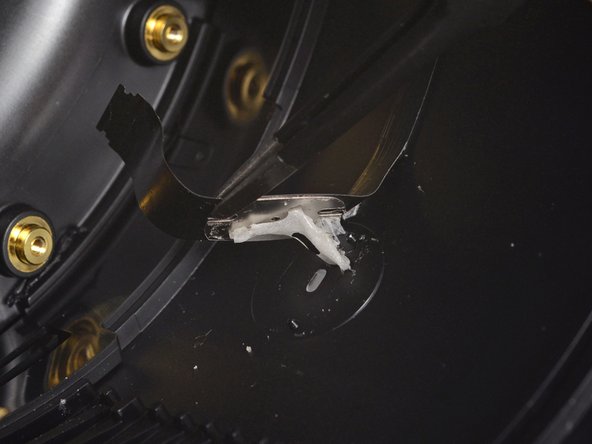
We wrestle a small board from the adhesive holding it to the barrel, and notice two Conexant CX20810 ADC chips by Synaptics for the microphone array.
-
Not to be outdone, the board has a microphone of its own—likely the low frequency microphone for woofer calibration.
-
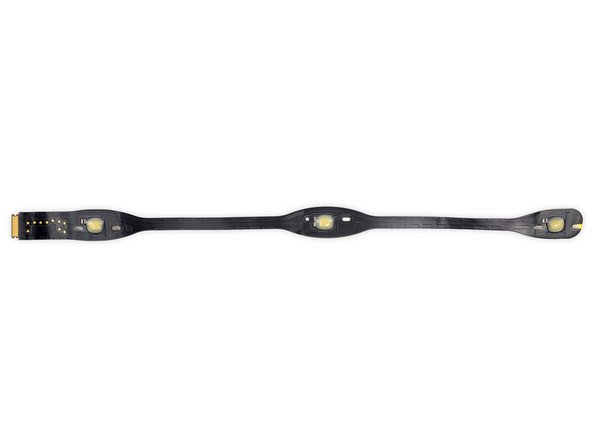
Back to the rest of the microphones: they come in two long strips of three mics each. Each strip is glued firmly to the inside of the case, with the mics positioned over funnel-shaped channels.
-
-
Este paso está sin traducir. Ayuda a traducirlo
-
We pull another threaded ring out of the HomeBody and finally gain access to
snow white andthe seven tweeters, complete with their conductive power posts. -
That's right—those gold screwposts are delivering power to the tweeters.
-
Taking a look at a port, we've got a very bad feeling about this. Or maybe it's the tweeter that's nervous.
-
Time to break out the ultrasonic cutter and pop this unit open!
-
-
Este paso está sin traducir. Ayuda a traducirlo
-
With the tweeter assembly open, we get a better look at the vented, horn-loaded tweeter that gives the HomePod its "precise" sound.
-
The vents on the sides of the voice coil bobbin and the four holes at the rear of the tweeter prevent air pressure from building up behind the tweeter dome as it moves.
-
-
Este paso está sin traducir. Ayuda a traducirlo
-
And with that: here are all the bits that make a Siri house a HomePod.
-
Do you know how Apple gets into these things? Did we miss a speaker nugget of wisdom? Let us know in the comments and be sure to check out our teardown video on YouTube.
-
Lastly, it's time to assign a repairability score. Despite many positives, if the opening procedure is truly not reversible, we're going to have to score it accordingly.
-
- The HomePod is built like a tank. Durability should not be an issue.
- The outer fabric mesh, despite its lack of seams, can be peeled off undamaged thanks to a wicked cool drawstring.
- All threaded fasteners are of the standard Torx variety—no annoying security screws here.
- Extremely clever use of conductive screw posts minimizes the cabling mess across multiple stacked layers of components.
- Very strong adhesives secure the touch input cover, microphone array, rubber foot, and (most annoyingly) the main point of entry on the top of the device—which otherwise looks designed to twist off without much fuss.
- Even though it looks like there ought to be a nondestructive way inside, we failed to decode it. Without a repair manual, your odds of success are slim.


Consideraciones Finales
Calificación de Reparabilidad


(10 es lo más fácil de reparar)
Un agradecimiento especial a estos traductores:
39%


Estos traductores nos están ayudando a reparar el mundo! ¿Quieres contribuir?
Empezar a traducir ›
82 comentarios
Thanks guys, very interesting report!
The power cable is actually user removable and replaceable. You just have to pull on it *really* hard. https://www.youtube.com/watch?v=gjxILSOf...
Very good teardown! Thanks!
Apparently the AC cable is replaceable, yet not meant to be user-replaced: https://9to5mac.com/2018/02/10/remove-ho...
What is the DAC?