Introducción
This is apparently a problem with Hisense TVs because there are several videos about how to find these particular capacitors. This is not to say that all Hisense TVs are plagued by this problem. The one I got, it was a Hisense TV from 2016 that I found by the side of the road. So, the capacitors in question had a 50/50 chance of going bad eventually, given that capacitors can randomly go bad. Fortunately, this is a relatively straight forward repair if you are good with finding capacitors with the right values and know how to solder.
Qué necesitas
-
-
There are at least 11 screws on the back of the TV highlighted in red that will need to be removed to get to the inside panel where the problem circuit board is located.
-
There are at least two different screws that you will need to differentiate. They're all Philips screwdrivers. Although, some are in holes too narrow to use a magnetic screwdriver with bits.
-
The ones in green, depending on which model Hisense you have, may or may not have to be removed. Some were one whole cover. Some, like the one pictured, were 3 sections.
-
-
-
Depending on the model, there will be between 5 and 7 cables you will need to unplug from this board to pull it out.
-
Some models have an additional circuit board plugged in at the bottom in lieu of a cable. In which case, you might need to unscrew it so as to facilitate the removal of the main board.
-
-
-
-
At this point, depending on your model, this board will be the main board in the middle of the back of the TV. There are 5 screws highlighted in blue that you will need to remove. Their positions might be slightly different depending on your model.
-
-
-
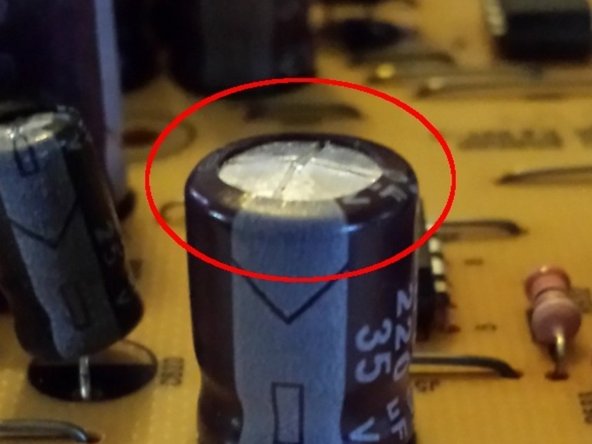
Once the circuit board is liberated from the TV, you'll have a chance to get a good look at the capacitors. The main culprits are at the top. If they bulge at the top, there's a good chance that they're blown and need replacing.
-
The particular capacitors I needed for my TV are 10uF 350V. You can purchase capacitors with a higher voltage rating. But, the farad value has to be the same.
-
At this point, it's down to just removing the bad capacitor and installing new ones. I used a solder removal tool not only because the component is flush to the board, it would give me a cleaner soldering surface when installing the new capacitor.
-


To reassemble your device, follow these instructions in reverse order.
To reassemble your device, follow these instructions in reverse order.