Saltar al contenido principal

Esta guía ha sufrido modificaciones. Revisa la última versión sin revisar.

Hipstreet Titan 2 HD Battery Replacement

Qué necesitas

  1. Hipstreet Titan 2 HD Battery Replacement, Rear Case: paso 1, imagen 1 de 1
    • Using the PH#00 screwdriver, remove the two 0.145 inch Phillips head screws.

    • The screws are located on the bottom face of the device, near the power and volume controls.

  2. Hipstreet Titan 2 HD Battery Replacement: paso 2, imagen 1 de 1
    • Place the small suction cup on your screen.

    • Moisturize the bottom of the suction cup to ensure a proper seal.

    • If the screen is cracked, the suction cup may not seal correctly; too much pressure may crack or damage the screen.

  3. Hipstreet Titan 2 HD Battery Replacement: paso 3, imagen 1 de 1
    • Insert the plastic opening tool between the screen cover and rear cover of the tablet.

    • Grasp the small suction cup.

  4. Hipstreet Titan 2 HD Battery Replacement: paso 4, imagen 1 de 2 Hipstreet Titan 2 HD Battery Replacement: paso 4, imagen 2 de 2
    • Slide the plastic opening tool along device edge to separate the screen cover from the rear cover.

    • Pull upward on the small suction cup handle while sliding the opening tool.

    • When sliding the plastic opening tool, avoid sliding the tool too far into the cover. This could damage the speaker connector on the back cover.

  5. Hipstreet Titan 2 HD Battery Replacement: paso 5, imagen 1 de 2 Hipstreet Titan 2 HD Battery Replacement: paso 5, imagen 2 de 2
    • Use the plastic opening tool to remove the speaker from the rear cover.

    • The speaker is held in place with adhesive and is easily removed.

    • Do not pull on the speaker wires. This could damage the soldering connections.

  6. Hipstreet Titan 2 HD Battery Replacement: paso 6, imagen 1 de 1
    • Once the speaker is disconnected, the cover removal is complete.

  7. Hipstreet Titan 2 HD Battery Replacement, Battery: paso 7, imagen 1 de 2 Hipstreet Titan 2 HD Battery Replacement, Battery: paso 7, imagen 2 de 2
    • Remove the black placement tape from the battery.

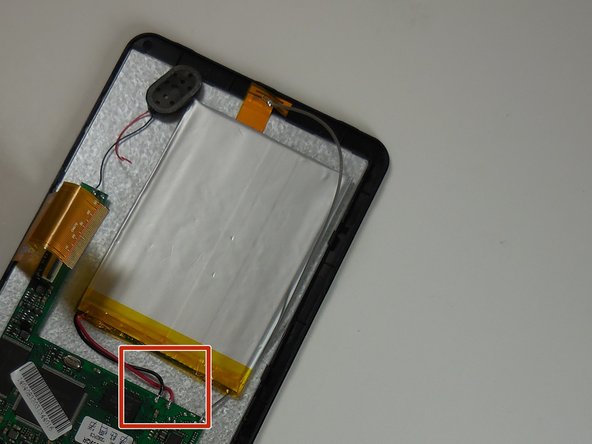
    • Find the two battery solder connections on the circuit board.

  8. Hipstreet Titan 2 HD Battery Replacement: paso 8, imagen 1 de 1
    • Remove the red and black battery wires from the circuit board with the solder removal tool.

  9. Hipstreet Titan 2 HD Battery Replacement: paso 9, imagen 1 de 1
    • Solder the new battery wire connectors to the circuit board.

    • The battery wires must be installed with the red wire on the left and black wire on the right.

Conclusión

To reassemble your device, follow these instructions in reverse order.

Una persona más ha completado esta guía.

Jeffrey

Miembro Desde 03/11/15

766 Reputación

5 Guías creadas

Equipo

0 comentarios

Agregar Comentario

Ver Estadísticas:

Ultimas 24 horas: 0

Ultimos 7 días: 0

Ultimos 30 días: 4

Todo El Tiempo: 4,269