Saltar al contenido principal

Harley-Davidson Sportster Evolution Front Brake Pads Replacement

Qué necesitas

  1. Harley-Davidson Sportster Evolution Front Brake Pads Replacement, Preparing the Motorcycle: paso 1, imagen 1 de 2 Harley-Davidson Sportster Evolution Front Brake Pads Replacement, Preparing the Motorcycle: paso 1, imagen 2 de 2
    • For the best access to the brake pads, we recommend securing the motorcycle in an upright position.

    • If you do not have a motorcycle lift, you will still be able change the brake pads, but it is still a good idea to secure the front wheel in place.

    • Be sure to allow time for the brake pads to cool completely before working on them. It may take ten to twenty minutes, especially if the motorcycle has just been ridden.

  2. Harley-Davidson Sportster Evolution Front Brake Pads Replacement: paso 2, imagen 1 de 1
    • Allowing the brake assembly to dangle from the brake lines can cause damage to the line.

    • Hang the caliper on a metal hanger attached to the handlebars or headlights.

  3. Harley-Davidson Sportster Evolution Front Brake Pads Replacement, Removing the old brake pads: paso 3, imagen 1 de 3 Harley-Davidson Sportster Evolution Front Brake Pads Replacement, Removing the old brake pads: paso 3, imagen 2 de 3 Harley-Davidson Sportster Evolution Front Brake Pads Replacement, Removing the old brake pads: paso 3, imagen 3 de 3
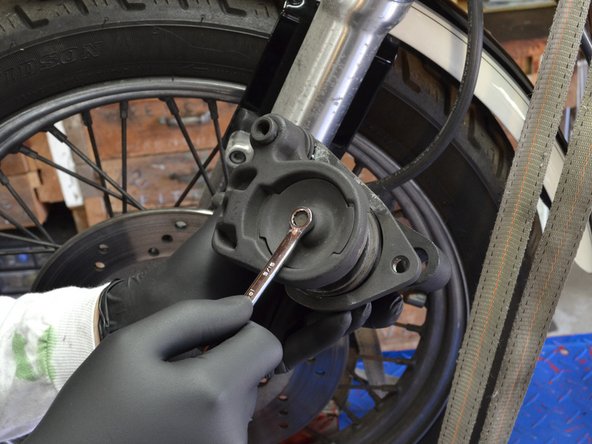
    • Using a 1/4" hex head or allen wrench, unscrew the two bolts holding the front brake assembly to the fork.

    • Unscrew and remove the bottom bolt, but do not completely remove the top bolt yet.

  4. Harley-Davidson Sportster Evolution Front Brake Pads Replacement: paso 4, imagen 1 de 3 Harley-Davidson Sportster Evolution Front Brake Pads Replacement: paso 4, imagen 2 de 3 Harley-Davidson Sportster Evolution Front Brake Pads Replacement: paso 4, imagen 3 de 3
    • Supporting the brake assembly with one hand, remove the top bolt.

    • Carefully slide the brake off of the brake rotor and hang it from the metal hanger.

  5. Harley-Davidson Sportster Evolution Front Brake Pads Replacement: paso 5, imagen 1 de 3 Harley-Davidson Sportster Evolution Front Brake Pads Replacement: paso 5, imagen 2 de 3 Harley-Davidson Sportster Evolution Front Brake Pads Replacement: paso 5, imagen 3 de 3
    • Using a 5/16 wrench, remove the bolt holding the stationary brake pad cover in place.

    • Remove the stationary brake pad cover from the brake assembly.

  6. Harley-Davidson Sportster Evolution Front Brake Pads Replacement: paso 6, imagen 1 de 1
    • Being careful to not let any loose parts fall out of the brake assembly, remove the stationary brake pad from the front brake assembly.

  7. Harley-Davidson Sportster Evolution Front Brake Pads Replacement: paso 7, imagen 1 de 1
    • Remove the floating caliper and remaining brake pad from the caliper assembly.

    • The brake pad and floating caliper are not attached to each other. Be careful to not drop either the brake pad or caliper.

  8. Harley-Davidson Sportster Evolution Front Brake Pads Replacement: paso 8, imagen 1 de 1
    • Using a can of brake cleaner, spray out the piston and inside of the brake caliper.

    • Make sure to do this over a bucket or tray; there tends to be a lot of grime inside the brake caliper and spraying it out can make quite a mess.

  9. Harley-Davidson Sportster Evolution Front Brake Pads Replacement, Depressing the brake piston: paso 9, imagen 1 de 3 Harley-Davidson Sportster Evolution Front Brake Pads Replacement, Depressing the brake piston: paso 9, imagen 2 de 3 Harley-Davidson Sportster Evolution Front Brake Pads Replacement, Depressing the brake piston: paso 9, imagen 3 de 3
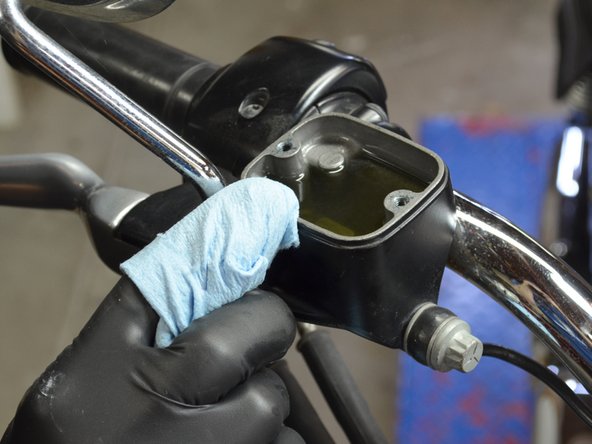
    • Using a Phillips #2 screwdriver, remove the two screws securing the cover on the master brake-fluid reservoir.

    • Carefully remove the cover of the master reservoir, making sure that you do not spill any of the brake fluid.

    • Brake fluid can cause ugly stains and scarring on cosmetic components of the motorcycle. Make sure you don't spill any.

  10. Harley-Davidson Sportster Evolution Front Brake Pads Replacement: paso 10, imagen 1 de 2 Harley-Davidson Sportster Evolution Front Brake Pads Replacement: paso 10, imagen 2 de 2
    • Position the screw of a large C clamp so that the head of the screw is pressing against the inside of the brake piston.

    • It is possible to use your hands rather than a C clamp, but it is much more difficult.

    • Slowly tighten the C clamp, forcing the brake piston back into the brake cylinder until it is completely depressed.

    • Make sure that you work slowly, or else the piston will force brake fluid out of the master reservoir and all over the motorcycle.

  11. Harley-Davidson Sportster Evolution Front Brake Pads Replacement: paso 11, imagen 1 de 3 Harley-Davidson Sportster Evolution Front Brake Pads Replacement: paso 11, imagen 2 de 3 Harley-Davidson Sportster Evolution Front Brake Pads Replacement: paso 11, imagen 3 de 3
    • To prevent spilling any brake fluid, first clean the area around the master cylinder with a clean rag, then replace the cover.

  12. Harley-Davidson Sportster Evolution Front Brake Pads Replacement, Preparing the new brake pads: paso 12, imagen 1 de 3 Harley-Davidson Sportster Evolution Front Brake Pads Replacement, Preparing the new brake pads: paso 12, imagen 2 de 3 Harley-Davidson Sportster Evolution Front Brake Pads Replacement, Preparing the new brake pads: paso 12, imagen 3 de 3
    • Inspect the new brake pads for chips or other signs of wear.

    • Apply a moderate amount of anti-squeal compound to the back of each new brake pad.

  13. Harley-Davidson Sportster Evolution Front Brake Pads Replacement, Readjusting the Floating Caliper Alignment Peg: paso 13, imagen 1 de 2 Harley-Davidson Sportster Evolution Front Brake Pads Replacement, Readjusting the Floating Caliper Alignment Peg: paso 13, imagen 2 de 2
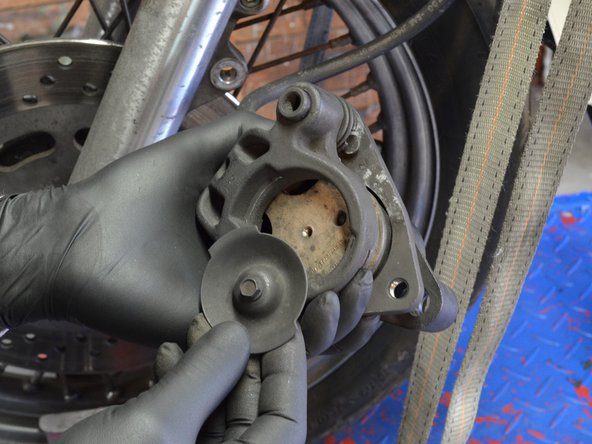
    • Using your fingers, pull the alignment peg out of its hole in the stationary caliper.

    • Apply a thin layer of grease to the alignment peg.

    • Re-install the alignment peg, but do not push it all the way in. Only push it in about half-way.

  14. Harley-Davidson Sportster Evolution Front Brake Pads Replacement, Installing New Brake Pads: paso 14, imagen 1 de 2 Harley-Davidson Sportster Evolution Front Brake Pads Replacement, Installing New Brake Pads: paso 14, imagen 2 de 2
    • Make sure that the floating caliper spring is in the proper place before re-installing the floating caliper.

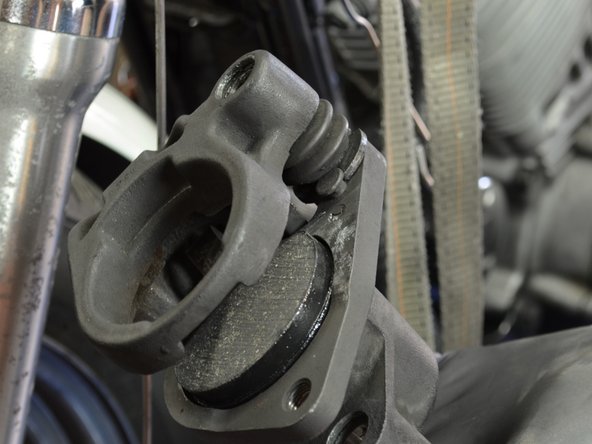
    • The spring should be on the same side as the alignment peg.

    • Place one of the brake pads into the floating caliper, with the anti-squeal side facing away from the spring and mount peg.

  15. Harley-Davidson Sportster Evolution Front Brake Pads Replacement: paso 15, imagen 1 de 3 Harley-Davidson Sportster Evolution Front Brake Pads Replacement: paso 15, imagen 2 de 3 Harley-Davidson Sportster Evolution Front Brake Pads Replacement: paso 15, imagen 3 de 3
    • Holding the brake assembly in one hand and the floating caliper in the other, gently slide the floating caliper into the front brake assembly.

    • The anti-squeal side of the brake pad should be facing away from the stationary caliper, and towards the brake piston.

    • Move the floating caliper alignment peg so that the metal tab on the floating caliper fits together with the indentation on the alignment peg.

  16. Harley-Davidson Sportster Evolution Front Brake Pads Replacement: paso 16, imagen 1 de 2 Harley-Davidson Sportster Evolution Front Brake Pads Replacement: paso 16, imagen 2 de 2
    • Being careful to not dislodge the floating caliper, insert the stationary brake pad so that the tab on the brake pad fits into the corresponding slot on the stationary caliper.

    • Make sure that the abrasive side of the brake pad is facing inwards, and the anti-squeal side is facing outwards.

  17. Harley-Davidson Sportster Evolution Front Brake Pads Replacement: paso 17, imagen 1 de 3 Harley-Davidson Sportster Evolution Front Brake Pads Replacement: paso 17, imagen 2 de 3 Harley-Davidson Sportster Evolution Front Brake Pads Replacement: paso 17, imagen 3 de 3
    • Using one hand to keep the brake pads from falling out, replace the cover on the stationary brake pad.

    • Insert the screw and lock washer that came with the brake pads and tighten using a Phillips #2 screwdriver.

  18. Harley-Davidson Sportster Evolution Front Brake Pads Replacement: paso 18, imagen 1 de 3 Harley-Davidson Sportster Evolution Front Brake Pads Replacement: paso 18, imagen 2 de 3 Harley-Davidson Sportster Evolution Front Brake Pads Replacement: paso 18, imagen 3 de 3
    • With the piston on the outside of the rotor, carefully slide the front brake assembly back over the rotor

    • Slide the brake assembly until the lower hole in the brake assembly aligns with the lower mount hole on the fork.

  19. Harley-Davidson Sportster Evolution Front Brake Pads Replacement: paso 19, imagen 1 de 2 Harley-Davidson Sportster Evolution Front Brake Pads Replacement: paso 19, imagen 2 de 2
    • Apply a small amount of grease on the lower brake mount screw.

    • The brake assembly should stay attached to the rotor. If it does not, go ahead and hang it from the metal hanger while you grease the screw.

    • Insert the screw into the lower mount hole.

  20. Harley-Davidson Sportster Evolution Front Brake Pads Replacement: paso 20, imagen 1 de 2 Harley-Davidson Sportster Evolution Front Brake Pads Replacement: paso 20, imagen 2 de 2
    • Insert the upper retaining bolt into the upper bolt hole in the fork and brake assembly.

    • Using only your hands, tighten the bolt as much as possible.

  21. Harley-Davidson Sportster Evolution Front Brake Pads Replacement: paso 21, imagen 1 de 2 Harley-Davidson Sportster Evolution Front Brake Pads Replacement: paso 21, imagen 2 de 2
    • Using a torque wrench, tighten both screws to between 25 and 30 foot-pounds.

Conclusión

Before taking the motorcycle up to full speed on the open road, test that the brakes work by starting and stopping at low speeds in an empty street or parking lot.

9 personas más completaron esta guía.

Brett Hartt

Miembro Desde 04/12/10

127,665 Reputación

143 Guías creadas

Equipo

iFixit Miembro de iFixit

Staff

135 Miembros

16,476 Guías creadas

9 comentarios

Thanks for taking the time to explain and for posting the detailed pictures. This was very helpful.

James - Contestar

Nice job. Was looking for a picture of that darn anti vibration clip. Thanks

Blake Will - Contestar

The spring clip is installed wrong. The brake pad will rattle. Push the brake pad in from the rotor side with the clip pushing down hard on the pad holding it in the housing. The clip is to stop the pad from rattling in the housing, not to hold it against the piston.

Frank Lock - Contestar

GOOD JOB !!! This is almost the same exact as my 98 road king brakes.

Robert Denniston -

Brett Hartt: this is so valuable for simple latin american like me. A professional tool that you are giving away. G. bless your generations forever.

Manu Costa - Contestar

Agregar Comentario

Ver Estadísticas:

Ultimas 24 horas: 5

Ultimos 7 días: 22

Ultimos 30 días: 128

Todo El Tiempo: 25,414