Saltar al contenido principal

Hamilton Beach 70740 Motor Replacement

Guía Archivada
Esta guía se mantiene únicamente para fines históricos. Utiliza la última versión de la guía para llevar a cabo tu reparación.

Qué necesitas

  1. Aviso: los pasos 1-5 provienen de una guía que está marcada como "En progreso".

    Hamilton Beach 70740 Motor Replacement, Base Removal: paso 1, imagen 1 de 3 Hamilton Beach 70740 Motor Replacement, Base Removal: paso 1, imagen 2 de 3 Hamilton Beach 70740 Motor Replacement, Base Removal: paso 1, imagen 3 de 3
    • Hold the food processor upside down and remove the two screws indicated with a screwdriver. Once unscrewed, remove the two rubber suction pads.

  2. Hamilton Beach 70740 Motor Replacement: paso 2, imagen 1 de 2 Hamilton Beach 70740 Motor Replacement: paso 2, imagen 2 de 2
    • Use a spudger to remove the 4 rubber base pads located at the corners of the device.

  3. Hamilton Beach 70740 Motor Replacement: paso 3, imagen 1 de 1
    • Unscrew all 4 screws that are located beneath the pads with a screwdriver and remove the plastic grey base.

  4. Hamilton Beach 70740 Motor Replacement: paso 4, imagen 1 de 1
    • Remove the screws indicated with a screw driver.

  5. Hamilton Beach 70740 Motor Replacement: paso 5, imagen 1 de 1
    • Remove the two screws behind the knob with a screwdriver.

  6. Hamilton Beach 70740 Motor Replacement, Motor/Cord: paso 6, imagen 1 de 1
    • Use a regular nylon spudger to remove the plastic caps at these locations with moderate pressure.

    • When working with electronics, it's important to choose a tool that's ESD-safe to avoid accidental damage to the device. The regular black nylon spudger or a plastic opening tool should be used whenever possible.

    • Apply pressure at the edge of the plastic cap circles. Apply stress elsewhere may damage the device.

    • Note that the plastic caps are glued

  7. Hamilton Beach 70740 Motor Replacement: paso 7, imagen 1 de 1
    • Remove the 4 screws located under the plastic caps with a screw driver.

  8. Hamilton Beach 70740 Motor Replacement: paso 8, imagen 1 de 2 Hamilton Beach 70740 Motor Replacement: paso 8, imagen 2 de 2
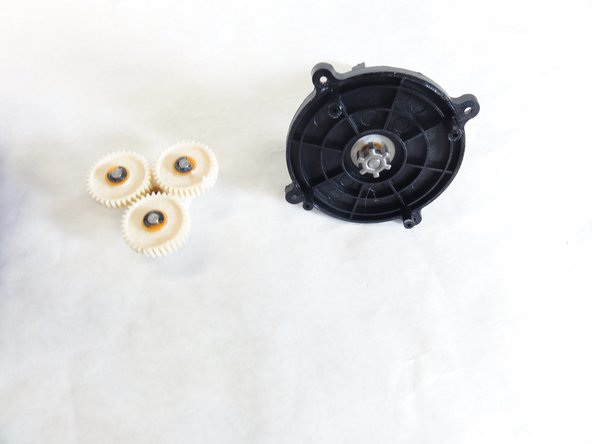
    • Lift and remove the plastic gears at the center of the device.

    • Remove any grease residue underneath the plastic gears.

  9. Hamilton Beach 70740 Motor Replacement: paso 9, imagen 1 de 2 Hamilton Beach 70740 Motor Replacement: paso 9, imagen 2 de 2
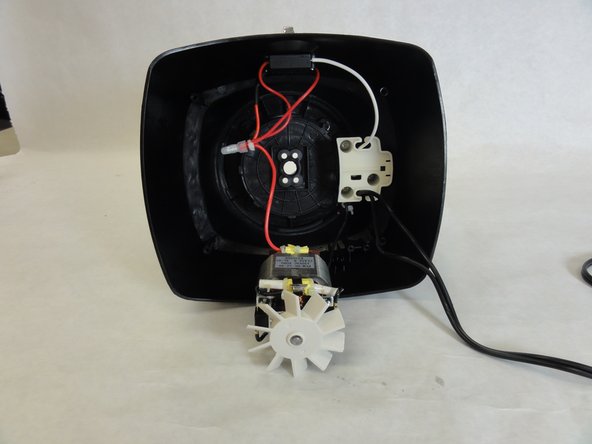
    • Remove the remaining screws to unhinge the motor located at the center of the device using a screw driver.

  10. Hamilton Beach 70740 Motor Replacement, Motor: paso 10, imagen 1 de 1
    • Remove to electrical cap to the positive terminal(black terminal), and undo the wiring.

  11. Hamilton Beach 70740 Motor Replacement: paso 11, imagen 1 de 1
    • Remove the electrical cap to the negative end(red wire), and undo the wiring. Once this is complete reconstruct the wiring with the new motor.

Conclusión

To reassemble your device, follow these instructions in reverse order.

2 personas más completaron esta guía.

David Gedeon

Miembro Desde 09/17/15

806 Reputación

6 Guías creadas

Equipo

IUPUI, Team 1-1, Baechle Fall 2015 Miembro de IUPUI, Team 1-1, Baechle Fall 2015

IUPUI-BAECHLE-F15S1G1

4 Miembros

8 Guías creadas

0 comentarios

Agregar Comentario

Ver Estadísticas:

Ultimas 24 horas: 0

Ultimos 7 días: 0

Ultimos 30 días: 1

Todo El Tiempo: 656