Introducción
The HTC Vive controller grip buttons may be weak or faulty from extended use or from being dropped on its side. Use caution when removing the rubber tabs to avoid damage. This guide will show you how to replace the grip buttons.
Qué necesitas
-
-
Turn over the Vive controller so that the bottom saucer is facing up.
-
Use the T5 Torx screwdriver to remove three black 21mm screws from the bottom saucer.
-
-
-
Use the nylon spudger to separate the top and bottom saucer covers all around the edges.
-
Remove only the top saucer cover by pulling up with your hand.
My top saucer was REALLY stubborn. Don’t force it with your hand, use the spudger to separate it at the seam. Try not to poke your spudger in too deep, there are internals just inside the seam.
The second time around, I learned why it was so stubborn. The picture suggests that you should start at the base of the saucer and work your way around, but that’s backwards.
Start separating with your spudger at the distal side of the saucer and work your way toward the handle. Then for the last part, pull the piece up and away, like peeling a banana. See the second picture for the bottom half of the saucer, below. Do the same on the top.
-
-
-
Use the Phillips 00 screwdriver to remove the three silver 12.8mm screws from the exposed upper sensor panel.
It’s Phillips 0, not 00.
You do not need to remove these screws to remove the bottom saucer. They provide stability to the two halves of the donut.
I had the same experience. Putting the screws back in made the bottom shell easier to remove.
I concur, you don’t need to remove these screws to take the bottom shell off.
I found mine had ph#000 screws size, not ph#00.
please do not remove the Phillips-head screws it is not necessary to remove them.
-
-
-
Carefully pull away the bottom saucer cover with your hand.
From what I can tell, there are two clicks on each side? one is quite easy, then the other one seems to require considerable force pushing down and on the side, I had to do it one side at a time and found two YouTube videos performing this step to use as reference. I have the vive pro wands and not the originals, so this may explain the difference. This felt very wrong to me.
-
-
-
Use the T5 Torx screwdriver to remove the two black 5.2mm screws on the back gray panel.
-
-
-
Turn over the Vive controller so that the exposed bottom saucer panel is facing up.
-
Use the T5 Torx screwdriver to remove the three black 5.2mm screws.
Leave the middle screw where it is (the one being unscrewed in the picture). That screw holds the two halves of the photodiode assembly together, not the case.
five screws… two at bottom
I concur with trevosklar, don’t need to remove center screw to remove front panel (pad cover).
-
-
-
Disconnect the upper ribbon cable gently by pulling the ribbon up and away from the motherboard with two fingers.
You do not have to remove the ribbon cables from the plugs…you can carefully work the battery holder around them and remove it…being very gentle. And the black part of the handle will stay attached to the cables and be in the way. But removing the cables does make it easier to access the area for the battery, just not completely necessary.
-
-
-
-
Disconnect the middle ribbon cable gently by pulling the ribbon cable up and away from the motherboard with two fingers.
-
-
-
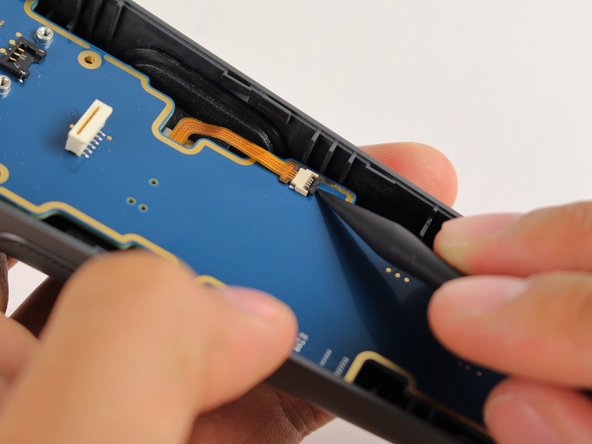
Use the nylon spudger to lift the white tab by 90 degrees.
-
Disconnect the bottom ribbon cable gently by pulling the ribbon cable down with two fingers.
Hallo what is the name of this conector because i Broker it
Yeah I did as instructed only to realize after that my gen 1 vive controller does not do that, and i desoldered the power button ribbon. That cable, does NOT detach on my model. destroyed.
-
-
-
Use the Phillips 00 screwdriver to remove two black 2.8mm screws from the silver plate.
-
Use the Phillips 00 screwdriver to remove the black 5.8mm screw from the bottom right corner of the silver plate.
-
-
-
Remove the silver plate by pinching it with two fingers and lifting up.
There is no plate on mine, only tape covering it.
Same with mine, also purchased 2018. It seems the silver plate part can be skipped for later models.
-
-
-
Use the T5 Torx screwdriver to remove the two silver 4.2mm screws from the bottom of the battery frame.
On my controller these were Philips 000 5.8mm screws, the same as in the previous step.
Second the above with a slight correction. Phillips 00.
-
-
-
Disconnect the three-pin cable gently by pinching the cable with two fingers and pulling up.
-
-
-
Lift the battery frame to remove the battery from the Vive controller
Suddenly, here the electronics of the saucer are gone, but there’s no previous step mentioning its removal. This is kind of important because loosening the ribbon cables attaching it to the mainboard is a bit finicky.
-
-
-
Use the Phillips 00 screwdriver to remove the two black 5.8mm screws from the top of the motherboard.
These should be the silver screws not the black screws
Yeah, I think he switched the bottom battery screws with these in a previous disassembly. (see my comment at step 14) I’m opening mine for the first time since new purchase and the motherboard has 4 T5 screws.
-
-
-
Lift the motherboard up and out of the Vive controller using your hands.
what is the benefit of the rectangular silver steel or ironic metal ,that iside the htc vive hand controller.?????
is it to solve some issus with the Mpu6500 sensor ??
or related to get rid of interferrences ??
the rectanguler metal piece is near to the mother board and the battery in the following image :-
https://d3nevzfk7ii3be.cloudfront.net/ig...
Thanks in advance!
I believe it’s just a weight to help balance the controller by shifting the center of gravity closer to the rear/bottom end. It doesn’t connect to anything, and the board has its own shield. So, just a slab of metal.
Awesome THANKS. … uh … where do I get another motherboard? DoH!
Anyone know of a good replacement button for the trackpad press button? (The one on the top side, tan or pinkish colored.)
-
-
-
Use the Phillips 00 screwdriver to remove the two black 5.8mm screws from the silver rectangular plate.
-


To reassemble your device, follow these instructions in reverse order.
To reassemble your device, follow these instructions in reverse order.
Cancelar: No complete esta guía.
Una persona más ha completado esta guía.
Equipo

Cal Poly, Team S15-G5, Livingston Fall 2017 Miembro de Cal Poly, Team S15-G5, Livingston Fall 2017
CPSU-LIVINGSTON-F17S15G5
4 Miembros
51 Guías creadas
2 comentarios
It’s all fine and dandy but this part is nowhere to be found
Hi, first of all ty for the tools and all the effort.
During disassembly my system button's 7 contanct fpc connector ripped apart and cant find any label on it.
I am trying to find a replacement part to re-solder it.
Can you help me with a name of that connector.
Thanks
Where can I buy new t5 21 mm screws? Mine are getting stripped out!
jeremyvanwoerden - Contestar
Where can you get replacement batteries?
Mike Justice - Contestar
The middle bottom screw may have some form of warranty sticker on it if you have a Vive Pro wand (which is purple). Mine had this. Easy enough to remove and get on with it.
sodiboo - Contestar