Esta versión puede contener ediciones incorrectas. Cambie a la última instantánea verificada.
Qué necesitas
-
Este paso está sin traducir. Ayuda a traducirlo
-
Gently insert an iPod opening tool between the rear panel and the inner rear frame near the headphone jack.
-
Use your iPod opening tool to pry up the rear case around the perimeter of the Evo.
-
-
Este paso está sin traducir. Ayuda a traducirlo
-
Using the tip of your finger, lift the battery from the end closest to the camera.
-
Remove the battery from the rear inner frame.
-
-
Este paso está sin traducir. Ayuda a traducirlo
-
Use the flat end of a spudger to pry up the red MicroSD retainer attached to the inner frame.
-
-
Este paso está sin traducir. Ayuda a traducirlo
-
Use a pair of tweezers to carefully pull the MicroSD card out of its slot in the inner rear frame.
-
-
Este paso está sin traducir. Ayuda a traducirlo
-
Remove six T5 Torx screws securing the rear inner frame to the inner case.
-
-
-
Este paso está sin traducir. Ayuda a traducirlo
-
Gently insert an iPod opening tool between the rear inner frame and its plastic surround near the Micro HDMI port.
-
Carefully pry the top edge of the rear inner frame away from the front surround of the Evo.
-
-
Este paso está sin traducir. Ayuda a traducirlo
-
Insert the iPod opening tool between the rear inner frame and its plastic surround and pry up at several points along the left edge of the Evo.
-
-
Este paso está sin traducir. Ayuda a traducirlo
-
Continue the prying procedure, now focusing on detaching the plastic surround from the bottom of the Evo.
-
Pry up the rear inner frame along the right edge using the method described in previous steps.
-
Eventually work around the entire perimeter of the rear inner frame until it is lifted slightly from the inner case.
-
-
Este paso está sin traducir. Ayuda a traducirlo
-
Remove the rear inner frame from the rest of the Evo.
-
-
Este paso está sin traducir. Ayuda a traducirlo
-
Remove the single Phillips screw securing the motherboard to the inner case near the headphone jack.
-
-
Este paso está sin traducir. Ayuda a traducirlo
-
Use the flat end of a spudger to pry the motherboard off the posts securing it to the metal display tray.
-
-
Este paso está sin traducir. Ayuda a traducirlo
-
Carefully peel the device information sticker off the left edge of the motherboard and EMI shield to reveal three connectors covered with tape.
-
-
Este paso está sin traducir. Ayuda a traducirlo
-
Remove the pieces of tape covering the following ribbon cables:
-
Front-facing camera
-
Front panel ribbon cable
-
Display ribbon cable
-
-
Este paso está sin traducir. Ayuda a traducirlo
-
Using the tip of an iPod opening tool, flip up the front-facing camera ribbon cable retaining flap.
-
Be very careful and gentle with these flaps. They are very easy to break or dislodge and equally difficult to reinstall.
-
Use a pair of tweezers to pull the front-facing camera ribbon cable straight out of its socket.
-
-
Este paso está sin traducir. Ayuda a traducirlo
-
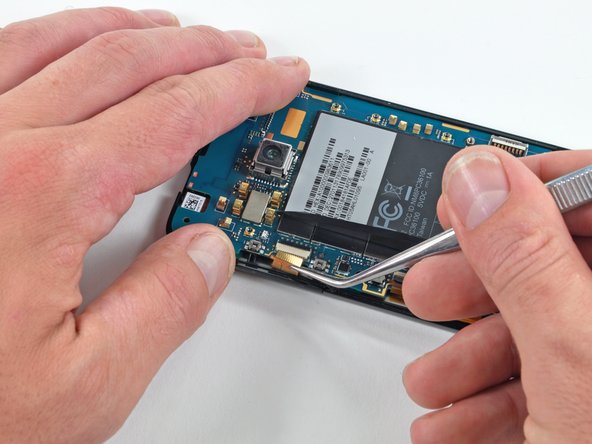
Using the tip of an iPod opening tool, flip up the front panel ribbon cable retaining flap.
-
Use a pair of tweezers to pull the front panel ribbon cable straight out of its socket.
-
-
Este paso está sin traducir. Ayuda a traducirlo
-
Using the tip of an iPod opening tool, flip up the display ribbon cable retaining flap.
-
Grasp the display ribbon cable with a pair of tweezers and pull it straight out of its socket.
-
-
Este paso está sin traducir. Ayuda a traducirlo
-
Carefully lift the motherboard out of the inner case, minding any cables that may get caught.
-


Cancelar: No complete esta guía.
18 personas más completaron esta guía.

Un comentario
My we girl dropped her HTC fine their is lines going down the screen does anyone no if the fine can be fixed