Saltar al contenido principal

HP iPAQ H2200 LCD Screen Replacement

Qué necesitas

  1. HP iPAQ H2200 LCD Screen Replacement, Battery: paso 1, imagen 1 de 1
    • Press and slide the battery cover tab to remove battery cover.

  2. HP iPAQ H2200 LCD Screen Replacement: paso 2, imagen 1 de 2 HP iPAQ H2200 LCD Screen Replacement: paso 2, imagen 2 de 2
    • Pull on the black tab to lift the battery out of the battery compartment.

  3. HP iPAQ H2200 LCD Screen Replacement, Main Board: paso 3, imagen 1 de 1
    • Remove the stylus by sliding it out of the slot.

  4. HP iPAQ H2200 LCD Screen Replacement: paso 4, imagen 1 de 1
    • Remove the CF card by sliding it out of the slot at the top of the device.

  5. HP iPAQ H2200 LCD Screen Replacement: paso 5, imagen 1 de 1
    • Press down and push the black side strips toward the top of the device to remove them.

  6. HP iPAQ H2200 LCD Screen Replacement: paso 6, imagen 1 de 3 HP iPAQ H2200 LCD Screen Replacement: paso 6, imagen 2 de 3 HP iPAQ H2200 LCD Screen Replacement: paso 6, imagen 3 de 3
    • Using the T5 Torx screwdriver, remove all six screws on the back and all screws on each side of the device.

  7. HP iPAQ H2200 LCD Screen Replacement: paso 7, imagen 1 de 2 HP iPAQ H2200 LCD Screen Replacement: paso 7, imagen 2 de 2
    • Remove the back faceplate by pushing and loosening the 4 side slots (2 on each side).

  8. HP iPAQ H2200 LCD Screen Replacement: paso 8, imagen 1 de 1
    • Open the LCD connector, where the orange strip attaches to the main board.

  9. HP iPAQ H2200 LCD Screen Replacement: paso 9, imagen 1 de 1
    • Carefully remove the orange LCD strip from the connector.

  10. HP iPAQ H2200 LCD Screen Replacement: paso 10, imagen 1 de 1
    • Unscrew the 2 screws located at each top corner of the main board.

  11. HP iPAQ H2200 LCD Screen Replacement: paso 11, imagen 1 de 1
    • Remove the main board by pushing outward on the two tabs located on each side near the bottom of the device.

  12. HP iPAQ H2200 LCD Screen Replacement, LCD Screen: paso 12, imagen 1 de 1
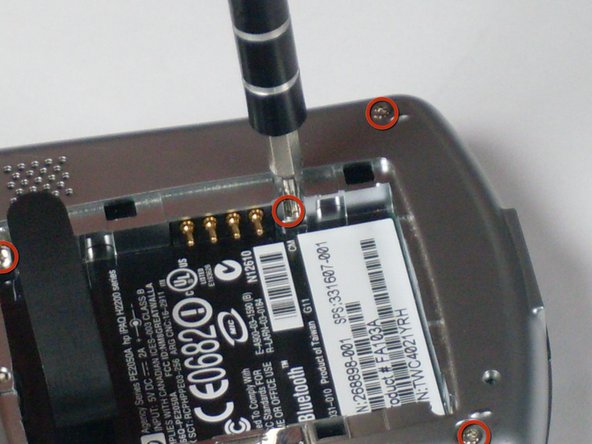
    • Unscrew the two bottom screws on LCD screen that were previously located under the main board.

  13. HP iPAQ H2200 LCD Screen Replacement: paso 13, imagen 1 de 2 HP iPAQ H2200 LCD Screen Replacement: paso 13, imagen 2 de 2
    • Press on side tabs to loosen and remove the LCD screen.

Conclusión

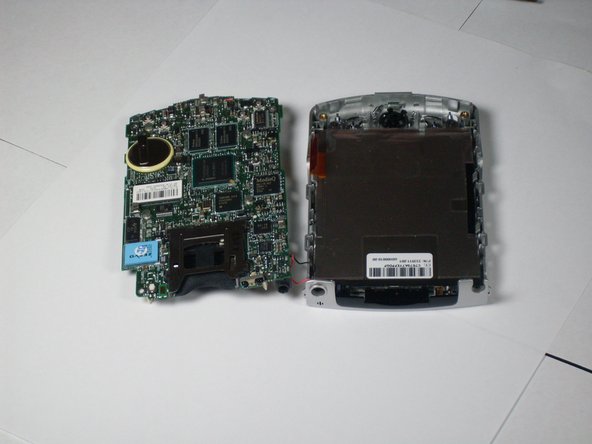
To reassemble your device, follow these instructions in reverse order.

Una persona más ha completado esta guía.

Tyler Andrews

Miembro Desde 01/13/10

209 Reputación

5 Guías creadas

Equipo

Cal Poly, Team 4-12, Forte Winter 2010 Miembro de Cal Poly, Team 4-12, Forte Winter 2010

CPSU-FORTE-W10S4G12

3 Miembros

5 Guías creadas

0 comentarios

Agregar Comentario

Ver Estadísticas:

Ultimas 24 horas: 1

Ultimos 7 días: 2

Ultimos 30 días: 7

Todo El Tiempo: 3,961