Saltar al contenido principal

HP TouchSmart 15-r015dx RAM Replacement

Qué necesitas

  1. HP TouchSmart 15-r015dx RAM Replacement, Battery: paso 1, imagen 1 de 1
    • Turn off your laptop.

    • Ensure your laptop is off. Removing the battery while it is on may harm your laptop or yourself.

    • Flip over to view the bottom of the laptop in order to gain access the battery and the DVD±RW Drive.

  2. HP TouchSmart 15-r015dx RAM Replacement: paso 2, imagen 1 de 1
    • There are two battery release switches circled.

  3. HP TouchSmart 15-r015dx RAM Replacement: paso 3, imagen 1 de 1
    • slide release switches inward towards each other to release battery.

  4. HP TouchSmart 15-r015dx RAM Replacement: paso 4, imagen 1 de 1
    • after sliding the release switches, pull battery towards yourself to remove battery.

  5. HP TouchSmart 15-r015dx RAM Replacement, DVD±RW Drive: paso 5, imagen 1 de 2 HP TouchSmart 15-r015dx RAM Replacement, DVD±RW Drive: paso 5, imagen 2 de 2
    • There is one screw holding the DVD±RW Drive in place. Use the #00 screwdriver to remove the screw.

  6. HP TouchSmart 15-r015dx RAM Replacement: paso 6, imagen 1 de 3 HP TouchSmart 15-r015dx RAM Replacement: paso 6, imagen 2 de 3 HP TouchSmart 15-r015dx RAM Replacement: paso 6, imagen 3 de 3
    • The DVD±RW Drive is here. Remove by gently pulling it straight out.

    • After removal of the DVD±RW Drive, two screws are exposed and must be removed.

  7. HP TouchSmart 15-r015dx RAM Replacement, Keyboard: paso 7, imagen 1 de 2 HP TouchSmart 15-r015dx RAM Replacement, Keyboard: paso 7, imagen 2 de 2
    • Using your Phillips #00 screwdriver, remove the two screws to loosen the fittings of the keyboard.

    • One of the screws lies in the label.

  8. HP TouchSmart 15-r015dx RAM Replacement: paso 8, imagen 1 de 3 HP TouchSmart 15-r015dx RAM Replacement: paso 8, imagen 2 de 3 HP TouchSmart 15-r015dx RAM Replacement: paso 8, imagen 3 de 3
    • Flip the laptop over to view the top and lift the screen up.

    • There are sixteen clips holding the keyboard in place. Gently pry up each clip using a plastic opening tool. Once all clips are loose, lift the keyboard from the computer.

    • Do NOT pull the keyboard up more than 2-3 inches as there is a film-material connecting the keyboard to the laptop.

  9. HP TouchSmart 15-r015dx RAM Replacement: paso 9, imagen 1 de 3 HP TouchSmart 15-r015dx RAM Replacement: paso 9, imagen 2 de 3 HP TouchSmart 15-r015dx RAM Replacement: paso 9, imagen 3 de 3
    • There is a small black latch holding the film-material in place.

    • Flip the black latch up to release the film-material. Once flipped up, simply pull the film-material out from the laptop to release the keyboard.

    • There are tiny prongs on the ribbon; it must be carefully removed and upon re-installation the prongs must be lined up exactly in each tiny track in order for the keyboard to work.

  10. HP TouchSmart 15-r015dx RAM Replacement, Hard Drive: paso 10, imagen 1 de 1
    • Flip the laptop over to view the bottom and remove the remaining screws from the bottom.

    • There are 2 screws located underneath the covers.

  11. HP TouchSmart 15-r015dx RAM Replacement: paso 11, imagen 1 de 2 HP TouchSmart 15-r015dx RAM Replacement: paso 11, imagen 2 de 2
    • Flip your laptop over to view top and open it.

    • Remove the four screws and the two wires before removing the base of the laptop.

    • The metal prongs that wires fit onto stay attached to the computer and can be easily bent when trying to remove or place the plastic piece on to secure the wire. Also pay attention to how the plastic piece looks when you take them off (i.e. which side is up and facing out).

  12. HP TouchSmart 15-r015dx RAM Replacement: paso 12, imagen 1 de 1
    • Use your plastic opening tool to pry the base of the laptop off.

  13. HP TouchSmart 15-r015dx RAM Replacement: paso 13, imagen 1 de 3 HP TouchSmart 15-r015dx RAM Replacement: paso 13, imagen 2 de 3 HP TouchSmart 15-r015dx RAM Replacement: paso 13, imagen 3 de 3
    • There are two screws holding the hard drive in place. Remove these screws.

    • Remove the hard drive by pulling it to the right like shown.

  14. HP TouchSmart 15-r015dx RAM Replacement, Motherboard: paso 14, imagen 1 de 3 HP TouchSmart 15-r015dx RAM Replacement, Motherboard: paso 14, imagen 2 de 3 HP TouchSmart 15-r015dx RAM Replacement, Motherboard: paso 14, imagen 3 de 3
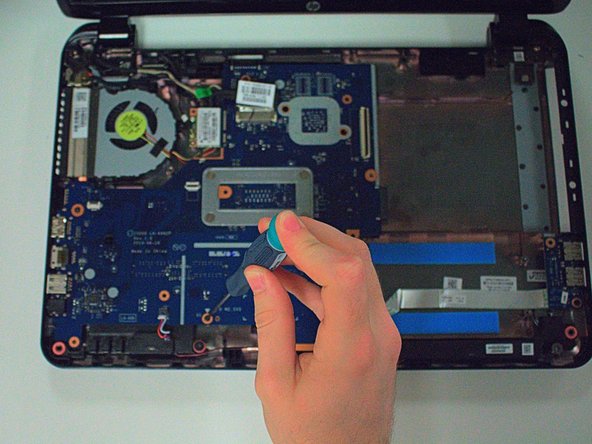
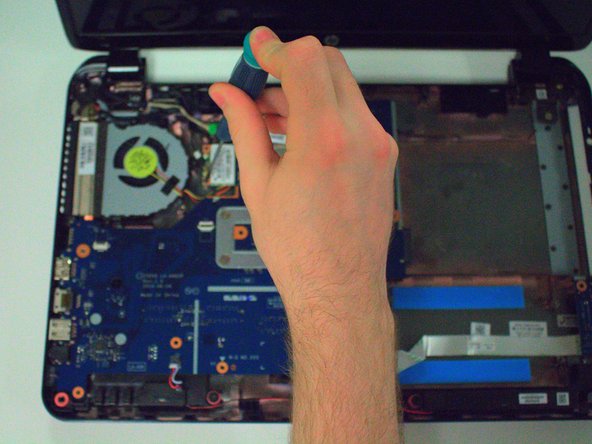
    • There are 3 screws holding the motherboard in place.

    • Unscrew the screws to release the motherboard.

  15. HP TouchSmart 15-r015dx RAM Replacement: paso 15, imagen 1 de 3 HP TouchSmart 15-r015dx RAM Replacement: paso 15, imagen 2 de 3 HP TouchSmart 15-r015dx RAM Replacement: paso 15, imagen 3 de 3
    • There are several wires that need to be disconnected from the motherboard.

    • Remove the wires carefully.

  16. HP TouchSmart 15-r015dx RAM Replacement: paso 16, imagen 1 de 1
    • After removing all the wires, pull the motherboard out.

  17. HP TouchSmart 15-r015dx RAM Replacement, RAM: paso 17, imagen 1 de 1
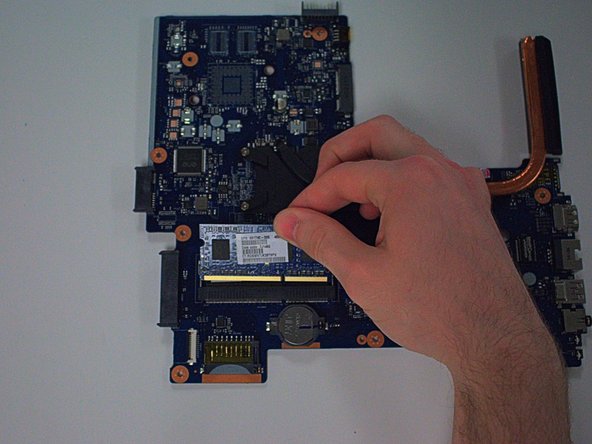
    • Put the motherboard on a hard, flat surface to avoid damaging it.

    • The RAM is marked in red.

  18. HP TouchSmart 15-r015dx RAM Replacement: paso 18, imagen 1 de 2 HP TouchSmart 15-r015dx RAM Replacement: paso 18, imagen 2 de 2
    • There are two switches holding the RAM in place that need to be moved.

    • After the switches are released, simply pull the RAM up as shown.

Conclusión

To reassemble your device, follow these instructions in reverse order.

9 personas más completaron esta guía.

Jacob Kleinsorge

Miembro Desde 01/30/15

2,093 Reputación

5 Guías creadas

Equipo

USF Tampa, Team 16-4, Watkins Winter 2015 Miembro de USF Tampa, Team 16-4, Watkins Winter 2015

USFT-WATKINS-W15S16G4

4 Miembros

6 Guías creadas

3 comentarios

Cool, thanks guys. I used the guide successfully to upgrade the RAM on my HP 15-r033na Notebook. It would have taken ages without your help! A really tough way to reach the memory.

I wonder if the second DIMM slot is usable. The specs I've found says this board only takes one card, so maybe the second is disconnected.

Tim Ellison - Contestar

Did you ever get an answer on this? Did your upgrade improve performance at all? Seems like 20 steps x 2 should only be undertaken if there's a serious boost at the end of that tunnel. Thoughts?

Note that my system now has 4GB in slot 1 and 2GB additional in slot 2. Still, I constantly run out of RAM.

Thanks!

Daniel - HP TS 15 owner

Daniel Robin -

Thanks so much for this guide. I’d found my PC’s manual/repair guide online (it’s an HP 15-r011dx) but the instructions were much more cumbersome. Your guide is excellent, and now with twice the RAM, I feel like I have a totally different PC!

The whole upgrade was much more fidgety though than any Mac I’ve ever worked on, and so strange that HP puts the RAM chip on the motherboard. Crazy… It’s like having to do a root canal to brush your teeth!

Traveled Woman - Contestar

Agregar Comentario

Ver Estadísticas:

Ultimas 24 horas: 0

Ultimos 7 días: 2

Ultimos 30 días: 21

Todo El Tiempo: 6,327