Esta versión puede contener ediciones incorrectas. Cambiar a la última instantánea verificada.
Qué necesitas
-
Este paso está sin traducir. Ayuda a traducirlo
-
Turn off your HP Stream 11-r020nr by holding the power button down for 10 seconds.
-
Turn the device top down so the rubber feet are facing up.
-
Use a metal spudger to remove all the rubber feet off of the bottom of the device, including the small ones. This will uncover 6 screws for a total of 11 screws.
-
-
Este paso está sin traducir. Ayuda a traducirlo
-
Using the Phillips #1 screwdriver, remove all eleven of the 5mm screws.
-
-
Este paso está sin traducir. Ayuda a traducirlo
-
Flip the laptop over and open.
-
Using the blue plastic opening tool, separate the keyboard plate from the main body by prying up starting around the bottom corners, prying the bottom up and all the way around the whole keyboard plate.
-
-
Este paso está sin traducir. Ayuda a traducirlo
-
Use the black nylon spudger to flip the black tab up that holds the ribbon cable in place.
-
Lift the ribbon cable free.
-
-
-
Este paso está sin traducir. Ayuda a traducirlo
-
Use the black nylon spudger to flip the black tab up that holds the large ribbon cable in place.
-
Pull the ribbon cable free from the base of the keyboard.
-
-
Este paso está sin traducir. Ayuda a traducirlo
-
Remove the tape covering the ribbon cable.
-
Use the black nylon spudger to flip the black tab up that holds the ribbon cable in place.
-
Pull the ribbon cable away from the base of the laptop.
-
-
Este paso está sin traducir. Ayuda a traducirlo
-
After detaching the two large ribbon cables, carefully lean the keyboard against the screen.
-
-
Este paso está sin traducir. Ayuda a traducirlo
-
With the black nylon spudger lift the small circular battery off of the main battery.
-
-
Este paso está sin traducir. Ayuda a traducirlo
-
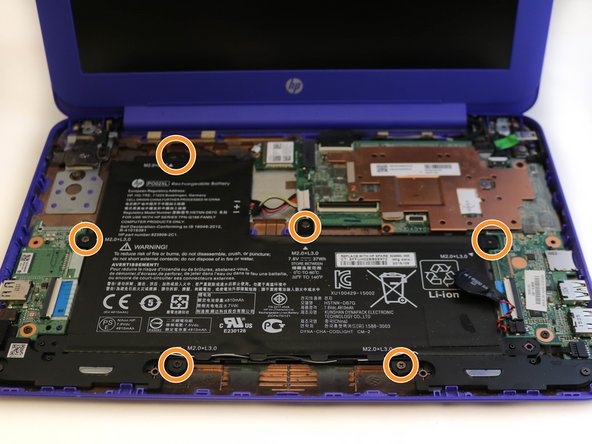
Lift the battery cable free from the motherboard with your fingers.
-
-
Este paso está sin traducir. Ayuda a traducirlo
-
Gently pull the wire away from the battery.
-
Using the Phillips #1 screwdriver, remove the six 3mm screws.
-


Cancelar: No complete esta guía.
Una persona más ha completado esta guía.

Equipo

Eastern Washington University, Team S1-G1, Carnegie Spring 2018 Miembro de Eastern Washington University, Team S1-G1, Carnegie Spring 2018
EWU-CARNEGIE-S18S1G1
4 Miembros
8 Guías creadas