Saltar al contenido principal

HP Spectre x360 15-bl012dx SSD Replacement

Qué necesitas

  1. HP Spectre x360 15-bl012dx SSD Replacement, Battery Replacement: paso 1, imagen 1 de 2 HP Spectre x360 15-bl012dx SSD Replacement, Battery Replacement: paso 1, imagen 2 de 2
    • Power off the device before beginning disassembly.

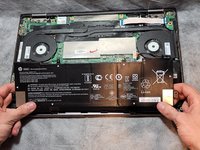
    • Place the computer so that the back panel is facing up. Begin by removing the two visible Torx T5 9 mm screws near the hinges.

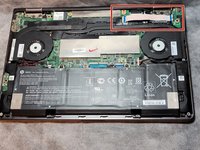
    • Next, remove the four visible Torx T5 3 mm on the sides.

    • Keep track of all screws.

  2. HP Spectre x360 15-bl012dx SSD Replacement: paso 2, imagen 1 de 3 HP Spectre x360 15-bl012dx SSD Replacement: paso 2, imagen 2 de 3 HP Spectre x360 15-bl012dx SSD Replacement: paso 2, imagen 3 de 3
    • Please note the upper two feet are already removed. The device was given to us this way.

    • Remove the two upper feet using an opening tool or spudger if they are still in place. The upper feet are closer to the hinges for the screen.

    • Remove the two 8 mm Phillips #1 screws under the feet.

    • These are the final screws to remove from the back panel. In total, you should remove eight screws between Steps 1 and 2.

  3. HP Spectre x360 15-bl012dx SSD Replacement: paso 3, imagen 1 de 1
    • Use a spudger to pry the back panel off of the laptop. Work your way around the perimeter of the device to loosen the connection.

    • Take the back panel off of the laptop.

  4. HP Spectre x360 15-bl012dx SSD Replacement: paso 4, imagen 1 de 1
    • Use a Phillips #1 screwdriver to remove six 4 mm screws securing the battery.

  5. HP Spectre x360 15-bl012dx SSD Replacement: paso 5, imagen 1 de 3 HP Spectre x360 15-bl012dx SSD Replacement: paso 5, imagen 2 de 3 HP Spectre x360 15-bl012dx SSD Replacement: paso 5, imagen 3 de 3
    • Unplug the battery connector located on the motherboard.

    • Remove the battery from the laptop.

  6. HP Spectre x360 15-bl012dx SSD Replacement, Solid State Drive (SSD): paso 6, imagen 1 de 3 HP Spectre x360 15-bl012dx SSD Replacement, Solid State Drive (SSD): paso 6, imagen 2 de 3 HP Spectre x360 15-bl012dx SSD Replacement, Solid State Drive (SSD): paso 6, imagen 3 de 3
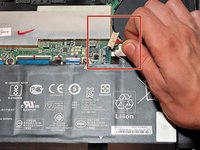
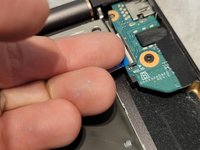
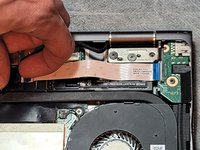
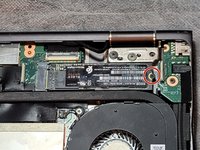
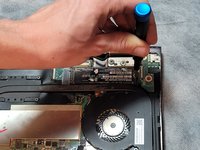
    • Using minimal force, lift the locking bars on the USB board ZIF connector using a plastic opening tool or fingernail and pull out the ribbon cable.

  7. HP Spectre x360 15-bl012dx SSD Replacement: paso 7, imagen 1 de 1
    • Using your fingers, remove the USB ribbon cable from the motherboard above the fan.

  8. HP Spectre x360 15-bl012dx SSD Replacement: paso 8, imagen 1 de 2 HP Spectre x360 15-bl012dx SSD Replacement: paso 8, imagen 2 de 2
    • Remove the 3 mm Phillips #1 screw that secures the solid state drive to the board.

    • Please note this laptop was not supplied with an SSD, so this is not the same SSD you will find in your device.

  9. HP Spectre x360 15-bl012dx SSD Replacement: paso 9, imagen 1 de 1
    • Slide the SSD card out of the connection at a 45 degree angle so that the SSD teeth are not bent.

Conclusión

To reassemble your device, follow these instructions in reverse order.

Cade Caldwell

Miembro Desde 02/22/22

202 Reputación

2 Guías creadas

Equipo

Clemson, Team 1-1, Hunter Spring 2022 Miembro de Clemson, Team 1-1, Hunter Spring 2022

CLEM-HUNTER-S22S1G1

5 Miembros

5 Guías creadas

0 comentarios

Agregar Comentario

Ver Estadísticas:

Ultimas 24 horas: 2

Ultimos 7 días: 15

Ultimos 30 días: 53

Todo El Tiempo: 2,391