Saltar al contenido principal

HP Spectre x360 13t-4000 Wifi Adapter Replacement

Qué necesitas

  1. HP Spectre x360 13t-4000 Wifi Adapter Replacement, Bottom Cover: paso 1, imagen 1 de 2 HP Spectre x360 13t-4000 Wifi Adapter Replacement, Bottom Cover: paso 1, imagen 2 de 2
    • Turn off and unplug the laptop.

    • Flip over the laptop so that the bottom backplate is exposed.

  2. HP Spectre x360 13t-4000 Wifi Adapter Replacement: paso 2, imagen 1 de 2 HP Spectre x360 13t-4000 Wifi Adapter Replacement: paso 2, imagen 2 de 2
    • Use a T5 screwdriver to remove the six 3 mm screws that secure the backplate.

    • Use the same screwdriver to remove the two 7 mm screws.

  3. HP Spectre x360 13t-4000 Wifi Adapter Replacement: paso 3, imagen 1 de 3 HP Spectre x360 13t-4000 Wifi Adapter Replacement: paso 3, imagen 2 de 3 HP Spectre x360 13t-4000 Wifi Adapter Replacement: paso 3, imagen 3 de 3
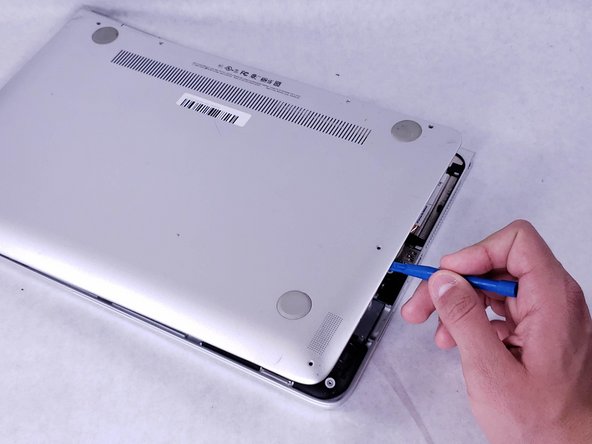
    • Insert an opening tool under the bottom cover at the screen hinges, and gently pry the cover free.

    • Carefully work your way around the cover's edges to pop it off completely.

  4. HP Spectre x360 13t-4000 Wifi Adapter Replacement, Battery: paso 4, imagen 1 de 3 HP Spectre x360 13t-4000 Wifi Adapter Replacement, Battery: paso 4, imagen 2 de 3 HP Spectre x360 13t-4000 Wifi Adapter Replacement, Battery: paso 4, imagen 3 de 3
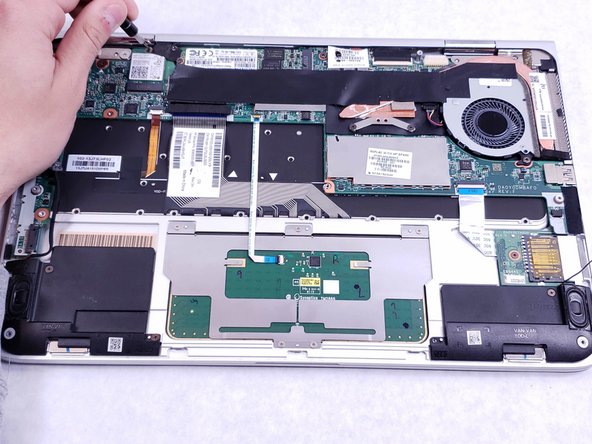
    • With the backplate removed, remove the four 3 mm screws securing the battery with a Phillips #1 screwdriver.

    • With the screws removed, disconnect the 3 wires connected to the battery.

    • Tweezers may be needed to remove the wires.

  5. HP Spectre x360 13t-4000 Wifi Adapter Replacement, Wifi Adapter: paso 5, imagen 1 de 3 HP Spectre x360 13t-4000 Wifi Adapter Replacement, Wifi Adapter: paso 5, imagen 2 de 3 HP Spectre x360 13t-4000 Wifi Adapter Replacement, Wifi Adapter: paso 5, imagen 3 de 3
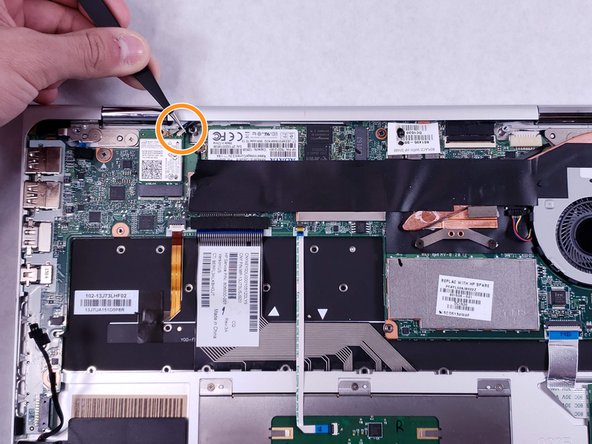
    • Using a Phillips#0 screwdriver, remove the 2 mm screw.

    • Located to the right of the screw, there are two wires connected to the adapter. Using tweezers, carefully remove the wires.

    • There may be tape covering the wires.

    • Now you can remove the adapter by pulling it from its socket.

Conclusión

To reassemble your device, follow these instructions in reverse order.

Equipo

0 comentarios

Agregar Comentario

Ver Estadísticas:

Ultimas 24 horas: 0

Ultimos 7 días: 1

Ultimos 30 días: 4

Todo El Tiempo: 907