Saltar al contenido principal

HP Spectre x2 12-a002dx SSD Replacement

Qué necesitas

  1. HP Spectre x2 12-a002dx SSD Replacement, Screen: paso 1, imagen 1 de 1
    • Make sure the device is powered off and the kick stand is retracted.

    • The HP Spectre should be placed on a flat surface with the keyboard detached.

  2. HP Spectre x2 12-a002dx SSD Replacement: paso 2, imagen 1 de 3 HP Spectre x2 12-a002dx SSD Replacement: paso 2, imagen 2 de 3 HP Spectre x2 12-a002dx SSD Replacement: paso 2, imagen 3 de 3
    • To remove the screen, there is an entire system of clips which need to be undone as well as 4 Phillips M1.5x2.7 screws.

    • The screws should be removed using a Phillips #000 screwdriver. There is a sticker where the laptop attaches to the keyboard.

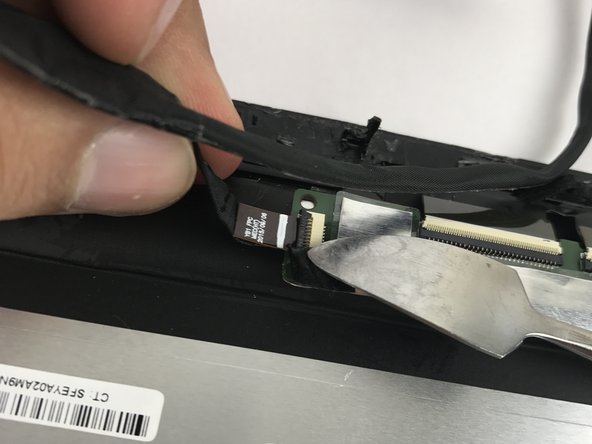
    • Heat the sticker (if needed) and use fine point tweezers to grip the sticker and remove it.

  3. HP Spectre x2 12-a002dx SSD Replacement: paso 3, imagen 1 de 3 HP Spectre x2 12-a002dx SSD Replacement: paso 3, imagen 2 de 3 HP Spectre x2 12-a002dx SSD Replacement: paso 3, imagen 3 de 3
    • Use the plastic opening tools or insert a spudger to begin unclipping the system.

    • Pry the screen off once all the clips have been unclipped.

    • The screen may shatter if not already shattered (beware of flying glass).

    • This screen will break. There is double tape underneath the frame, which is not listed in here.

  4. HP Spectre x2 12-a002dx SSD Replacement: paso 5, imagen 1 de 3 HP Spectre x2 12-a002dx SSD Replacement: paso 5, imagen 2 de 3 HP Spectre x2 12-a002dx SSD Replacement: paso 5, imagen 3 de 3
    • Remove the connecting cable of the screen and battery. Use a spudger to reveal the adhesive strip and carefully peel it off.

    • Insert a spudger to the other end and release the ZIF connectors. Detach the cable.

    • While a metal spudger is pictured, use a black nylon spudger instead because it is ESD safe.

  5. HP Spectre x2 12-a002dx SSD Replacement, SSD: paso 6, imagen 1 de 1
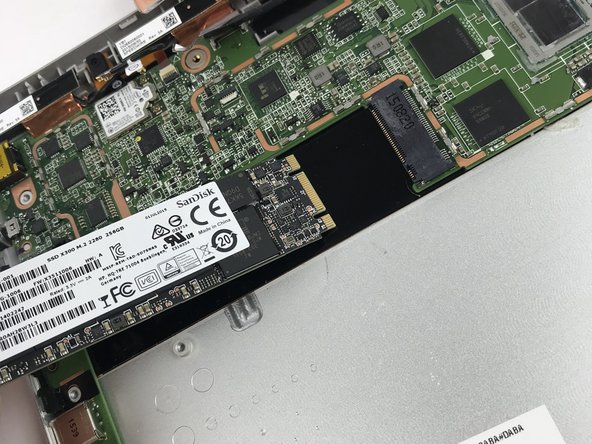
    • Once you have successfully removed the screen, locate the solid state drive (SSD).

  6. HP Spectre x2 12-a002dx SSD Replacement: paso 7, imagen 1 de 1
    • Unscrew the PM2.0x2.5 screw on the SSD using a JIS00 screwdriver.

    • Store the screw in a safe place. You will need it to secure the replacement SSD in place.

  7. HP Spectre x2 12-a002dx SSD Replacement: paso 8, imagen 1 de 1
    • Next, carefully peel the sticker on top of the SSD off.

  8. HP Spectre x2 12-a002dx SSD Replacement: paso 9, imagen 1 de 2 HP Spectre x2 12-a002dx SSD Replacement: paso 9, imagen 2 de 2
    • Carefully, pull the SSD out of the slot at an angle.

Conclusión

To reassemble your device, follow these instructions in reverse order.

6 personas más completaron esta guía.

Talha Bin Amir

Miembro Desde 10/23/17

683 Reputación

5 Guías creadas

Equipo

USF Tampa, Team S10-G6, Thompson Fall 2017 Miembro de USF Tampa, Team S10-G6, Thompson Fall 2017

USFT-THOMPSON-F17S10G6

4 Miembros

7 Guías creadas

4 comentarios

Hola, esta unidad se puede cambiar, la memoria RAM se puede aumentar. Ha hecho un video al respecto.

Angel Cervantes Ramirez - Contestar

Me temo que no, la memoria esta soldada en la placa base.

fnpulido - Contestar

it would be nice if you listed the compatible ssds… key, interface, etc.

Alec Kristi - Contestar

it is a m.2 interface and it compatible with all 2280 size drives

Dean Cadry -

Agregar Comentario

Ver Estadísticas:

Ultimas 24 horas: 0

Ultimos 7 días: 13

Ultimos 30 días: 26

Todo El Tiempo: 5,241