Saltar al contenido principal
Únete a la Comunidad de Reparación - Crear Cuenta

HP Pavilion x360 14m-ba011dx Screen Replacement

Qué necesitas

    1. HP Pavilion x360 14m-ba011dx Screen Replacement, Battery: paso 1, imagen 1 de 2 HP Pavilion x360 14m-ba011dx Screen Replacement, Battery: paso 1, imagen 2 de 2
      • Remove the top left and right rubber pads closest to the hinge of screen using a plastic spudger to expose the screws underneath.

      • Remove the following 6 screws from the bottom of the device using a Phillips #00 Screwdriver:​

      • Two 7.5 mm screws.

      • Three 5 mm screws.

      • One 6.5 mm screw.

      Pregunta a FixBot

      Agregar Comentario

    2. HP Pavilion x360 14m-ba011dx Screen Replacement: paso 2, imagen 1 de 1
      • Push into the two screw holes that were under the rubber pads with the screwdriver to pop the keyboard out just a little.

      • Do this with the screen open so that you do not damage the screen.

      • Do not remove keyboard all the way.

      Pregunta a FixBot

      Agregar Comentario

    3. HP Pavilion x360 14m-ba011dx Screen Replacement: paso 3, imagen 1 de 2 HP Pavilion x360 14m-ba011dx Screen Replacement: paso 3, imagen 2 de 2
      • Separate the keyboard from the rest of the device using a metal or plastic spudger around the edges.

      • Pull up gently just until you can see the cables attaching the keyboard to the motherboard.

      • Flip the small white flaps holding the cables to the motherboard open to unplug the cords.

      Pregunta a FixBot

      Agregar Comentario

    4. HP Pavilion x360 14m-ba011dx Screen Replacement: paso 4, imagen 1 de 2 HP Pavilion x360 14m-ba011dx Screen Replacement: paso 4, imagen 2 de 2
      • Remove the purple cable attaching the battery to the motherboard by flipping the black flap and pulling the cable out.

      • Remove seven 4 mm screws using a Phillips #00 Screwdriver.

      Pregunta a FixBot

      Agregar Comentario

    5. HP Pavilion x360 14m-ba011dx Screen Replacement: paso 5, imagen 1 de 1
      • Remove the battery by gently pushing battery up, then pulling.

      Pregunta a FixBot

      Agregar Comentario

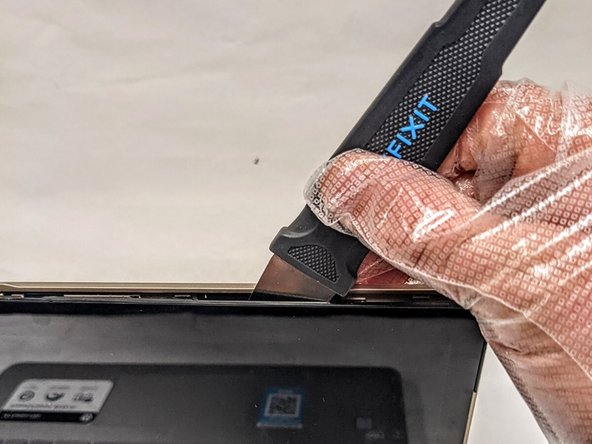
    1. HP Pavilion x360 14m-ba011dx Screen Replacement, Screen: paso 6, imagen 1 de 2 HP Pavilion x360 14m-ba011dx Screen Replacement, Screen: paso 6, imagen 2 de 2
      • Insert the Jimmy between the screen and back case.

      • Carefully detach the screen from the back case by sliding the Jimmy around the casing and prying the screen from the case.

      Pregunta a FixBot

      Agregar Comentario

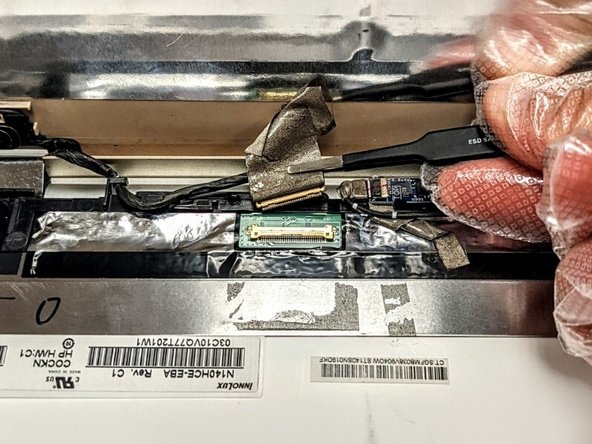
    2. HP Pavilion x360 14m-ba011dx Screen Replacement: paso 7, imagen 1 de 2 HP Pavilion x360 14m-ba011dx Screen Replacement: paso 7, imagen 2 de 2
      Herramienta utilizada en este paso:
      Tweezers
      $4.99
      • Using the tweezers, remove the tape securing the connector and gently disconnect the wire.

      Pregunta a FixBot

      Agregar Comentario

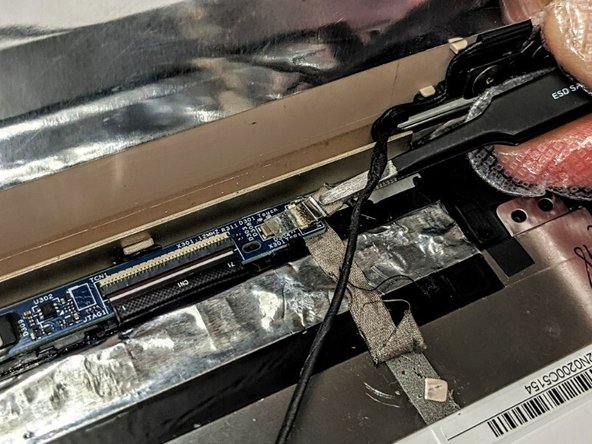
    3. HP Pavilion x360 14m-ba011dx Screen Replacement: paso 8, imagen 1 de 2 HP Pavilion x360 14m-ba011dx Screen Replacement: paso 8, imagen 2 de 2
      • Using the tweezers, remove the right side connector from the connector port and free the wiring from right to left.

      Pregunta a FixBot

      Agregar Comentario

    4. HP Pavilion x360 14m-ba011dx Screen Replacement: paso 9, imagen 1 de 2 HP Pavilion x360 14m-ba011dx Screen Replacement: paso 9, imagen 2 de 2
      • Using the tweezers, remove the left side connector from the connector port and ensure all tape securing the wiring harness is free.

      • Remove the screen from the rest of the laptop.

      Pregunta a FixBot

      Agregar Comentario

Conclusión

To reassemble your device, follow these instructions in reverse order.

Cancelar: No complete esta guía.

Una persona más ha completado esta guía.

0Guía Comentarios

Agregar Comentario

Ver Estadísticas:

Ultimas 24 horas: 4

Ultimos 7 días: 30

Ultimos 30 días: 82

Todo El Tiempo: 2,379