Saltar al contenido principal

HP Pavilion g7-2275dx Hard Drive Replacement

Qué necesitas

  1. HP Pavilion g7-2275dx Hard Drive Replacement, Disassembling HP Pavilion g7-2275dx Back Panel: paso 1, imagen 1 de 1
    • Unscrew one Phillips #1 screw from the back panel.

    • The screw is on a spring and attached to the panel. It will pop up, but will not separate from the back panel.

  2. HP Pavilion g7-2275dx Hard Drive Replacement: paso 2, imagen 1 de 2 HP Pavilion g7-2275dx Hard Drive Replacement: paso 2, imagen 2 de 2
    • Slide the back panel down and pull it up.

  3. HP Pavilion g7-2275dx Hard Drive Replacement, Hard Drive: paso 3, imagen 1 de 2 HP Pavilion g7-2275dx Hard Drive Replacement, Hard Drive: paso 3, imagen 2 de 2
    • Static electricity can damage the components of your laptop. Make sure you are wearing an anti-static bracelet before you touch the hard drive.

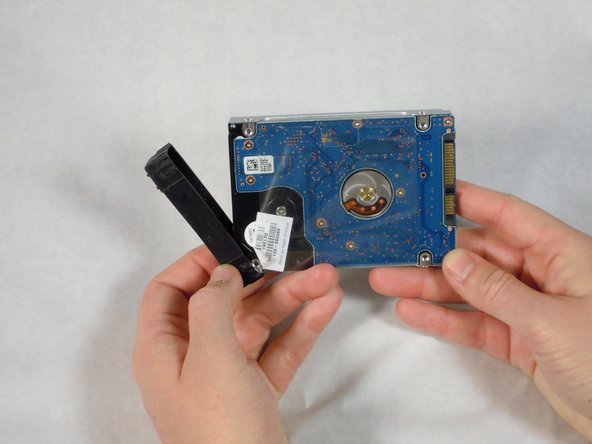
    • Using the black tab on the connect and/or a prying tool, lift up to disconnect the black hard drive cable from the green circuit board.

    • Pull the black cable up and out of the back panel. This will make taking the hard drive out much easier.

  4. HP Pavilion g7-2275dx Hard Drive Replacement: paso 4, imagen 1 de 2 HP Pavilion g7-2275dx Hard Drive Replacement: paso 4, imagen 2 de 2
    • Gently pull up on the plastic tab attached to the hard drive.

    • Pull the hard drive up and to the right to remove it completely from the laptop.

  5. HP Pavilion g7-2275dx Hard Drive Replacement, Hard Drive: paso 5, imagen 1 de 1
    • Remove the black SATA cable from the hard drive.

  6. HP Pavilion g7-2275dx Hard Drive Replacement: paso 6, imagen 1 de 2 HP Pavilion g7-2275dx Hard Drive Replacement: paso 6, imagen 2 de 2
    • Remove the black rubber end caps.

  7. HP Pavilion g7-2275dx Hard Drive Replacement: paso 7, imagen 1 de 2 HP Pavilion g7-2275dx Hard Drive Replacement: paso 7, imagen 2 de 2
    • Remove the four silver 5 mm Phillips #1 screws from the hard drive.

  8. HP Pavilion g7-2275dx Hard Drive Replacement: paso 8, imagen 1 de 1
    • Remove the plastic cover from the hard drive.

Conclusión

To reassemble or replace your hard drive, follow these instructions in reverse order with the working drive.

5 personas más completaron esta guía.

Erik Miller

Miembro Desde 04/22/14

2,123 Reputación

4 Guías creadas

Equipo

Cal Poly, Team 11-51, Amido Spring 2014 Miembro de Cal Poly, Team 11-51, Amido Spring 2014

CPSU-AMIDO-S14S11G51

4 Miembros

21 Guías creadas

0 comentarios

Agregar Comentario

Ver Estadísticas:

Ultimas 24 horas: 0

Ultimos 7 días: 3

Ultimos 30 días: 16

Todo El Tiempo: 4,943