Saltar al contenido principal

Esta guía ha sufrido modificaciones. Revisa la última versión sin revisar.

HP Pavilion dv7-1285dx Hard Drive Replacement

Qué necesitas

  1. HP Pavilion dv7-1285dx Hard Drive Replacement, Battery: paso 1, imagen 1 de 1
    • Ensure the device is powered down and unplugged.

    • Turn the device upside down with the battery compartment facing you.

    • Slide the black slider to the right and lift the battery out of its compartment.

  2. HP Pavilion dv7-1285dx Hard Drive Replacement, Back Plate: paso 2, imagen 1 de 1
    • Locate and remove the six Phillips PM2.5×7.0 screws around the perimeter of the back plate.

    • These screws do not completely detach from the device when unscrewed.

  3. HP Pavilion dv7-1285dx Hard Drive Replacement: paso 3, imagen 1 de 2 HP Pavilion dv7-1285dx Hard Drive Replacement: paso 3, imagen 2 de 2
    • Use the plastic opening tool to lift up the back plate and set it aside.

  4. HP Pavilion dv7-1285dx Hard Drive Replacement, Hard Drive: paso 4, imagen 1 de 2 HP Pavilion dv7-1285dx Hard Drive Replacement, Hard Drive: paso 4, imagen 2 de 2
    • Rotate the device 180 degrees.

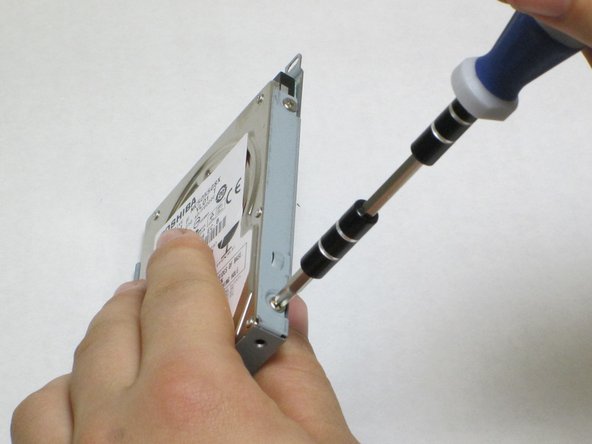
    • Locate the 2 black Phillips PM2.5×7.0 screws on the right side of the hard drive case and unscrew them.

  5. HP Pavilion dv7-1285dx Hard Drive Replacement: paso 5, imagen 1 de 3 HP Pavilion dv7-1285dx Hard Drive Replacement: paso 5, imagen 2 de 3 HP Pavilion dv7-1285dx Hard Drive Replacement: paso 5, imagen 3 de 3
    • Use the clear pull tab located on the left side of the hard drive case to unplug the hard drive by carefully pulling it to the left. Some force may be required.

    • After removing the hard drive, orient it such that the label face is up.

  6. HP Pavilion dv7-1285dx Hard Drive Replacement: paso 6, imagen 1 de 2 HP Pavilion dv7-1285dx Hard Drive Replacement: paso 6, imagen 2 de 2
    • Remove the 4 Phillips head screws located on the sides of the hard drive (two per side).

  7. HP Pavilion dv7-1285dx Hard Drive Replacement: paso 7, imagen 1 de 3 HP Pavilion dv7-1285dx Hard Drive Replacement: paso 7, imagen 2 de 3 HP Pavilion dv7-1285dx Hard Drive Replacement: paso 7, imagen 3 de 3
    • Hold the case as shown and use your thumbs to gently slide the hard drive out of its case.

    • Transfer the screws to the new hard drive case.

Conclusión

To reassemble your device, follow these instructions in reverse order.

3 personas más completaron esta guía.

Jesse Quisido

Miembro Desde 04/14/14

489 Reputación

3 Guías creadas

Equipo

Cal Poly, Team 12-34, Maness Spring 2014 Miembro de Cal Poly, Team 12-34, Maness Spring 2014

CPSU-MANESS-S14S12G34

4 Miembros

7 Guías creadas

0 comentarios

Agregar Comentario

Ver Estadísticas:

Ultimas 24 horas: 0

Ultimos 7 días: 0

Ultimos 30 días: 5

Todo El Tiempo: 3,589