Saltar al contenido principal

HP Pavilion ZD7000 Screen Replacement

Qué necesitas

  1. HP Pavilion ZD7000 Screen Replacement, Battery: paso 1, imagen 1 de 1
    • Begin by turning the laptop over so that you can see the bottom of the computer.

  2. HP Pavilion ZD7000 Screen Replacement: paso 2, imagen 1 de 1
    • Slide the battery release switch to the right while simultaneously lifting up the battery.

  3. HP Pavilion ZD7000 Screen Replacement, Fans: paso 3, imagen 1 de 1
    • Loosen the eight Phillips screws around the plate to remove it.

  4. HP Pavilion ZD7000 Screen Replacement: paso 4, imagen 1 de 1
    • Remove the nine Phillips screws from the plate covering the fans.

    • The three screws around the lower fan also hold the fan onto the metal plate.

  5. HP Pavilion ZD7000 Screen Replacement: paso 5, imagen 1 de 1
    • Lift the plate and lower fan off the heat sink being careful not to damage the lower fan cable, which is attached to the motherboard.

    • Disconnect the lower fan connector from the motherboard.

    • Remove the metal plate and lower fan.

    • The lower fan will easily separate from the metal plate.

  6. HP Pavilion ZD7000 Screen Replacement: paso 6, imagen 1 de 1
    • Disconnect the upper fan connector from the motherboard.

    • Remove the four spring loaded screws holding the heat sink assembly to the motherboard.

    • When reassembling, ensure that all the screws are equally tightened: thread all screws one turn, then add one turn to each screw in the following order: top left, bottom right, bottom left, top right. Repeat this order until the assembly is firmly seated.

  7. HP Pavilion ZD7000 Screen Replacement: paso 7, imagen 1 de 1
    • Slide the heat sink assembly including the upper fan out by pulling it down and left simultaneously.

    • When reinstalling the heat sink, ensure it is thoroughly cleaned and the thermal paste (or pads) are replaced to ensure proper thermal contact with the devices on the logic board.

  8. HP Pavilion ZD7000 Screen Replacement, Screen: paso 8, imagen 1 de 1
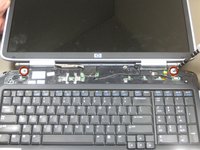
    • Begin after removing the battery and fans.

    • Remove the screws from the outer frame of the laptop.

  9. HP Pavilion ZD7000 Screen Replacement: paso 9, imagen 1 de 1
    • Remove screws from the battery area, noting the following:

    • These screws are on oversize clearing holes, but hold other components on the keyboard. It is not recommended to remove them yet.

    • Two screws secure the optical drive: one in the battery compartment and one in the RAM compartment.

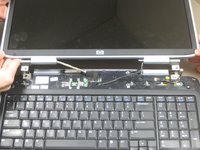
    • With the screws removed, PUSH the optical drive out through the opening at the BLUE arrow. You will need to remove the drive to access two more screws at the edge of the frame in the opening of the optical drive.

  10. HP Pavilion ZD7000 Screen Replacement: paso 10, imagen 1 de 1
    • Remove eight screws from the back panel of the laptop.

  11. HP Pavilion ZD7000 Screen Replacement: paso 11, imagen 1 de 1
    • Using a flathead screwdriver, remove two screws on the left-side panel of the laptop.

  12. HP Pavilion ZD7000 Screen Replacement: paso 12, imagen 1 de 1
    • Open the laptop so that both the screen and keyboard are in view.

    • Carefully pry off the frame above the keyboard.

  13. HP Pavilion ZD7000 Screen Replacement: paso 13, imagen 1 de 2 HP Pavilion ZD7000 Screen Replacement: paso 13, imagen 2 de 2
    • To begin disconnecting the monitor, remove two screws.

    • Do not pull the monitor off yet.

    • Make sure to keep the screen propped up to reduce the amount of strain on the screws as you take them out.

  14. HP Pavilion ZD7000 Screen Replacement: paso 14, imagen 1 de 1
    • Disconnect the two wires connecting the monitor to the rest of the laptop.

    • Do not tug on the wires. Just like wall plugs, you need to disconnect them from the actual point of connection.

Conclusión

To reassemble your device, follow these instructions in reverse order.

Una persona más ha completado esta guía.

Shantel

Miembro Desde 04/20/10

545 Reputación

6 Guías creadas

Equipo

Cal Poly, Team 30-37, Garner Spring 2010 Miembro de Cal Poly, Team 30-37, Garner Spring 2010

CPSU-GARNER-S10S30G37

4 Miembros

6 Guías creadas

0 comentarios

Agregar Comentario

Ver Estadísticas:

Ultimas 24 horas: 0

Ultimos 7 días: 0

Ultimos 30 días: 4

Todo El Tiempo: 8,246