Saltar al contenido principal

HP Pavilion Sleekbook 15-b000 Case Replacement

Qué necesitas

  1. HP Pavilion Sleekbook 15-b000 Case Replacement, Battery: paso 1, imagen 1 de 1
    • Unplug laptop from adapter and all other devices.

  2. HP Pavilion Sleekbook 15-b000 Case Replacement: paso 2, imagen 1 de 1
    • Flip the laptop over with battery facing you.

  3. HP Pavilion Sleekbook 15-b000 Case Replacement: paso 3, imagen 1 de 2 HP Pavilion Sleekbook 15-b000 Case Replacement: paso 3, imagen 2 de 2
    • Slide the battery lock on the right side open.

    • Slide the Battery release latch on the left side.

  4. HP Pavilion Sleekbook 15-b000 Case Replacement: paso 4, imagen 1 de 1
    • Pull battery out.

  5. HP Pavilion Sleekbook 15-b000 Case Replacement, Keyboard: paso 5, imagen 1 de 1
    • Remove the two 6.5mm Phillips #1 keyboard screws from bottom of laptop.

  6. HP Pavilion Sleekbook 15-b000 Case Replacement: paso 6, imagen 1 de 1
    • Push screwdriver through screw hole top pop the keyboard.

    • Make sure the screen is open.

  7. HP Pavilion Sleekbook 15-b000 Case Replacement: paso 7, imagen 1 de 1
    • Pry up the keyboard.

    • The keyboard is still attached by it's ribbon.

  8. HP Pavilion Sleekbook 15-b000 Case Replacement: paso 8, imagen 1 de 1
    • Remove keyboard wire by popping latch under blue plastic

  9. HP Pavilion Sleekbook 15-b000 Case Replacement, Case: paso 9, imagen 1 de 1
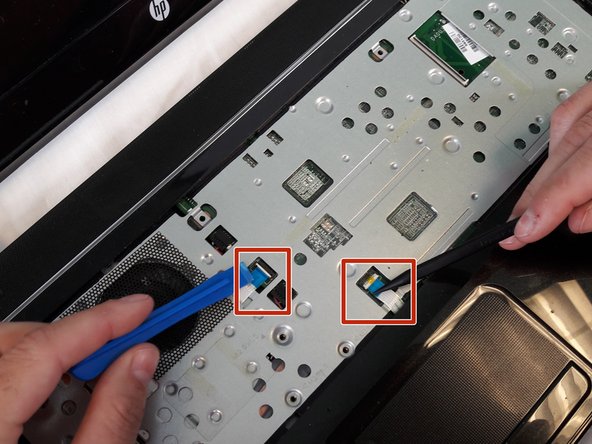
    • Using the spudger to lift up on the white tabs

    • Pull horizontally on the blue ribbon to disconnect the cables

  10. HP Pavilion Sleekbook 15-b000 Case Replacement: paso 10, imagen 1 de 1
    • Remove the five 5.5mm Phillips #1 screws from the case

  11. HP Pavilion Sleekbook 15-b000 Case Replacement: paso 11, imagen 1 de 1
    • Remove eight 6.5mm Phillips #1 screws from the back cover

  12. HP Pavilion Sleekbook 15-b000 Case Replacement: paso 12, imagen 1 de 3 HP Pavilion Sleekbook 15-b000 Case Replacement: paso 12, imagen 2 de 3 HP Pavilion Sleekbook 15-b000 Case Replacement: paso 12, imagen 3 de 3
    • Starting at a top corner, use the pry tool to split the case.

    • Slowly work around the case, pulling up gently to release the clips.

Conclusión

To reassemble your device, follow these instructions in reverse order.

Una persona más ha completado esta guía.

Equipo

USF Tampa, Team S11-G2, Cheng Spring 2018 Miembro de USF Tampa, Team S11-G2, Cheng Spring 2018

USFT-CHENG-S18S11G2

4 Miembros

10 Guías creadas

0 comentarios

Agregar Comentario

Ver Estadísticas:

Ultimas 24 horas: 2

Ultimos 7 días: 4

Ultimos 30 días: 18

Todo El Tiempo: 465