Saltar al contenido principal

HP Pavilion G6-1d16dx Screen hinges Replacement

Qué necesitas

  1. HP Pavilion G6-1d16dx Screen hinges Replacement, Battery: paso 1, imagen 1 de 1
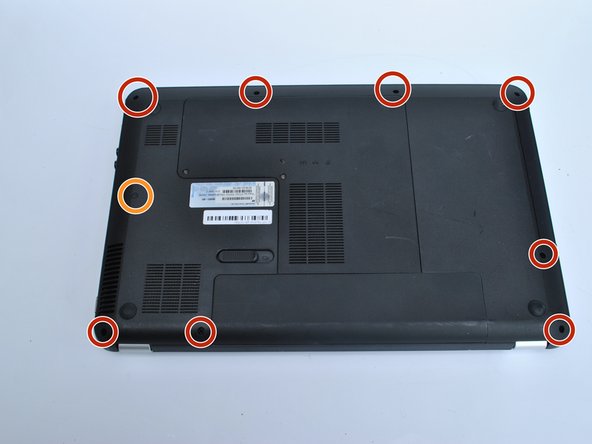
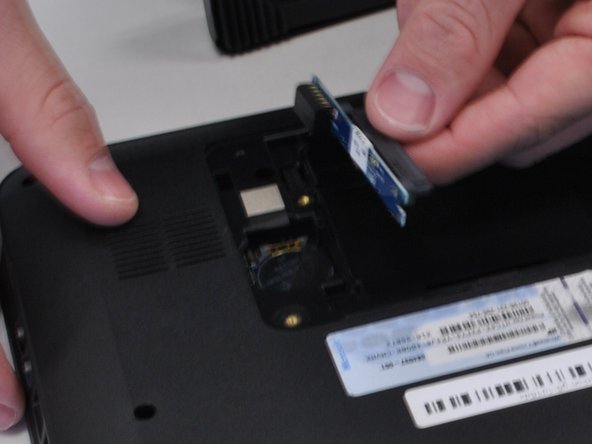
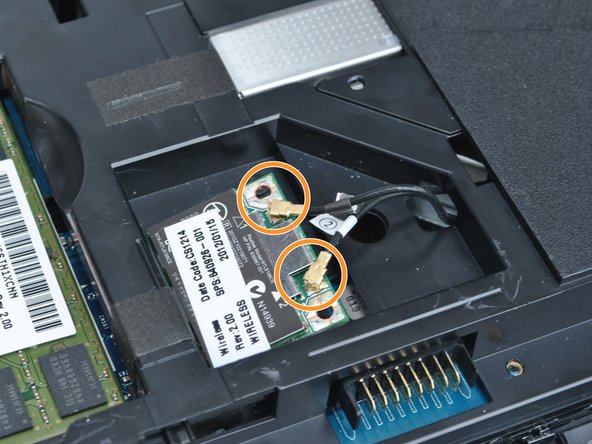
    • Flip the computer so that the bottom side is facing up, and locate the battery above the screen hinges.

  2. HP Pavilion G6-1d16dx Screen hinges Replacement: paso 2, imagen 1 de 1
    • Slide the switch under the battery compartment to release the battery.

  3. HP Pavilion G6-1d16dx Screen hinges Replacement: paso 3, imagen 1 de 1
    • Remove the battery.

    • The battery will have popped out of the compartment when it was released.

  4. HP Pavilion G6-1d16dx Screen hinges Replacement, Motherboard: paso 4, imagen 1 de 1
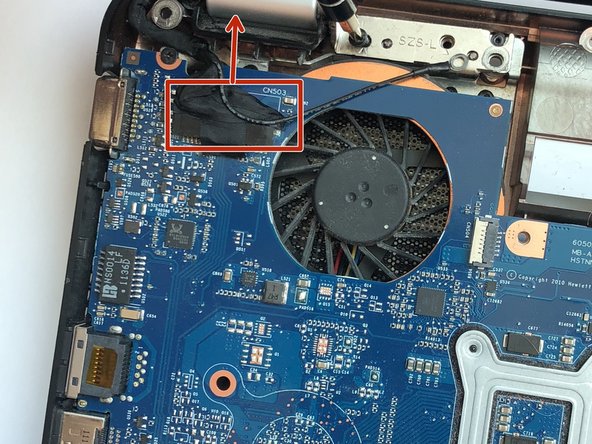
    • Unscrew the two silver screws holding the protective cover in place until they make a clicking noise.

    • The screws do not remove from the cover.

  5. HP Pavilion G6-1d16dx Screen hinges Replacement: paso 5, imagen 1 de 2 HP Pavilion G6-1d16dx Screen hinges Replacement: paso 5, imagen 2 de 2
    • Unsnap the Cover by lifting the edge along the battery compartment.

    • Remove all of the body screws.

    • Remove the rubber cap and the screw underneath it.

  6. HP Pavilion G6-1d16dx Screen hinges Replacement: paso 6, imagen 1 de 3 HP Pavilion G6-1d16dx Screen hinges Replacement: paso 6, imagen 2 de 3 HP Pavilion G6-1d16dx Screen hinges Replacement: paso 6, imagen 3 de 3
    • The keyboard is held in by nine tabs

    • Using a metal tool, depress the center tab and pry up the keyboard by pivoting the tool towards the screen.

  7. HP Pavilion G6-1d16dx Screen hinges Replacement: paso 7, imagen 1 de 2 HP Pavilion G6-1d16dx Screen hinges Replacement: paso 7, imagen 2 de 2
    • Slide the tool that is now under the keyboard sideways along the edge and use another tool to depress the other tabs along the edge of the keyboard.

    • As you depress the tabs, the edges of the keyboard will pop up.

    • Lift off the keyboard

  8. HP Pavilion G6-1d16dx Screen hinges Replacement: paso 8, imagen 1 de 1
    • Flip up the black tab holding the keyboard in place via the ribbon cable and pull out the cable

  9. HP Pavilion G6-1d16dx Screen hinges Replacement: paso 9, imagen 1 de 3 HP Pavilion G6-1d16dx Screen hinges Replacement: paso 9, imagen 2 de 3 HP Pavilion G6-1d16dx Screen hinges Replacement: paso 9, imagen 3 de 3
    • Remove the two remaining ribbon cables.

    • Remove the screws holding in the protective cover underneath the keyboard.

    • Pop the cover off using any flat metal tool, starting with where you took out the optical drive

    • It will be very sticky near the edge closest to the screen. This is where the sticker in the battery compartment is stuck to. just use a little more force.

  10. HP Pavilion G6-1d16dx Screen hinges Replacement: paso 10, imagen 1 de 1
    • Unplug the ribbon cable on the right side of the motherboard.

  11. HP Pavilion G6-1d16dx Screen hinges Replacement: paso 11, imagen 1 de 2 HP Pavilion G6-1d16dx Screen hinges Replacement: paso 11, imagen 2 de 2
    • Underneath the computer, unscrew the hard drive connector screw, and pop out the hard drive plug-in.

  12. HP Pavilion G6-1d16dx Screen hinges Replacement: paso 12, imagen 1 de 1
    • Unscrew all mother board screws and lift the motherboard out of the body.

    • For replacing the screen hinges and screen, skip this step

  13. HP Pavilion G6-1d16dx Screen hinges Replacement, Screen hinges: paso 13, imagen 1 de 1
    • Remove the five screws holding hinges to base.

    • Do not unscrew the motherboard screws

  14. HP Pavilion G6-1d16dx Screen hinges Replacement: paso 14, imagen 1 de 2 HP Pavilion G6-1d16dx Screen hinges Replacement: paso 14, imagen 2 de 2
    • Lift the tape tab up from the screen plug, and unplug the screen from the motherboard.

    • Unplug the wires from the wireless card and pull them through the body.

  15. HP Pavilion G6-1d16dx Screen hinges Replacement: paso 15, imagen 1 de 1
    • Remove the sticky tabs on the bottom of the screen just outside the hinges, and remove the two screws underneath.

  16. HP Pavilion G6-1d16dx Screen hinges Replacement: paso 16, imagen 1 de 1
    • Pry off the plastic surrounding the screen with any flat metal tool.

  17. HP Pavilion G6-1d16dx Screen hinges Replacement: paso 17, imagen 1 de 1
    • Remove the screws holding the hinge covers in place.

    • Remove the hinge covers.

  18. HP Pavilion G6-1d16dx Screen hinges Replacement: paso 18, imagen 1 de 1
    • Use a pair of pliers to unscrew the nut and pull out the hinge.

Conclusión

To reassemble your device, follow these instructions in reverse order.

2 personas más completaron esta guía.

Un comentario

Not so good a manual. See my remarks.

This laptop is of extremely poor building quality. Disaster lures in every badly made detail.

Eveline Bernard - Contestar

Agregar Comentario

Ver Estadísticas:

Ultimas 24 horas: 2

Ultimos 7 días: 5

Ultimos 30 días: 15

Todo El Tiempo: 3,408