Saltar al contenido principal

HP Pavilion DV2160BR DVD±RW Drive Replacement

Qué necesitas

  1. HP Pavilion DV2160BR DVD±RW Drive Replacement, Battery: paso 1, imagen 1 de 1
    • Start with the bottom of the laptop facing up.

  2. HP Pavilion DV2160BR DVD±RW Drive Replacement: paso 2, imagen 1 de 2 HP Pavilion DV2160BR DVD±RW Drive Replacement: paso 2, imagen 2 de 2
    • Locate the battery compartment at the rear of the device.

    • There is a slider button located under the left side of the battery compartment. It is indicated by a battery symbol. Move the slider to the left and lift the battery out.

  3. HP Pavilion DV2160BR DVD±RW Drive Replacement, DVD±RW Drive: paso 3, imagen 1 de 1
    • Locate the locking screw which is located in a recessed hole on the underside of the laptop.

    • Remove the M2.5X3-Lg #1 Phillips screw.

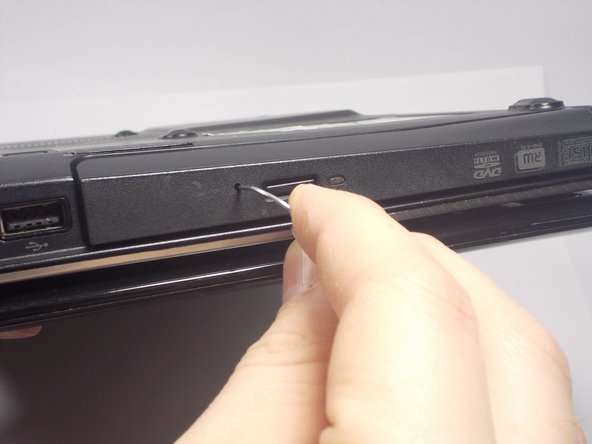
  4. HP Pavilion DV2160BR DVD±RW Drive Replacement: paso 4, imagen 1 de 2 HP Pavilion DV2160BR DVD±RW Drive Replacement: paso 4, imagen 2 de 2
    • Locate the CD drive tray release hole on the front of the drive.

    • Straighten a paper clip and push it gently into the CD drive tray release hole.

    • The drive tray will pop open.

  5. HP Pavilion DV2160BR DVD±RW Drive Replacement: paso 5, imagen 1 de 1
    • Grasp the side edges of the drive tray.

    • Gently pull the drive from the laptop.

  6. HP Pavilion DV2160BR DVD±RW Drive Replacement: paso 6, imagen 1 de 1
    • Locate the mounting bracket which is attached to the back of the drive.

    • Remove the two M2x3-Lg #0 Phillips screws.

Conclusión

To reassemble your device, follow these instructions in reverse order.

Una persona más ha completado esta guía.

Equipo

0 comentarios

Agregar Comentario

Ver Estadísticas:

Ultimas 24 horas: 0

Ultimos 7 días: 0

Ultimos 30 días: 1

Todo El Tiempo: 228