Introducción
The disk drive helps you listen to music, watch movies, or even write information to it to store for later use. This guide will help you replace it.
Qué necesitas
-
-
Press and hold the release switch, and then slide the battery out. Insert the new battery into the slot and you're done!
-
-
-
-
In the battery compartment, find the phillips screw that is holding the rear panel onto the computer. Unscrew it.
-
With the battery compartment closest to you, push the panel away from you. Once it slides back until it stops, gently lift it and put it to the side.
-
Please note that this particular screw does not completely come out, it stays with the rear panel and that is ok.
-
-
-
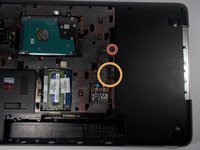
With the battery compartment closest to you, there will be a 9mm screw next in the center-right of the back plate, labeled with a keyboard symbol and a disk symbol. Remove this phillips screw.
-
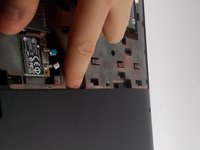
In the opening next to the screw, gently push out against the disk drive, and remove it from the disk drive compartment.
-


To reassemble your device, follow these instructions in reverse order.
To reassemble your device, follow these instructions in reverse order.
Equipo

UMass Dartmouth, Team 1-6, Miles Spring 2016 Miembro de UMass Dartmouth, Team 1-6, Miles Spring 2016
UMASSD-MILES-S16S1G6
Miembros de 3
9 Guías creadas