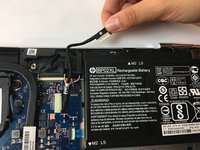
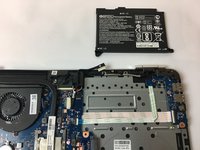
Saltar al contenido principal

HP Pavilion 15-au123cl RAM Replacement

Qué necesitas

  1. HP Pavilion 15-au123cl RAM Replacement, Battery: paso 1, imagen 1 de 1
    • Make sure the laptop is off and unplugged before starting.

    • Using the plastic opening tool, remove the top rubber feet on the back panel as it hides one of the screws we will be removing.

  2. HP Pavilion 15-au123cl RAM Replacement: paso 2, imagen 1 de 2 HP Pavilion 15-au123cl RAM Replacement: paso 2, imagen 2 de 2
    • Using a PH0 screwdriver, unscrew the ten 4.4mm Phillips head screws located on the back panel.

  3. HP Pavilion 15-au123cl RAM Replacement: paso 3, imagen 1 de 2 HP Pavilion 15-au123cl RAM Replacement: paso 3, imagen 2 de 2
    • Using the plastic opening tool, remove the back cover of the laptop.

    • It is recommended that you start with a corner and run the tool throughout the edges of the cover.

    • Be sure not to bend the cover by applying too much force.

  4. HP Pavilion 15-au123cl RAM Replacement: paso 4, imagen 1 de 2 HP Pavilion 15-au123cl RAM Replacement: paso 4, imagen 2 de 2
    • Using a PH0 screwdriver, unscrew the two 3.8mm PH0 Phillips head screws that hold the battery in place.

  5. HP Pavilion 15-au123cl RAM Replacement: paso 5, imagen 1 de 3 HP Pavilion 15-au123cl RAM Replacement: paso 5, imagen 2 de 3 HP Pavilion 15-au123cl RAM Replacement: paso 5, imagen 3 de 3
    • Carefully disconnect the cable connecting the top of the battery and remove the battery.

  6. HP Pavilion 15-au123cl RAM Replacement, RAM: paso 6, imagen 1 de 2 HP Pavilion 15-au123cl RAM Replacement, RAM: paso 6, imagen 2 de 2
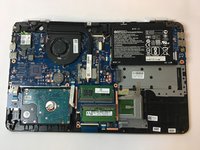
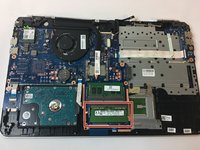
    • The RAM is located at the lower middle region of the motherboard.

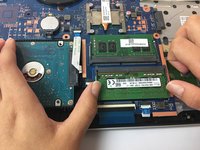
    • Push down on the clips on both sides of the RAM stick evenly.

    • The RAM will become loose and move upward when the clips are pushed.

  7. HP Pavilion 15-au123cl RAM Replacement: paso 7, imagen 1 de 1
    • Pull the RAM stick out of the motherboard.

    • The same steps work on both sticks of RAM.

Conclusión

To reassemble your device, follow these instructions in reverse order.

2 personas más completaron esta guía.

Mohammad Gardezi

Miembro Desde 10/17/17

1,420 Reputación

6 Guías creadas

Equipo

USF Tampa, Team S13-G3, Cagle Fall 2017 Miembro de USF Tampa, Team S13-G3, Cagle Fall 2017

USFT-CAGLE-F17S13G3

2 Miembros

6 Guías creadas

Un comentario

Thanks mate….your steps are helpful <3

Can you please guide on how to buy the RAM for this laptop…my current RAM is 4GB

Im planning to upgrade to 8GB

thanks

Gokul Prasad Rao - Contestar

Agregar Comentario

Ver Estadísticas:

Ultimas 24 horas: 0

Ultimos 7 días: 1

Ultimos 30 días: 9

Todo El Tiempo: 1,260