Saltar al contenido principal

HP Omen 15-5002xx Keyboard Replacement

Qué necesitas

  1. HP Omen 15-5002xx Keyboard Replacement, Back Cover: paso 1, imagen 1 de 2 HP Omen 15-5002xx Keyboard Replacement, Back Cover: paso 1, imagen 2 de 2
    • Flip the laptop upside down so the backside is facing up.

    • Use a spudger or your fingers to remove the thin rubber strips that are attached from the edges of the laptop.

    • Remember where each thin rubber came from and set them off to the side.

    • Unscrew all 14 screw with the J00 JIS Screwdriver.

  2. HP Omen 15-5002xx Keyboard Replacement, Battery: paso 2, imagen 1 de 1
    • Open the case slowly from opposite sides of the laptop.

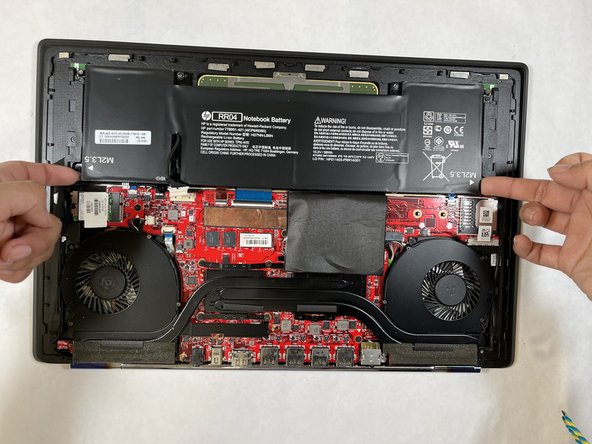
    • Use the J00 JIS screwdriver to remove eight screws securing the battery.

  3. HP Omen 15-5002xx Keyboard Replacement: paso 3, imagen 1 de 2 HP Omen 15-5002xx Keyboard Replacement: paso 3, imagen 2 de 2
    • Carefully remove the battery connector that is attached to the motherboard by slowly sliding it towards the battery with two fingers.

    • Remove the battery by lifting it up and out.

  4. HP Omen 15-5002xx Keyboard Replacement, Fan: paso 4, imagen 1 de 1
    Herramienta utilizada en este paso:
    Flathead 1.5 mm Screwdriver
    $5.49
    Comprar
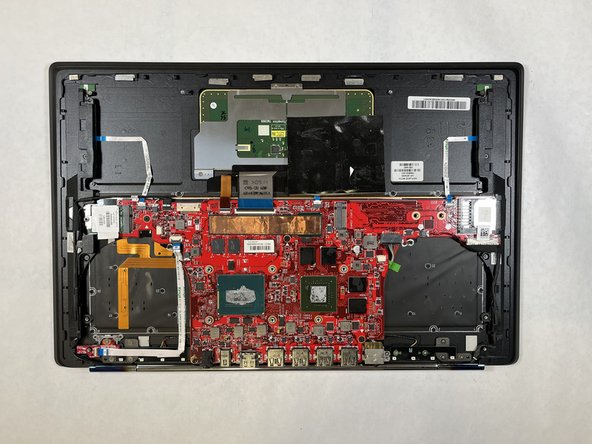
    • Remove the twelve big screws with the J00 JIS screwdriver.

    • Remove all eight small screws with the 1.5 flathead screwdriver.

  5. HP Omen 15-5002xx Keyboard Replacement: paso 5, imagen 1 de 2 HP Omen 15-5002xx Keyboard Replacement: paso 5, imagen 2 de 2
    • Carefully detach the fan connector that is attached to the motherboard by slowly sliding the connector out with two fingers.

    • Remove the battery carefully.

  6. HP Omen 15-5002xx Keyboard Replacement, Wi-Fi Card: paso 6, imagen 1 de 1
    • Use the Phillips #00 to remove one screw securing the Wi-Fi Card.

  7. HP Omen 15-5002xx Keyboard Replacement: paso 7, imagen 1 de 1
    • Carefully remove the Wi-Fi Card by slowly sliding the card sideways away from the motherboard.

  8. HP Omen 15-5002xx Keyboard Replacement, Motherboard: paso 8, imagen 1 de 1
    Herramienta utilizada en este paso:
    Flathead 1.5 mm Screwdriver
    $5.49
    Comprar
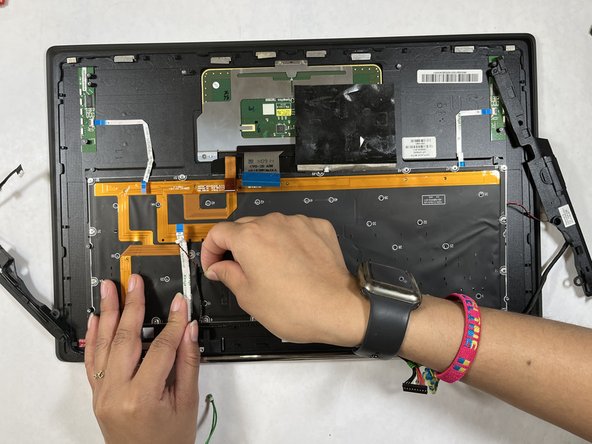
    • Use the 1.5 flathead screwdriver and remove the twelve screws from the motherboard.

  9. HP Omen 15-5002xx Keyboard Replacement: paso 9, imagen 1 de 3 HP Omen 15-5002xx Keyboard Replacement: paso 9, imagen 2 de 3 HP Omen 15-5002xx Keyboard Replacement: paso 9, imagen 3 de 3
    • Disconnect the four cables attached to the motherboard.

  10. HP Omen 15-5002xx Keyboard Replacement: paso 10, imagen 1 de 2 HP Omen 15-5002xx Keyboard Replacement: paso 10, imagen 2 de 2
    • Disconnect the remaining four connectors from the motherboard.

    • Remove the motherboard.

  11. HP Omen 15-5002xx Keyboard Replacement, Keyboard: paso 11, imagen 1 de 1
    Herramienta utilizada en este paso:
    Flathead 1.5 mm Screwdriver
    $5.49
    Comprar
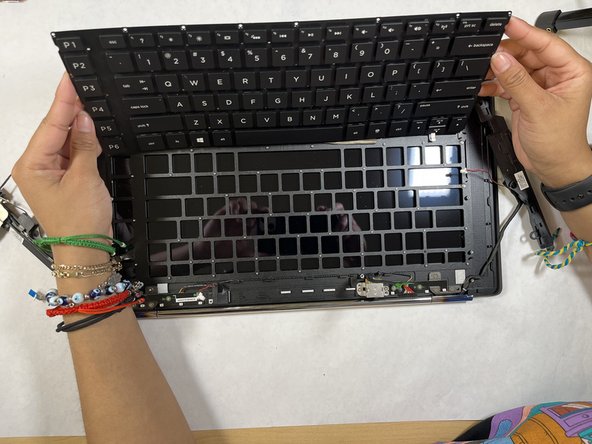
    • Remove all 51 screws using the 1.5 mm flathead screwdriver from the underside of the keyboard.

    • All necessary screws are numbered from 1-51 on the side of each screw hole.

  12. HP Omen 15-5002xx Keyboard Replacement: paso 12, imagen 1 de 2 HP Omen 15-5002xx Keyboard Replacement: paso 12, imagen 2 de 2
    • Slowly pull the electricity tape off of the computer.

    • You are able to replace the electricity tape or keep the tape attached with the wire.

  13. HP Omen 15-5002xx Keyboard Replacement: paso 13, imagen 1 de 2 HP Omen 15-5002xx Keyboard Replacement: paso 13, imagen 2 de 2
    • With two hands, lift the keyboards from the sides.

Conclusión

To reassemble your device, follow these instructions in reverse order.

Hassan Isse

Miembro Desde 09/01/21

97 Reputación

1 Guía escrita

Equipo

Gateway, Team 1-1, Saknee Fall 2021 Miembro de Gateway, Team 1-1, Saknee Fall 2021

GCC-SAKNEE-F21S1G1

5 Miembros

6 Guías creadas

0 comentarios

Agregar Comentario

Ver Estadísticas:

Ultimas 24 horas: 0

Ultimos 7 días: 6

Ultimos 30 días: 45

Todo El Tiempo: 1,129