Saltar al contenido principal

HP Officejet Pro 8600 Plus Battery Replacement

Qué necesitas

  1. HP Officejet Pro 8600 Plus Battery Replacement, Motherboard: paso 1, imagen 1 de 2 HP Officejet Pro 8600 Plus Battery Replacement, Motherboard: paso 1, imagen 2 de 2
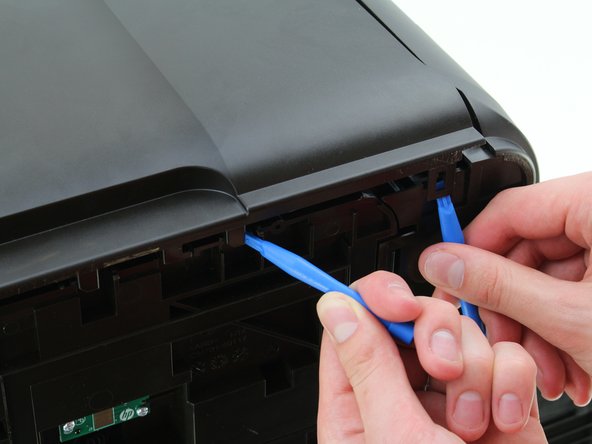
    • Turn the printer so the back is facing you.

    • Put the printer in a vertical position by lifting its right side.

  2. HP Officejet Pro 8600 Plus Battery Replacement: paso 2, imagen 1 de 1
    • Remove the two 12mm T10 Torx screws on the top edge of the printer.

  3. HP Officejet Pro 8600 Plus Battery Replacement: paso 3, imagen 1 de 1
    • Rotate the printer clockwise so the bottom of the printer is facing you.

  4. HP Officejet Pro 8600 Plus Battery Replacement: paso 4, imagen 1 de 2 HP Officejet Pro 8600 Plus Battery Replacement: paso 4, imagen 2 de 2
    • Insert the plastic opening tool underneath the slot on the right that aligns with the edge of the back panel.

    • Insert a second plastic opening tool in the notch lining up with the crease in the back panel.

    • This step requires applying a significant amount of force on the left notch. Don't be alarmed if you hear popping noises.

  5. HP Officejet Pro 8600 Plus Battery Replacement: paso 5, imagen 1 de 1
    • Remove the side panel from the printer by lifting upwards toward you.

    • For reassembly, slide the side panel from left to right into place.

  6. HP Officejet Pro 8600 Plus Battery Replacement: paso 6, imagen 1 de 1
    • Remove the four 6.5 mm T10 Torx screws from the motherboard.

  7. HP Officejet Pro 8600 Plus Battery Replacement: paso 7, imagen 1 de 1
    • Remove the black brace from the right side of the motherboard, located near the black ribbon cable.

  8. HP Officejet Pro 8600 Plus Battery Replacement: paso 8, imagen 1 de 3 HP Officejet Pro 8600 Plus Battery Replacement: paso 8, imagen 2 de 3 HP Officejet Pro 8600 Plus Battery Replacement: paso 8, imagen 3 de 3
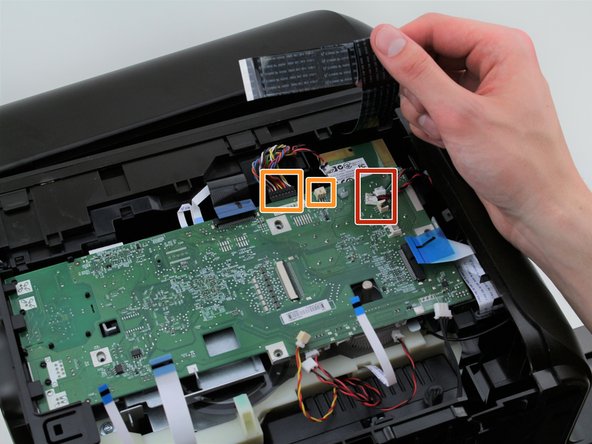
    • Remove the cables connected to the top of the motherboard by gently pulling them out of their ports.

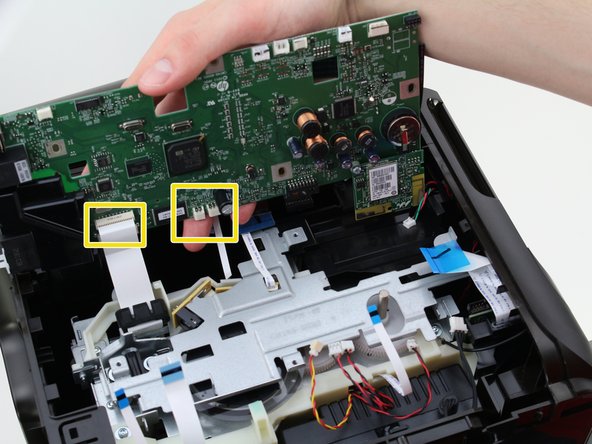
    • Remove the cables connected to the edge of the motherboard by gently pulling them out of their ports.

    • Remove the cables connected to the underside of the motherboard by gently pulling them out of their ports.

  9. HP Officejet Pro 8600 Plus Battery Replacement, Battery: paso 9, imagen 1 de 2 HP Officejet Pro 8600 Plus Battery Replacement, Battery: paso 9, imagen 2 de 2
    • Turn the motherboard over so the back is facing upward.

    • Use the plastic opening tool to pry the battery out of place.

  10. HP Officejet Pro 8600 Plus Battery Replacement: paso 10, imagen 1 de 1
    • Remove the battery by grabbing its edges, lifting upward, and sliding sideways.

Conclusión

To reassemble your device, follow these instructions in reverse order.

9 personas más completaron esta guía.

Mackinnon Buck

Miembro Desde 04/18/18

1,182 Reputación

3 Guías creadas

Equipo

Cal Poly, Team S16-G4, Livingston Spring 2018 Miembro de Cal Poly, Team S16-G4, Livingston Spring 2018

CPSU-LIVINGSTON-S18S16G4

4 Miembros

10 Guías creadas

2 comentarios

Are there any procedures required after either battery replacement or motherboard replacement? Re-loading of firmware, initialization, etc. Does the printer's serial number change as a result of battery replacement or motherboard replacement?

Erik Fjerstad - Contestar

Bonjour ,

ma batterie est ok , par contre la courroie s'effiloche.

Peut on la remplacer et si oui comment y accéder?

J'ai déplacé le tendeur pour augmenter la tension de la courroie mais ce n'est pas suffisant.

Merci

BàV phil

Philippe Herbots - Contestar

Agregar Comentario

Ver Estadísticas:

Ultimas 24 horas: 3

Ultimos 7 días: 32

Ultimos 30 días: 112

Todo El Tiempo: 5,060