Saltar al contenido principal

HP Mini 110-3131dx Fan Replacement

Qué necesitas

    • Power off the laptop before trying to remove the battery.

    • Turn the laptop upside down, and locate the sliding tabs on the battery.

    • Slide both tabs in an inward direction, then slide the battery away from the laptop.

  1. HP Mini 110-3131dx Fan Replacement, Keyboard: paso 2, imagen 1 de 1
    • Remove the three black screws marked by the keyboard symbol using a Phillips #1 screwdriver.

  2. HP Mini 110-3131dx Fan Replacement: paso 3, imagen 1 de 3 HP Mini 110-3131dx Fan Replacement: paso 3, imagen 2 de 3 HP Mini 110-3131dx Fan Replacement: paso 3, imagen 3 de 3
    • Turn the laptop upright and open it.

    • Disconnect the clips located around the perimeter of the keyboard.

    • Slide the iFixit opening tool between the top edge of the keyboard and the plastic bezel.

    • Start either above the esc key or the delete key.

    • Pull the keyboard with your fingers until it comes out on both sides.

    • Be careful not to pull the keyboard out too fast. There is a fragile ribbon cable that attaches to the motherboard behind the keyboard.

  3. HP Mini 110-3131dx Fan Replacement: paso 4, imagen 1 de 1
    • Tilt the keyboard toward you to reveal the ribbon cable.

    • Lift up the black tab on top of the keyboard ribbon cable to release the ribbon cable.

    • Pull the ribbon cable out of its container.

  4. HP Mini 110-3131dx Fan Replacement, Hard Drive: paso 5, imagen 1 de 1
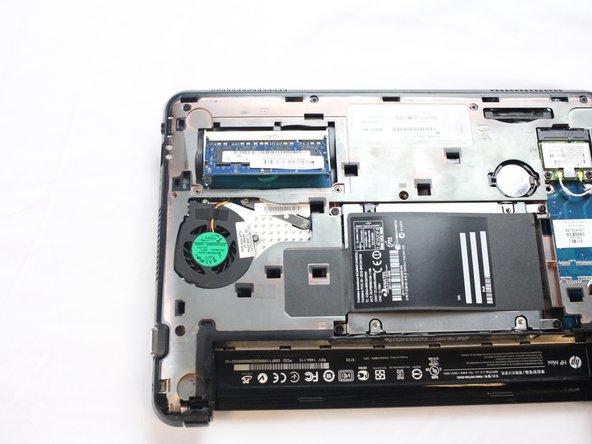
    • Remove the four screws holding down the hard drive using a Phillips #1 screwdriver.

  5. HP Mini 110-3131dx Fan Replacement: paso 6, imagen 1 de 2 HP Mini 110-3131dx Fan Replacement: paso 6, imagen 2 de 2
    • Lift the black flap covering the hard drive then slide it towards the left using the orange tab until it's released from its receptacle.

    • Pull the hard drive out of the laptop.

    • Put the hard drive in an anti-static bag to decrease the likelihood of harming it with static electricity.

  6. HP Mini 110-3131dx Fan Replacement, Memory Card: paso 7, imagen 1 de 3 HP Mini 110-3131dx Fan Replacement, Memory Card: paso 7, imagen 2 de 3 HP Mini 110-3131dx Fan Replacement, Memory Card: paso 7, imagen 3 de 3
    • Find the two silver screws that hold the memory card cover.

    • Take a PH1 screwdriver and unscrew the two screws.

    • Remove the metal cover

  7. HP Mini 110-3131dx Fan Replacement: paso 8, imagen 1 de 2 HP Mini 110-3131dx Fan Replacement: paso 8, imagen 2 de 2
    • Pull the two white tabs located on either side of the memory card away from each other until the card pops up

    • Remove the card

  8. HP Mini 110-3131dx Fan Replacement, Keyboard Bezel: paso 9, imagen 1 de 2 HP Mini 110-3131dx Fan Replacement, Keyboard Bezel: paso 9, imagen 2 de 2
    • Remove the six black screws around the perimeter of the laptop using a Phillips #1 screwdriver.

    • Be sure to keep track of which screws go where as they are not all the same size.

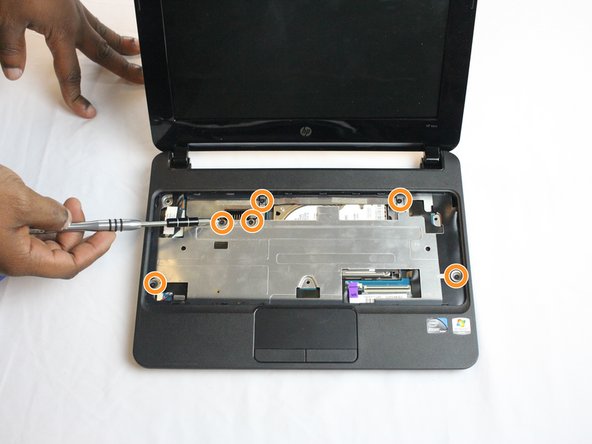
    • Flip the laptop over and remove the six black screws.

  9. HP Mini 110-3131dx Fan Replacement: paso 10, imagen 1 de 2 HP Mini 110-3131dx Fan Replacement: paso 10, imagen 2 de 2
    • Using your fingernail or the iFixit opening tool, flip the black tab up to release the ribbon cable that connects the touchpad and motherboard.

    • Disconnect the red and black wires from the motherboard on the left-hand side of the bezel using your fingernail or iFixit opening tool.

  10. HP Mini 110-3131dx Fan Replacement: paso 11, imagen 1 de 1
    • Lift the keyboard bezel from the back end and slide the iFixit opening tool around the perimeter of the bezel until it is fully released.

  11. HP Mini 110-3131dx Fan Replacement, Fan: paso 12, imagen 1 de 2 HP Mini 110-3131dx Fan Replacement, Fan: paso 12, imagen 2 de 2
    • Find the two 3.8mm screws that is holding the fan to the frame of the computer.

    • It might be required to hold wires out of the way to contact one of the screws.

    • Take out the screws with a Phillips PH1 screwdriver.

  12. HP Mini 110-3131dx Fan Replacement: paso 13, imagen 1 de 2 HP Mini 110-3131dx Fan Replacement: paso 13, imagen 2 de 2
    • Unplug the fan power cable by driving the connector away from the receptacle with a pry stick and one finger (or two pry sticks).

    • Raise the fan out of the computer.

Conclusión

To reassemble your device, follow these instructions in reverse order.

3 personas más completaron esta guía.

aarondcollege

Miembro Desde 10/06/16

1,297 Reputación

10 Guías creadas

Equipo

USF Tampa, Team 2-4, Cagle Fall 2016 Miembro de USF Tampa, Team 2-4, Cagle Fall 2016

USFT-CAGLE-F16S2G4

5 Miembros

10 Guías creadas

0 comentarios

Agregar Comentario

Ver Estadísticas:

Ultimas 24 horas: 0

Ultimos 7 días: 2

Ultimos 30 días: 7

Todo El Tiempo: 873