Saltar al contenido principal

Esta guía ha sufrido modificaciones. Revisa la última versión sin revisar.

HP Mini 1000 RAM Replacement

Qué necesitas

  1. HP Mini 1000 RAM Replacement, Battery: paso 1, imagen 1 de 2 HP Mini 1000 RAM Replacement, Battery: paso 1, imagen 2 de 2
    • With the case closed, place the Mini 1000 top-side down on a flat surface.

    • Push both of the battery release latches toward each other.

  2. HP Mini 1000 RAM Replacement: paso 2, imagen 1 de 1
    • Lift the battery out of the Mini 1000 from the edge closest to the release latches.

  3. HP Mini 1000 RAM Replacement, RAM: paso 3, imagen 1 de 2 HP Mini 1000 RAM Replacement, RAM: paso 3, imagen 2 de 2
    • Before proceeding, slide the right battery release latch to the unlocked position nearest the center of the computer.

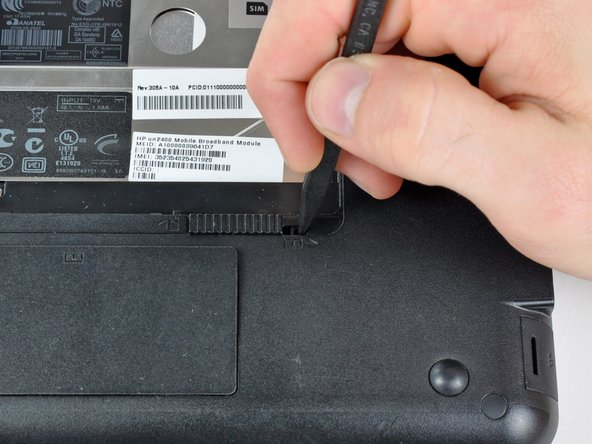
    • Use the tip of a spudger to slide the RAM compartment cover release latch away from the center of the computer.

    • At this point, the edge of the RAM compartment cover nearest the battery compartment should pop up from the lower case.

  4. HP Mini 1000 RAM Replacement: paso 4, imagen 1 de 1
    • Remove the RAM compartment cover from the lower case.

  5. HP Mini 1000 RAM Replacement: paso 5, imagen 1 de 2 HP Mini 1000 RAM Replacement: paso 5, imagen 2 de 2
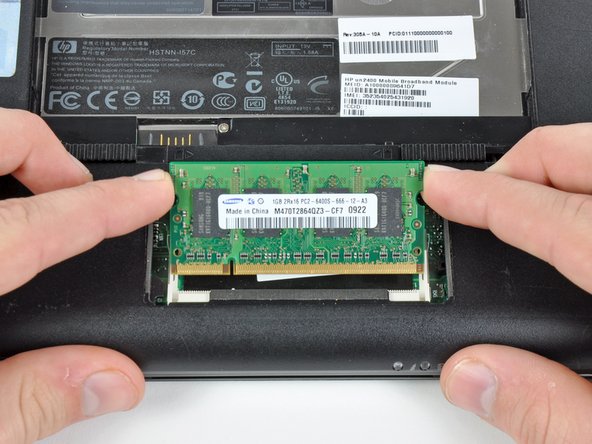
    • Use your fingers to simultaneously pull both RAM retaining arms away from the center of the RAM chip.

    • The RAM chip should pop up slightly from its socket.

    • Pull the RAM chip out of its socket and remove it from the Mini 1000.

Conclusión

To reassemble your device, follow these instructions in reverse order.

2 personas más completaron esta guía.

0 comentarios

Agregar Comentario

Ver Estadísticas:

Ultimas 24 horas: 1

Ultimos 7 días: 5

Ultimos 30 días: 10

Todo El Tiempo: 4,443