Saltar al contenido principal

HP Elitebook 8570w Optical Drive Replacement

Qué necesitas

  1. HP Elitebook 8570w Optical Drive Replacement, Optical Drive: paso 1, imagen 1 de 1
    • Begin by removing the computers back covering.

    • Use the right slider to unlock the backing.

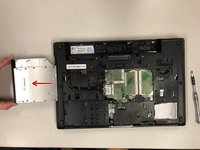
    • Slide the backing towards you while holding the slider to remove it.

  2. HP Elitebook 8570w Optical Drive Replacement: paso 2, imagen 1 de 1
    • Once the backing is removed, locate the panel to the left where the optical drive is stored.

    • Locate the single screw in the photo.

    • Unscrew the 0.8mm Phillips screw and place to the side.

  3. HP Elitebook 8570w Optical Drive Replacement: paso 3, imagen 1 de 1
    • Locate the small metal piece in the photo.

    • Using a tool, push the piece in the given direction.

  4. HP Elitebook 8570w Optical Drive Replacement: paso 4, imagen 1 de 2 HP Elitebook 8570w Optical Drive Replacement: paso 4, imagen 2 de 2
    • Once pushing the piece outwards, the optical drive will pop out of the side of the computer.

    • Grab the optical drive and carefully remove it from the back of the computer.

Conclusión

To reassemble your device, follow these instructions in reverse order.

MJ Routh

Miembro Desde 11/06/17

465 Reputación

3 Guías creadas

Equipo

Baylor, Team S8-G5, Johnson Fall 2017 Miembro de Baylor, Team S8-G5, Johnson Fall 2017

BU-JOHNSON-F17S8G5

3 Miembros

4 Guías creadas

0 comentarios

Agregar Comentario

Ver Estadísticas:

Ultimas 24 horas: 0

Ultimos 7 días: 3

Ultimos 30 días: 20

Todo El Tiempo: 1,756