Saltar al contenido principal

HP EliteBook 8530w CPU Replacement

Qué necesitas

  1. HP EliteBook 8530w CPU Replacement, Battery: paso 1, imagen 1 de 2 HP EliteBook 8530w CPU Replacement, Battery: paso 1, imagen 2 de 2
    • Turn the laptop off then place it down so that the back is facing up.

    • Slide the battery release switch to the left and hold it there.

  2. HP EliteBook 8530w CPU Replacement: paso 2, imagen 1 de 2 HP EliteBook 8530w CPU Replacement: paso 2, imagen 2 de 2
    • Pull the battery away upward and away from the laptop while continuing to hold the release switch.

    • Once the battery is removed from the laptop, you may release the switch.

    • To properly dispose of your battery, look for the closest location that accepts electronic waste in your area and drop it off there.

  3. HP EliteBook 8530w CPU Replacement, Fan: paso 3, imagen 1 de 1
    • Unscrew the two screws from the center panel with a Phillips #00 screwdriver.

    • These screws should have a keyboard icon stamped next to them.

  4. HP EliteBook 8530w CPU Replacement: paso 4, imagen 1 de 3 HP EliteBook 8530w CPU Replacement: paso 4, imagen 2 de 3 HP EliteBook 8530w CPU Replacement: paso 4, imagen 3 de 3
    • Flip the laptop over then open the lid.

    • Slide the four tabs at the top of the keyboard towards you with your finger.

    • Wedge a finger or spudger in the top corner of the keyboard and hinge it forward to reveal the backside.

    • Do not try to pull the keyboard out of the laptop. There are still cables connected to it that can easily be damaged.

  5. HP EliteBook 8530w CPU Replacement: paso 5, imagen 1 de 3 HP EliteBook 8530w CPU Replacement: paso 5, imagen 2 de 3 HP EliteBook 8530w CPU Replacement: paso 5, imagen 3 de 3
    • Use a Torx TR7 screwdriver to remove the three screws holding down the fan.

    • Gently remove the fan connector that plugs into the motherboard.

    • Note: It can help to use something like tweezers to remove the connector if you are having trouble.

    • Remove the fan.

  6. HP EliteBook 8530w CPU Replacement, Heatsink: paso 6, imagen 1 de 3 HP EliteBook 8530w CPU Replacement, Heatsink: paso 6, imagen 2 de 3 HP EliteBook 8530w CPU Replacement, Heatsink: paso 6, imagen 3 de 3
    • Remove the eight screws holding down the heat sink using a Torx TR7 bit.

    • Gently remove the heat sink by lifting it up and sliding it away from the side of the laptop.

    • The thermal paste will be situated on the small square portion of the heatsink that sat directly atop the CPU. Clean both the heatsink and CPU of the old thermal paste before application as shown in this guide.

  7. HP EliteBook 8530w CPU Replacement, CPU: paso 7, imagen 1 de 2 HP EliteBook 8530w CPU Replacement, CPU: paso 7, imagen 2 de 2
    • Unscrew the socket mount with a flat head screwdriver to unlock the CPU.

    • Turn it counter clockwise, towards the "unlock" symbol on the socket.

  8. HP EliteBook 8530w CPU Replacement: paso 8, imagen 1 de 2 HP EliteBook 8530w CPU Replacement: paso 8, imagen 2 de 2
    • Hold the CPU from the edges to pull it up and remove it.

  9. HP EliteBook 8530w CPU Replacement: paso 9, imagen 1 de 1
    • Retrieve your replacement CPU.

    • Point the small golden triangle on the new CPU to the bottom right.

    • The small golden triangle on the CPU should align with the one on the socket. This cannot be seen due to obstruction caused by the laptop chassis.

  10. HP EliteBook 8530w CPU Replacement: paso 10, imagen 1 de 2 HP EliteBook 8530w CPU Replacement: paso 10, imagen 2 de 2
    • Align and insert the pins on the CPU with the socket.

    • Ensure that you keep the small golden triangle on the CPU in the same position from last step.

  11. HP EliteBook 8530w CPU Replacement: paso 11, imagen 1 de 1
  12. HP EliteBook 8530w CPU Replacement: paso 12, imagen 1 de 1
    • Screw the socket mount with a flathead screwdriver to lock the CPU into place.

    • Ensure you turn the screw clockwise, towards the "lock" symbol.

Conclusión

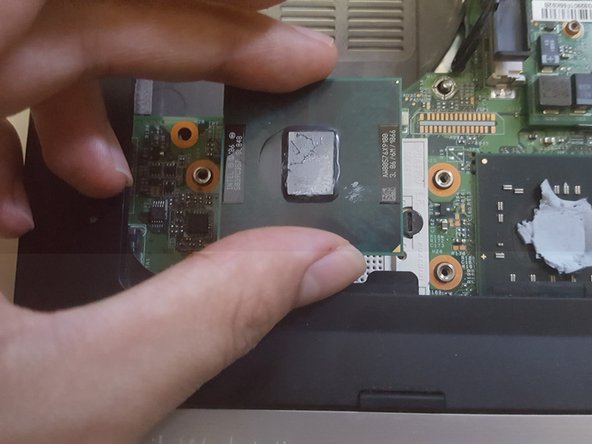
Your new CPU is now installed. To reassemble, follow the heatsink replacement guide in reverse.

Ryan Liyanage

Miembro Desde 09/14/20

133 Reputación

1 Guía escrita

Equipo

0 comentarios

Agregar Comentario

Ver Estadísticas:

Ultimas 24 horas: 0

Ultimos 7 días: 2

Ultimos 30 días: 21

Todo El Tiempo: 852