Saltar al contenido principal

HP EliteBook 1050 G1 Speakers Replacement

Qué necesitas

  1. HP EliteBook 1050 G1 Speakers Replacement, Battery: paso 1, imagen 1 de 2 HP EliteBook 1050 G1 Speakers Replacement, Battery: paso 1, imagen 2 de 2
    • Be sure to power off and unplug your device before you begin your repair.

    • Close your laptop and turn it over so that the side without the HP logo is facing you.

    • Using the TR9 screwdriver, loosen the nine screws from the base of the device.

    • These screws do not come out. Instead of removing them, you should simply loosen all the screws and proceed to the next step.

  2. HP EliteBook 1050 G1 Speakers Replacement: paso 2, imagen 1 de 2 HP EliteBook 1050 G1 Speakers Replacement: paso 2, imagen 2 de 2
    • Remove the base by inserting the plastic opening tool into the slit between the two portions of the case and gently prying the metal cover away from the body of the device.

    • Slowly work your way around the edge of the base.

    • Lift the cover of the laptop off of the body of the device.

  3. HP EliteBook 1050 G1 Speakers Replacement: paso 3, imagen 1 de 3 HP EliteBook 1050 G1 Speakers Replacement: paso 3, imagen 2 de 3 HP EliteBook 1050 G1 Speakers Replacement: paso 3, imagen 3 de 3
    • Find the connector between the battery and the device. It is on the left-hand side above the battery.

    • Use the spudger to gently pull the corners of the connector away from the black housing.

    • Alternate working each corner to avoid damaging the connector.

  4. HP EliteBook 1050 G1 Speakers Replacement: paso 4, imagen 1 de 2 HP EliteBook 1050 G1 Speakers Replacement: paso 4, imagen 2 de 2
    • Remove the seven black 3mm Phillips #00 screws next to the M2x3 label along the edge of the battery using the Phillips #00 screwdriver.

    • There are arrows next to the labels that will help you identify the screws.

    • HP placed Threadlocker Blue Sealant around the screws to keep them from loosening, so be careful to not strip the screws. To avoid this, apply constant downward pressure on the screws during this step.

    • In this step, a JIS #00 screwdriver could be more useful than a regular Phillips #00 screwdriver.

  5. HP EliteBook 1050 G1 Speakers Replacement: paso 5, imagen 1 de 1
    • Grip the battery by the edges and lift it out of its housing.

  6. HP EliteBook 1050 G1 Speakers Replacement, Speakers: paso 6, imagen 1 de 3 HP EliteBook 1050 G1 Speakers Replacement, Speakers: paso 6, imagen 2 de 3 HP EliteBook 1050 G1 Speakers Replacement, Speakers: paso 6, imagen 3 de 3
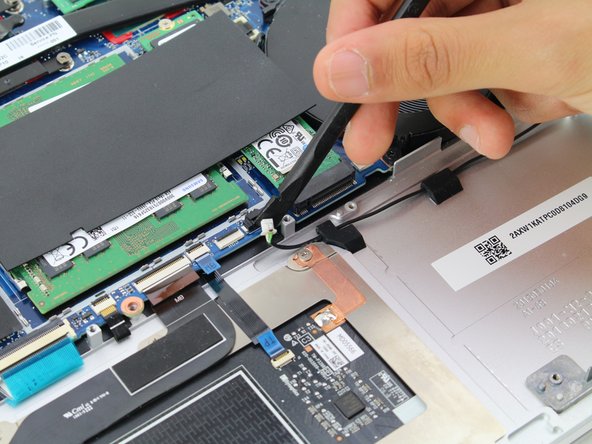
    • Use the spudger to wiggle out the speaker cable. Make sure to apply moderate pressure on the sides as this will make it easier for the speaker cable to come out.

    • Do not put too much pressure on the sides of the cable as this could damage the cable.

  7. HP EliteBook 1050 G1 Speakers Replacement: paso 7, imagen 1 de 2 HP EliteBook 1050 G1 Speakers Replacement: paso 7, imagen 2 de 2
    • Remove the cable from the spongy connector by sliding it out.

    • Let the cable rest on the bottom of the motherboard so it doesn't get in the way.

  8. HP EliteBook 1050 G1 Speakers Replacement: paso 8, imagen 1 de 3 HP EliteBook 1050 G1 Speakers Replacement: paso 8, imagen 2 de 3 HP EliteBook 1050 G1 Speakers Replacement: paso 8, imagen 3 de 3
    • Using a Phillips #00 Screwdriver, unscrew the two 3 mm silver screws from the speaker.

    • Make sure to apply pressure on the top of the screwdriver with the palm of your hand as this will prevent the screw from stripping.

  9. HP EliteBook 1050 G1 Speakers Replacement: paso 9, imagen 1 de 1
    • Lift the speaker up to fully remove it.

  10. HP EliteBook 1050 G1 Speakers Replacement: paso 10, imagen 1 de 3 HP EliteBook 1050 G1 Speakers Replacement: paso 10, imagen 2 de 3 HP EliteBook 1050 G1 Speakers Replacement: paso 10, imagen 3 de 3
    • Use the iFixit opening tool to remove the speaker cable for the other speaker. Make sure to apply moderate pressure on the sides of the cable to loosen it.

  11. HP EliteBook 1050 G1 Speakers Replacement: paso 11, imagen 1 de 3 HP EliteBook 1050 G1 Speakers Replacement: paso 11, imagen 2 de 3 HP EliteBook 1050 G1 Speakers Replacement: paso 11, imagen 3 de 3
    • Use the Philips #00 screwdriver to remove the two 3 mm silver screws on the speaker.

    • Apply the proper screw driver technique as stated earlier in the guide to prevent screws from stripping.

  12. HP EliteBook 1050 G1 Speakers Replacement: paso 12, imagen 1 de 1
    • Remove the speaker cable from the black spongy connector.

  13. HP EliteBook 1050 G1 Speakers Replacement: paso 13, imagen 1 de 1
    • Lift the speaker up to finish the removal process.

Conclusión

To reassemble your device, follow these instructions in reverse order.

Keerat Grewal

Miembro Desde 04/18/19

163 Reputación

1 Guía escrita

Equipo

Cal Poly, Team S2-G10, Maness Spring 2019 Miembro de Cal Poly, Team S2-G10, Maness Spring 2019

CPSU-MANESS-S19S2G10

4 Miembros

9 Guías creadas

0 comentarios

Agregar Comentario

Ver Estadísticas:

Ultimas 24 horas: 2

Ultimos 7 días: 9

Ultimos 30 días: 19

Todo El Tiempo: 417