Saltar al contenido principal

HP Compaq 6510b Fan Replacement

Qué necesitas

  1. HP Compaq 6510b Fan Replacement, Battery: paso 1, imagen 1 de 2 HP Compaq 6510b Fan Replacement, Battery: paso 1, imagen 2 de 2
    • Flip the computer over so the backside is facing you.

    • Using the two prongs that are located in the back, slide the further left prong and the upper right prong to the left as indicated in the image.

    • Slide the battery out.

  2. HP Compaq 6510b Fan Replacement, RAM: paso 2, imagen 1 de 2 HP Compaq 6510b Fan Replacement, RAM: paso 2, imagen 2 de 2
    • Flip your device over.

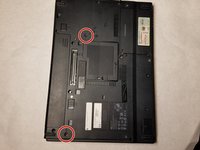
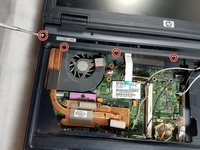
    • In the center of the bottom of the laptop, there is a panel with two screws. Using the JIS #1 screw head unscrew both.
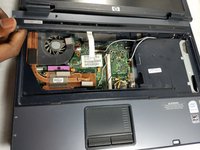
    • Lift the panel.

  3. HP Compaq 6510b Fan Replacement: paso 3, imagen 1 de 3 HP Compaq 6510b Fan Replacement: paso 3, imagen 2 de 3 HP Compaq 6510b Fan Replacement: paso 3, imagen 3 de 3
    • The RAM is held down by two prongs. Gently pull them until the RAM pops out of place.

    • Lift the RAM out of place.

  4. HP Compaq 6510b Fan Replacement, Fan: paso 4, imagen 1 de 1
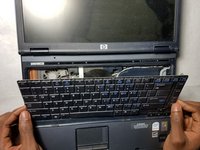
    • Look for tabs in between esc and f1, f4 and f5, f8 and f9, f12 and scroll.

    • Pull these tabs towards you.

  5. HP Compaq 6510b Fan Replacement: paso 5, imagen 1 de 2 HP Compaq 6510b Fan Replacement: paso 5, imagen 2 de 2
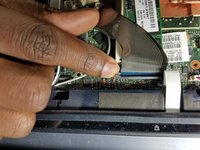
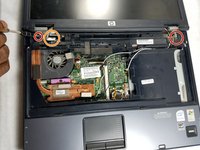
    • Flip the laptop over and on the back of the center of the keyboard there is a screw with a rectangle beside it that looks like a keyboard. Remove this Phillips 5mm screw and another similar screw in the back top left of the keyboard.

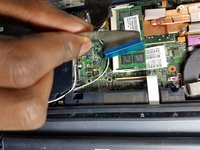
    • Then carefully lift the keyboard out of place with your fingernails or a plastic opening tool.

  6. HP Compaq 6510b Fan Replacement: paso 6, imagen 1 de 3 HP Compaq 6510b Fan Replacement: paso 6, imagen 2 de 3 HP Compaq 6510b Fan Replacement: paso 6, imagen 3 de 3
    • There will be a metallic film attached to the keyboard from the motherboard. A black latch runs along the film keeping it in place. Lift the latch and detach the film; remove it to fully remove the keyboard.

  7. HP Compaq 6510b Fan Replacement: paso 7, imagen 1 de 3 HP Compaq 6510b Fan Replacement: paso 7, imagen 2 de 3 HP Compaq 6510b Fan Replacement: paso 7, imagen 3 de 3
    • Carefully undo the white film the same way you took out the metallic film

    • Once this film is removed the bar with the power button and media tools above the keyboard will pop out of place using a spudger.

  8. HP Compaq 6510b Fan Replacement: paso 8, imagen 1 de 2 HP Compaq 6510b Fan Replacement: paso 8, imagen 2 de 2
    • Underneath, a metal clamp will be revealed with two Torx Security T7 17mm screws. Unscrew these.

    • Carefully lift the cable out of place that is to the right of it.

  9. HP Compaq 6510b Fan Replacement: paso 9, imagen 1 de 2 HP Compaq 6510b Fan Replacement: paso 9, imagen 2 de 2
    • Unscrew these two JIS #1 5mm screws on the fan.

    • Carefully unplug the fans' wires.

    • Remove the fan and put in new one.

Conclusión

To reassemble your device, follow these instructions in reverse order.

2 personas más completaron esta guía.

Joseph Noudom

Miembro Desde 03/01/18

569 Reputación

4 Guías creadas

Equipo

Un comentario

Many Thanks!

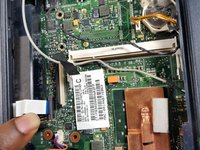
BTW, my German keyboard was held by a 3rd screw. In step 3, one needs to remove the remaining screw next to the WIFI module as well.

Torsten Spengler - Contestar

Agregar Comentario

Ver Estadísticas:

Ultimas 24 horas: 0

Ultimos 7 días: 0

Ultimos 30 días: 7

Todo El Tiempo: 1,131