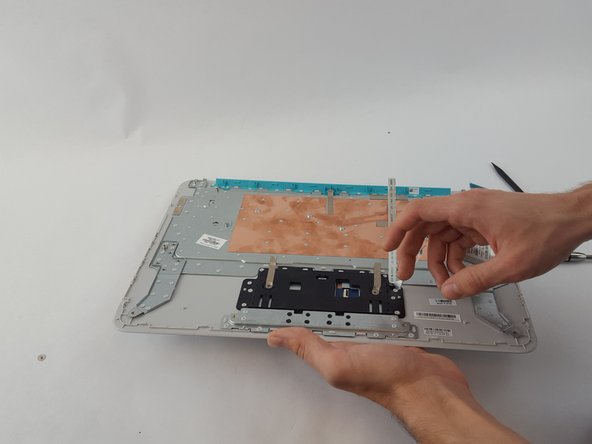
Saltar al contenido principal

HP Chromebook 14-x010wm Touchpad Replacement

Qué necesitas

  1. HP Chromebook 14-x010wm Touchpad Replacement, Touchpad: paso 1, imagen 1 de 3 HP Chromebook 14-x010wm Touchpad Replacement, Touchpad: paso 1, imagen 2 de 3 HP Chromebook 14-x010wm Touchpad Replacement, Touchpad: paso 1, imagen 3 de 3
    • Before starting the fix, make sure the computer is turned off, the power is disconnected, and all external devices are disconnected as well.

    • Close the laptop lid.

    • Turn the laptop upside-down.

  2. HP Chromebook 14-x010wm Touchpad Replacement: paso 2, imagen 1 de 2 HP Chromebook 14-x010wm Touchpad Replacement: paso 2, imagen 2 de 2
    • Remove the two larger rubber screw covers.

    • Remove the two smaller rubber screw covers.

    • Remove the middle rubber screw cover.

  3. HP Chromebook 14-x010wm Touchpad Replacement: paso 3, imagen 1 de 1
    • Using a Phillips #1 screwdriver, remove the thirteen 5.7 mm screws located on the back of the device as shown.

  4. HP Chromebook 14-x010wm Touchpad Replacement: paso 4, imagen 1 de 3 HP Chromebook 14-x010wm Touchpad Replacement: paso 4, imagen 2 de 3 HP Chromebook 14-x010wm Touchpad Replacement: paso 4, imagen 3 de 3
    • Turn the computer right side up with the front facing towards you.

  5. HP Chromebook 14-x010wm Touchpad Replacement: paso 5, imagen 1 de 2 HP Chromebook 14-x010wm Touchpad Replacement: paso 5, imagen 2 de 2
    • Carefully open the computer’s lid as far as it will go until the back edge of the keyboard cover separates from the base.

    • Opening the lid too far may cause damage to some of the internal pieces of the laptop.

  6. HP Chromebook 14-x010wm Touchpad Replacement: paso 6, imagen 1 de 3 HP Chromebook 14-x010wm Touchpad Replacement: paso 6, imagen 2 de 3 HP Chromebook 14-x010wm Touchpad Replacement: paso 6, imagen 3 de 3
    • Using a plastic opening tool, pry open along the front edge and the sides of the keyboard cover to separate it from the computer’s base.

    • Carefully lift the keyboard cover from the computer’s base.

    • Lifting the keyboard cover too much may damage the internal cables of the laptop.

  7. HP Chromebook 14-x010wm Touchpad Replacement: paso 7, imagen 1 de 2 HP Chromebook 14-x010wm Touchpad Replacement: paso 7, imagen 2 de 2
    • Using a spudger, remove the battery cable by slowly pulling the plastic connector towards you.

  8. HP Chromebook 14-x010wm Touchpad Replacement: paso 8, imagen 1 de 3 HP Chromebook 14-x010wm Touchpad Replacement: paso 8, imagen 2 de 3 HP Chromebook 14-x010wm Touchpad Replacement: paso 8, imagen 3 de 3
    • Using a spudger, lift the black plastic flap of the zero insertion force (ZIF) connector that holds the keyboard cable in place.

    • Disconnect the keyboard cable by pulling it from the system board.

  9. HP Chromebook 14-x010wm Touchpad Replacement: paso 9, imagen 1 de 3 HP Chromebook 14-x010wm Touchpad Replacement: paso 9, imagen 2 de 3 HP Chromebook 14-x010wm Touchpad Replacement: paso 9, imagen 3 de 3
    • Using a spudger, lift the black plastic flap of the zero insertion force (ZIF) connector that holds the TouchPad cable in place.

    • Disconnect the TouchPad cable by pulling it from the system board.

    • At this point, the keyboard cover should be completely detached from the computer’s base.

  10. HP Chromebook 14-x010wm Touchpad Replacement: paso 10, imagen 1 de 3 HP Chromebook 14-x010wm Touchpad Replacement: paso 10, imagen 2 de 3 HP Chromebook 14-x010wm Touchpad Replacement: paso 10, imagen 3 de 3
    • Remove the keyboard cover by sliding it towards you.

    • Turn the keyboard cover upside down.

  11. HP Chromebook 14-x010wm Touchpad Replacement: paso 11, imagen 1 de 3 HP Chromebook 14-x010wm Touchpad Replacement: paso 11, imagen 2 de 3 HP Chromebook 14-x010wm Touchpad Replacement: paso 11, imagen 3 de 3
    • Using a spudger, lift the black plastic flap to release the TouchPad cable from the connector.

    • Disconnect the TouchPad cable by pulling it away from the connector.

  12. HP Chromebook 14-x010wm Touchpad Replacement: paso 12, imagen 1 de 2 HP Chromebook 14-x010wm Touchpad Replacement: paso 12, imagen 2 de 2
    • Using a Phillips #000 screwdriver, remove the two 2.4 mm screws that secure the TouchPad to the keyboard cover.

  13. HP Chromebook 14-x010wm Touchpad Replacement: paso 13, imagen 1 de 2 HP Chromebook 14-x010wm Touchpad Replacement: paso 13, imagen 2 de 2
    • Lift the keyboard cover. The TouchPad will be detached.

Conclusión

To reassemble your device, follow these instructions in reverse order.

Una persona más ha completado esta guía.

Equipo

USF Tampa, Team 15-2, Remmell Spring 2017 Miembro de USF Tampa, Team 15-2, Remmell Spring 2017

USFT-REMMELL-S17S15G2

4 Miembros

1 Guía escrita

0 comentarios

Agregar Comentario

Ver Estadísticas:

Ultimas 24 horas: 0

Ultimos 7 días: 0

Ultimos 30 días: 0

Todo El Tiempo: 1,982